1
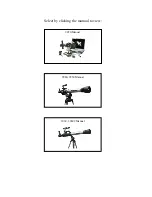
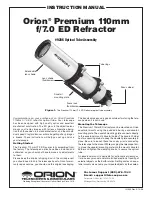
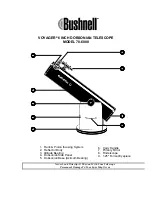
COMPONENTS OF THE TELESCOPE
1.
Focusing Knob
2.
Focusing Tube
3.
Diagonal Mirror
4.
Eyepiece
5.
Telescope Tube
6.
Tripod Legs
7.
Knob bolt
8.
Objective Lens
9.
Bracket
10.
Barlow Lens
11.
Smartphone Adapter
12.
Smartphone Adapter Knob
Read the following information and instructions before use.
Follow them and keep them for reference.
M-32015-ENG
A)
HOW TO CARE FOR YOUR TELESCOPE
Appropriate care of the telescope will allow many years of pleasant
viewing enjoyment.
The Objective Lens
The objective lens of Telescope has been intensely polished and
established to minute tolerances. It must be cleaned with care and
as seldom as possible to avoid affecting its precision and
performance. An inexperienced person must never take the lenses
out of their mount.
Cleaning The Lens
Clean the lens only when it is required. The first step is to remove
the dust with a camelhair brush or an ear-type syringe. Set few
drops of ether or isopropyl alcohol on a piece of clean cotton that
has been washed several times and wipe the lenses very delicately,
avoiding a circular motion. In addition, blow any remaining lint or
dust off with an ear-type syringe.
Sudden Temperature Changes
If possible, avoid taking the telescope from cold outside air into a
warm room. This will make the objective lens covered with
condensed moisture, which must be removed at once. To do this,
place the objective lens at a safe distance from heat source and let it
warm slowly until the moisture has vanished.
It is important to note that any stains left on the lenses must be
delicately wiped off after the lenses are completely dry.
Features:
Professional aspherical lens for super sharp images
This telescope employs aspherical lenses to reduce image
abberration often found in conventional spherical lens elements,
producing a sharp and less distorted image from the center to the
edge of the field of view.
Image from spherical lens Image from aspherical lens
Wide angle view
This telescope employs wide angle eyepieces, which offer a larger
view of the sky while still retaining the same magnification, giving a
greater area of sky coverage
.
B)
HELPFUL HINTS FOR SETTING UP THE TELESCOPE
Tripod Set-Up
1.
Remove the tripod from the box.
2.
Spread tripod legs (6) so that the leg braces are fully extended
and rest safely at the base of the tripod center post.
3.
Fasten all locks to hold legs securely in place.
4.
Temporarily remove the knob bolt.
Telescope Set-Up
1.
Take out the Telescope Tube (5) from the box.
2.
Put the telescope on the tripod such that the holes of the bracket
(9) align with the tripod’s knob bolt position. Re-install and
tighten the knob bolt.
Putting In Diagonal Mirror & Eyepiece
1.
Insert diagonal mirror (3) into focusing tube (2). Secure by
tightening the small retaining screw.
2.
Install the soft eyepiece cap over the eyepiece (4) if needed.
Insert eyepiece (4) into diagonal mirror (3). Secure by tightening
the small retaining screw.
Putting In The Barlow Lens
1.
Remove the diagonal mirror (3) and
insert the Barlow lens (10) into the
focusing tube (2).
2.
Now the eyepiece can then be inserted
into the Barlow lens. If needed, diagonal
mirror should be installed between the
Barlow lens and the focusing tube.
C)
OBSERVING ASTRONOMICAL OBJECTS THROUGH
YOUR TELESCOPE
1. Glance through the main telescope’s eyepiece (4) for your object.
(Note : You may have to alter the angle of the telescope slightly.)
The object will most likely seem to be blurry at this stage, but that
is normal. You are just trying to get the object in the viewing field
of your telescope lens. Once you have accomplished this task,
fasten the knobs to keep the accuracy of your telescope steady.
2. Now adjust the Focusing Tube (2) by turning the Focusing Knob
(1) slowly back and forth until the blurred object becomes precise.
3. If you are going to be looking through the telescope for a short
period of time, you can insert the Eyepiece directly into the
Focusing Tube. To be more comfortable when using your
telescope for longer periods of time, place the Diagonal Mirror (3)
into the Focusing Tube and the Eyepiece into the Diagonal Mirror.
WARNING ! NOT SUITABLE FOR CHILDREN UNDER 36
MONTHS DUE TO SMALL PARTS. CHOKING
HAZARD. THIS TELESCOPE SET IS
APPROPRIATE FOR CHILDREN OVER 8
YEARS OLD. TO BE USED UNDER THE
DIRECT SUPERVISION OF ADULTS.
CAUTION ! DO NOT VIEW SUN THROUGH TELESCOPE AS
SERIOUS INJURY TO EYE MAY RESULT.
1
2
3
4
6
9
8
11
12
7
10
5
10
10
10
10
10
10
10
42947912
Galaxy Tracker® 375 Smart Telescope