background image

QUICK SETUP 

MANU

AL

easy

net

™ Pro Series DVR

ED-P400/P800/P1600

Summary of Contents for Pro Series

Page 1: ...QUICK SETUP MANUAL easynet Pro Series DVR ED P400 P800 P1600...

Page 2: ......

Page 3: ...site www nuvico com TABLE OF CONTENTS HOW TO SET REMOTE CONTROL ID 2 HOW TO START THE DVR 3 HOW TO SET DATE TIME 4 QUICK RECORD SETUP 6 HOW TO SETUP IP ADDRESS UNDER THE NETWORK SETUP 10 HOW TO SEARCH...

Page 4: ...2 HOW TO SET REMOTE CONTROL ID Example How to program ID 1 Factory Default into the remote control It is a 3 step process Press ID button then press 1 button then finally press ID button again to save...

Page 5: ...USB mouse into any available USB port 2 Connect the power cable from the power source outlet preferably a UPS to the back of the DVR Turn on and start the DVR Using Front Panel Remote Press the POWER...

Page 6: ...s started it is important to setup the time and the date 1 Follow the instructions below Using Front Panel Remote Press MENU button and press button Using Mouse Click on the Setup Menu icon 2 Access D...

Page 7: ...active internet connection is maintained Time Zone Select appropriate Time Zone for your location Format Allows the format and display of DATE Time to be customized Time Set or modify the Date and Tim...

Page 8: ...meras 1 Follow the instructions below Using Front Panel Remote Press MENU button and press button Using Mouse Click on the Setup Menu icon 2 Access the GLOBAL RECORD sub menu Front Panel Remote Press...

Page 9: ...west and 4CIF being the best PPS 1 2 4 7 15 30 Refers to pictures per second for all cameras 1 being jerky and 30 being smooth real time video Quality Q1 Q2 Q3 Q4 Q5 Refers to detail level for all cam...

Page 10: ...e Quality Priority Mode it will automatically adjust its recording frame rate and resolution based on the number of days specified to give you the highest picture quality possible Frame Rate Smoother...

Page 11: ...nel Remote Press button to highlight Save and press button to save Mouse Click on Save to save 6 To exit out to the Live screen Front Panel Remote Press and hold onto ESC button for 2 seconds Mouse Ri...

Page 12: ...or viewing video across a local area network or through the internet 1 Follow the instructions below Using Front Panel Remote Press MENU button and press button Using Mouse Click on the Setup Menu ico...

Page 13: ...Remote For DHCP Press button and press to check or uncheck For IP Netmask Gateway DNS1 DNS2 Port follow the instructions below These parameters are given by your Internet Service Provider or Network A...

Page 14: ...uctions below These parameters are given by your Internet Service Provider or Network Administrator on a corporate network environment Highlight and click the IP portion on the screen Virtual numeric...

Page 15: ...e Server Address given by your Internet Service Provider or Network Administrator Port 7000 is the factory default This port number is customizable and can be changed Host Name Type the address that i...

Page 16: ...nel Remote Press button to highlight Save and press button to save Mouse Click on Save to save 6 To exit out to the Live screen Front Panel Remote Press and hold onto ESC button for 2 seconds Mouse Ri...

Page 17: ...low the instructions below Using Front Panel Remote Press SEARCH button Using Mouse Click on the Search icon 2 Select Time Search Using Front Panel Remote Press button twice to highlight Time Search a...

Page 18: ...utton couple of times to highlight Start and press button Your desired video will start playing Using Mouse Click on the desired group such as Month Day Year Hour Minute Second and click on the part o...

Page 19: ...instructions below Using Front Panel Remote Press SEARCH button Using Mouse Click on the Search icon 2 Select Calendar Search Using Front Panel Remote Press button three times to highlight Calendar S...

Page 20: ...e same method for year and day Using Mouse Click on either the Year Date or Day and change to the desired value 4 Select your desired time of the day Using Front Panel Remote Press buttons to highligh...

Page 21: ...the Live screen Front Panel Remote Press button Mouse Click on the X Close HOW TO COPY VIDEOS INTO CD DVD USB 1 Follow the instructions below Using Front Panel Remote Press COPY button Using Mouse Cli...

Page 22: ...deo to be copied Channel By factory default Select All is checked therefore all the channels or cameras will be copied However should you want to copy only the specific cameras you can unselect Select...

Page 23: ...llow the instructions below Using Front Panel Remote Press SEARCH button Using Mouse Click on the Search icon 3 Choose your desired medium such as DVD or USB Using Front Panel Remote Use and press eit...

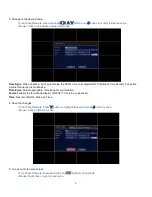
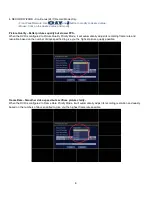
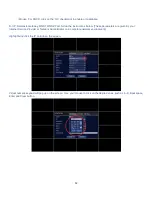
Page 24: ...22 4 DVR will search for video from your desired medium...

Page 25: ...23 5 DVR will display videos that are available on your desired medium 6 Follow Time Search method that is explained on page 15...

Page 26: ...ons below Using Front Panel Remote Press LOCK button Using Mouse Click on the Log In icon 2 You need to input admin password 0 0 0 0 0 0 for the DVR Using Front Panel Remote Use and press either butto...

Page 27: ...to highlight 0 then press button six times Finally use and press either button to highlight and press button Using Mouse Highlight 0 and click six times then highlight and click 4 Lastly when you sele...

Page 28: ......

Page 29: ......

Page 30: ...om unauthorized resellers htm NUVICO Corporate Headquarters 53 Smith Street Englewood NJ 07631 Tel 201 541 1605 Toll Free 866 523 1700 Fax 201 541 1620 sales nuvico com www nuvico com NUVICO Internati...

Reviews: