background image

Owner’s Manual

Youth


Summary of Contents for Evolv Youth

Page 1: ...Owner s Manual Youth ...

Page 2: ...via uw recycleerder na het verstrijken van de levensduur Sea responsable con respecto al medio ambiente y recicle este producto al finalizar su vida útil en el lugar de reciclaje correspondiente Siate responsabili verso l ambiente e riciclate questo prodotto al termine della sua vita d uso presso la vostra sede di riciclaggio Kierrätä tämä tuote sen käyttöiän lopussa ympäristövastuullisella tavall...

Page 3: ...tion Assembly 15 Basic Unit Reference Drawing Evolv 24 Evolv Youth Options Parts Detail 25 Adjusting Your Evolv 27 Perfect Fit Guide 29 Glider Adjustments 30 Shadow Tray Adjustments 31 Transferring Standing 32 Maintenance 33 Specifications 34 Standing Log 35 Limited Warranty 36 Videos on EasyStand Evolv assembly fitting can be viewed at www easystand com video ...

Page 4: ...dical Inc at 1 800 342 8968 or 507 697 6393 It is important and necessary that you inspect your EasyStand Evolv periodically to assure that it is in safe operating condition Minor adjustments can be made by the operator However replacement of worn parts major adjustments or any other important corrections should be handled by an authorized supplier or service center Only Altimate Medical Inc appro...

Page 5: ...wheels in the locked position before transferring into the EasyStand Use these locks whenever you want to keep the EasyStand stationary The EasyStand Evolv Youth meets EN12182 1999 test standard for strength durability and tipping stability Please contact Altimate Medical Inc for relevant clinical data and literature strength durability and test results as applicable The EasyStand Evolv Electric L...

Page 6: ...FIG 1 FIG 3 FIG 2 FIG 5 FIG 3 Basic Unit Assembly EasyStand Evolv page 3 Basic Unit Assembly Evolv Videos on EasyStand Evolv assembly fitting can be viewed at www easystand com videos ...

Page 7: ...n do not overtighten Slide the front column into the opening of the main frame as shown Install the four bolts into the holes Do not tighten securely until all bolts are started Lift seat up and flip down footplates Then insert quick adjust handles into footplates Tighten securely FIG 3 Attach the pump handle to the pump on the main frame with bolts and tighten securely Insert top of handle into p...

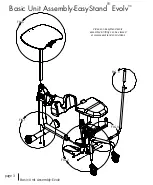
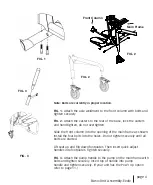
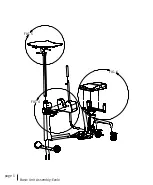
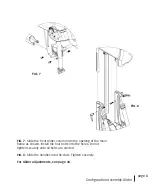
Page 8: ...FIG 5 FIG 4 FIG 6 page 5 Basic Unit Assembly Evolv ...

Page 9: ...ecurely FIG 5 Insert the tray post into the front column Holes in the post must face upward Place tray onto the tray post insert nut into slot and tighten securely FIG 6 Install the seat onto the main frame For easier installation pump the seat halfway up Tighten the bolts securely For Evolv adjustments see page 27 ...

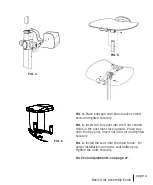
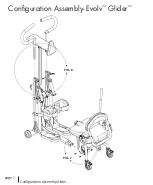
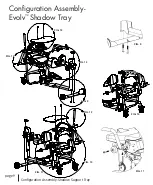
Page 10: ...page 7 Configuration Assembly Glider Configuration Assembly Evolv Glider FIG 8 FIG 7 ...

Page 11: ... Slide the front Glider column into the opening of the main frame as shown Install the four bolts into the holes Do not tighten securely until all bolts are started FIG 8 Slide the handles into the slots Tighten securely For Glider adjustments see page 30 ...

Page 12: ...FIG 9 FIG 9 FIG 10 FIG 10 FIG 11 FIG 11 FIG 12 FIG 13 FIG 15 FIG 14 Configuration Assembly Evolv Shadow Tray page 9 Configuration Assembly Shadow Support Tray ...

Page 13: ...arted Flip down footplates and insert quick adjust handles Tighten securely FIG 11 Install the left table arm rest Tighten bolts securely FIG 12 Install the right table arm rest Tighten bolts securely FIG 13 Install the table top onto the right table arm rest Tighten bolts securely FIG 14 Place kneepad onto knee bracket Insert screws and tighten securely FIG 15 Remove the bolts from the pump handl...

Page 14: ...rawing FIG B Raising the Lift Press the UP arrow up button on the hand control to lift the seat Lowering the Lift Press the DOWN arrow down button on the hand control to lower the seat FIG B FIG A Getting Started The unit will arrive to you unplugged from the battery you need to plug in the white cord that supplies power to the pump and the black cord that supplies power to the remote The black co...

Page 15: ... emergency situations FIG C The release allows the user to be lowered to a seated position in the unlikely occurance of the battery losing charge while the user is in a standing position The actuator only retracts if the release is pulled and there is weight on the seat The release is located on the left side of the seat and is signified by a red tag with the word EMERGENCY 1 To activate the emerg...

Page 16: ...attery at a full condition without overcharging it When the battery EMF rises to a factory preset point the charger circuit will not allow the peak output voltage to exceed that value This factory setting protects a battery from excessive depletion of electrolyte which can occur from overcharging WARNING USE ONLY CELL CON MODEL 452240 SC FOR CHARGING THE EASYSTAND EVOLV POW R UP OPTION 1 Plug the ...

Page 17: ...RECOMMENDS THAT BATTERY REPLACEMENT BE PERFORMED BY A QUALIFIED TECHNICIAN WARRANTY WILL BE VOIDED IF IDENTICAL BATTERY IS NOT REPLACED 1 If necessary remove the charger from the hand pendant 2 Take the cover off the control box to access the batteries and wiring 3 Remove the plug connecting the batteries to the control box 4 Remove the batteries 5 Replace the batteries with the identical type 6 R...

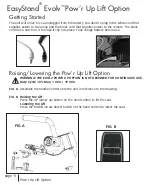
Page 18: ...page 15 Option Assembly Option Assembly Back Option Assembly Back Option Assembly ...

Page 19: ...ured Back PNG50068 Removable 19 Contoured Back PNG50174 19 Flat Back PNG50067 Removable 19 Flat Back PNG50173 13 Contoured Back PNG50062 Removable 13 Contoured Back PNG50172 page 16 Option Assembly Back Options ...

Page 20: ...Actuator Left Handle PNG50126 C Standard Actuator Right Handle PNG50059 page 17 Option Assembly 13 Flat Back PNG50066 Removable 13 Flat Back PNG50171 Pump Handles D Removable Actuator Right Handle PNG50035 E T Style Handle Extension PNG50070 F Quad Grip Handle Extension PNG50044 ...

Page 21: ...page 18 Option Assembly Foot Straps Airline Buckle Hip Belt and Velcro Hip Belt Secure Foot Straps PNG30031 Standard Foot Straps PNG30030 Airline Buckle Hip Belt PNG30028 Velcro Hip Belt PNG30029 ...

Page 22: ...Assembly Chest Vests and Chest Straps Y Style Chest Vest Medium PNG30171 Y Style Chest Vest Large PNG30021 X Style Chest Vest Medium PNG30170 X Style Chest Vest Large PNG30056 Chest Strap PNG50192 Small PNG50193 Large ...

Page 23: ...e Tray Chest Pad and Pow r Up Lift Standard Chest Pad PNG30000 not available w the NG50187 Glider Large Contoured Chest Pad PNG30000 not available w the NG50187 Glider Pow r Up Lift PN50010 Angle Adjustable Tray PNG50043 not available w the NG50024 Glider ...

Page 24: ...dles Independent Knee PNG50080 not available w the NG50187 Glider Independent Roho Knee PNG50083 not available w the NG50187 Glider Hand Cycle Attachment PNG50045 not available w the NG50187 Glider or Shadow Tray Standard Glide Handles PNG10177 Glide Handle Extensions PNG50251 ...

Page 25: ... 22 Option Assembly Universal Lateral Supports Receiver Head Support and Roho Seat Universal Lateral Supports Receiver PNG50041 Head Support 21 30 H PNG50240 Head Support 24 33 H PNG50037 Roho Seat PNG30177 ...

Page 26: ...page 23 Option Assembly Lateral Supports 9 15 W PNG50224 Lateral Supports 12 18 W PNG50176 Hip Supports 10 16 W PNG50161 Hip Supports 12 18 W PNG50198 Lateral Supports and Hip Supports ...

Page 27: ...page 24 Evolv Youth Reference Drawing Basic Unit Reference Drawing EasyStand Evolv Youth ...

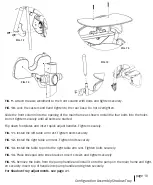
Page 28: ...page 25 Evolv Options Parts Detail EasyStand Evolv Youth Options Parts Detail ...

Page 29: ...Evolv Options Parts Detail page 26 ...

Page 30: ...toe out by lifting the front edge of the foot plate and twisting the foot plate Kneepad FIG E To adjust the kneepad depress the spring button connecting the kneepad to the front column Position the kneepad so that the user s knee is cushioned in the front and has 2 fingers space between the back of the leg and the seat Glider Kneepad FIG F The glider kneepads are independently adjustable in height...

Page 31: ... the back angle to vertical 10 degrees Caution If the back is adjusted outside of 10 degrees from vertical it is possible for the back angle adjustment knob to come into contact with the lower back tube causing damage to the unit Tray Front Pad FIG G To adjust the height of the front pad loosen the clamp located just above the front column Lift the tray to the user s desired height level and tight...

Page 32: ... adjustment knob E so the increment indicator F is in the green safe area B A F E Perfect Fit Guide step five step six Position the user s hips as close as possible to stander s hip pivot I J I improper J proper step four Loosen the ratchet handles on the footplates to adjust height and plantar dorsi G Client s knee should be slightly lower than the hip H Tighten ratchet handles after positioning ...

Page 33: ...on the kneepad The kneepads are independently adjustable with five adjustments in height To adjust the kneepad remove the hex key bolts from the kneepad and adjust to the desired position Replace the bolts and tighten securely FIG D Before transferring flip up the kneepads to allow easier access Caution Never adjust kneepads or footplates while in the standing position Caution While using the Glid...

Page 34: ...ght loosen knob and move to desired position Tighten securely FIG B To flip the table up move the table to the end of the tube and lift Tighen knob securely Caution After flipping up the tray be certain to tighten the knob Failure to do so can cause the table to fall suddenly Caution Avoid placing fingers near the table depth and chest height adjustment slots FIG A Chest Pad Adjustment FIG B Table...

Page 35: ...ack in to Standing Please consult with your physician or therapist before starting a standing program Once transferred into the EasyStand position your feet and the knee support and secure any straps and side supports Push the pump handle forward with 15 25 strokes The seat will slowly rise into the standing position Remember that you can stop the seat anywhere between the sitting and standing pos...

Page 36: ... of the equipment for which this hydraulic unit is used on the weight limit for the EasyStand Evolv Youth is 200 lbs If your EasyStand was shipped to you during or exposed to a temperature of less then 50 degrees Fahrenheit you must allow the hydraulic unit to warm up to room temperature before any use Failure to follow this step could damage the unit and render it inoperable It is sometimes not n...

Page 37: ...w TM Tray Glider TM Evolv TM Youth Specs 4 0 5 6 122 168cm 200 lbs 90kg 14 19 36 48cm 14 21 36 53cm 21 5 55cm 3 25 5 75 8 15cm 0 10 0 25cm 9 23cm 21 x24 53x61cm 25 x33 64x84cm 102 lbs 46kg Charcoal Black 15 5 30 39 76cm 4 0 5 6 122 168cm 200 lbs 90kg 14 19 36 48cm 15 18 38 46cm 22 5 57cm n a 4 14 10 36cm 10 25cm 7 5 x19 19x48cm 25 x40 64x102cm 175 lbs 79kg Charcoal Black 15 5 30 39 76cm 18 46cm 4 ...

Page 38: ...page 35 Standing Log ...

Page 39: ...rranty service please write directly to AMI at the address below Do not return products to our factory without prior authorization LIMITATIONS AND EXCLUSIONS The foregoing warranty shall not apply to serial numbered products if the serial number has been removed or defaced Products subject to negligence abuse misuse improper operation improper maintenance improper storage or damages beyond AMl s c...

Page 40: ...program protocol and any medical precautions Standing programs should be monitored by the attending therapist AMI maintains a policy of continual product improvement and reserves the right to change features specifications and prices without prior notification Check with AMI for latest info FORM MANEVYM 0107 Copyright 2007 Altimate Medical Inc All rights reserved Printed in the U S A P O Box 180 2...

Reviews: