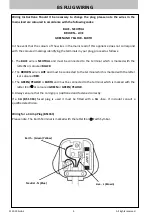
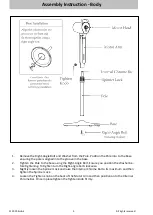
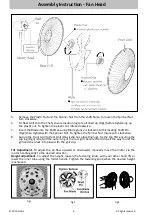
background image


Equinox 

16” 

DC FAN


Domestic DC Fan


C412/C413 

-

 20190115


Summary of Contents for Equinox

Page 1: ...Equinox 16 DC FAN Domestic DC Fan C412 C413 20190115 ...

Page 2: ...nce as domestic household waste For disposal a Contact your local council b The manufacturer will take back the old appliance for disposal when you replace it with a new product c Old products contain valuable resources which should be recycled as scrap metal Wild disposal of waste in forests and landscapes endangers your health when hazardous substances leak into the ground water and find their w...

Page 3: ...be connected to the terminal which is marked with the letter N or coloured BLACK 2 The BROWN wire is LIVE and must be connected to the terminal which is marked with the letter L or coloured RED 3 The GREEN YELLOW is EARTH and must be connected to the terminal which is marked with the letter E or or coloured GREEN or GREEN YELLOW 4 Always ensure that the cord grip is positioned and fastened correct...

Page 4: ...ing OFF the appliance first 9 Always unplug the appliance when not in use or when moving location To disconnect the appliance from the power supply grip the plug and pull from the power socket Never pull by the cord 10 Close supervision is necessary when the appliance is used in the presence of children and pets 11 Do not run power cord under carpeting or cover with rugs or runners Arrange the cor...

Page 5: ...using the Right Angle Bolt Ensure you position the Washer be fore tightening To tighten turn the Right angle bolt clockwise 3 Slightly loosen the Spinner Lock and raise the Internal Chrome Bar to its maximum and then tighten the Spinner Lock 4 Loosen the Tighten knob on the back of the Motor Arm and then position onto the Internal Chrome Bar Once in place tighten the Tighten knob firmly Assembly I...

Page 6: ...Nut rotate anti clockwise 8 Secure the Front Grill to Rear Grill the circlip has a locating lug Fix the top first ensuring the top lug Fig3 is behind the outer ring of the rear grill Secure the circlip all the way round the grill and then lock into place with the grill clip Tilt Adjustment To adjust the air flow upward or downward manually move the motor via the motor handle gently to the desired ...

Page 7: ...ress this button to start or stop oscillation Operating Instruction Control Panel PLUG FAN INTO THE MAINS POWER A BEEP WILL SOUND SIGNIFIYING THAT THE FAN IS READY TO BE USED USEFUL INFORMATION Storage The product can be stored when not in use We recommend using the original box It is important to keep it safe in a dry environment You must remove the battery from the remote control Prior to storag...

Page 8: ...s the timer button to increase the time intervals 0 5 to 12 1 2 hrs to 12 hrs When the fan is running press this button to set the off timer by repeating the same steps above Timer mode can be cancelled by pressing the timer button until you reach the 0 0 interval Front Back Using the Remote Control Point towards the front of the fan Within 5 meters Use size AAA manganese or al kaline batteries Do...

Page 9: ...eriodically clean this appliance by carefully vacuuming the fan guards to re move any dust or dirt that have accumulated Maintenance Cleaning MODEL Equinox Voltage 220 240V 1Ph Wind Speed 140 M Min Wind Volume 42 M3 Min Noise 38 61 dB a Net Weight 5 6 Kg Gross Weight 6 9 Kg Net Dimension W x H x D 400mm x 1300mm x 400mm Gross Dimension W x H x D 589mm x 627mm x 154mm In the unlikely event of a pro...

Page 10: ...our appliance has been altered and damaged by owner or third parties d In the event of abuse whether physical or verbal abuse towards any member of staff 8 Warranty provision will be free of charge and we will decide whether this will take the form of a repair or the replacement of the appliance Small appliances that can be reasonably transported or posted may need to be handed over or shipped to ...

Reviews: