A
B
C
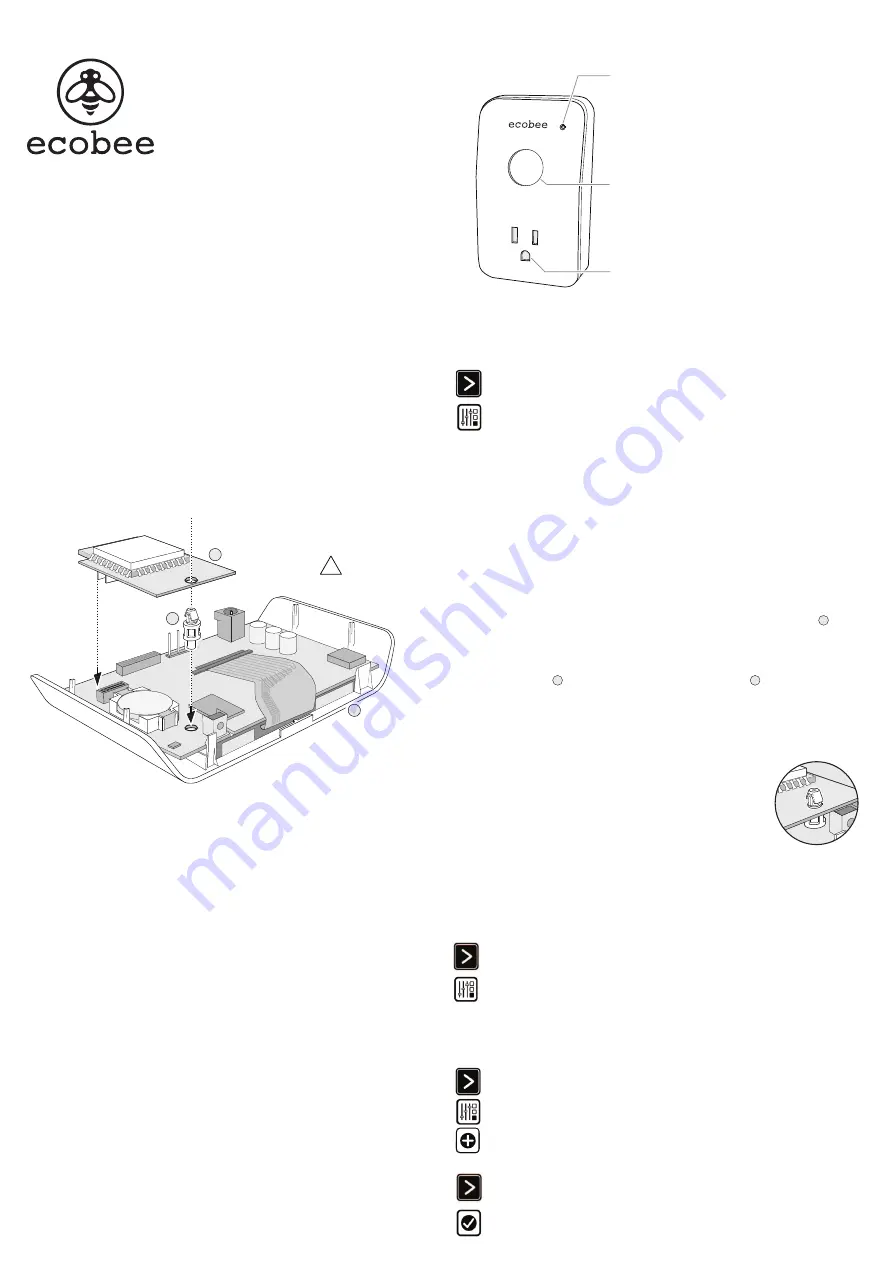
To install the ZigBee Module:
This equipment is sensitive to electrostatic discharge (ESD). Before starting, discharge your body
of static electricity by touching a grounded metal object. Always hold the devices by their edges
and do not touch any of the internal components.
1. Use a lat-head screwdriver to gently remove the Smart Thermostat faceplate
A
from
the gray backplate attached to the wall. Once removed, lay the Smart Thermostat on a
lat surface, with the internal components facing up.
2. Insert the plastic stand-of
B
that comes with the ZigBee Module
C
into the round hole
in the thermostat circuit board, just above the battery.
3. Align the connector of the ZigBee Module to the connector on the Smart Thermostat and
gently push into place. The stand-of will secure the module and ensure it does not move.
4. Make sure the top of the plastic stand-of snaps through the ZigBee module, as shown in
the illustration on the right.
5. Attach the Smart Thermostat back onto the backplate on the wall.
Smart Plug
Instruction Manual
At ecobee, we’re not just all about thermostats – we’re about energy solutions.
That’s why we’ve created Smart Plugs, WiFi-enabled electrical outlets that you
can monitor and control from your existing Smart Thermostat and ecobee®
Web Portal.
To verify the software version you are running:
1. From the Smart Thermostat Home screen, press
More
.
2. Press
Settings,
select
About
, then select
Version
.
Step 1. Check Smart Thermostat Software
To use Smart Plugs, your Smart Thermostat needs to be running software
version 2.4.0.298 or later. Software updates occur automatically when the Smart
Thermostat is connected to the Internet. If you are running an earlier software
version, contact ecobee customer service (email support@ecobee.com or call
877-932-6233) to receive a free upgrade.
Step 2. Install ZigBee® Module
To use Smart Plugs, you need to install a ZigBee Module in your Smart Thermostat. You only need one module per thermostat – it can be connected to an unlimited
number of Smart Plugs. If you already have installed a ZigBee Module, you can skip this step.
1. From the Home screen, press
More
.
2. Press
Settings
and select
ZigBeeModule(Internal)
. Follow the
prompts to conigure Home Automation. You may choose to add
your smart plug at this time, as per the prompts or add the plug once
the setup is complete.
Step 3. Install Smart Plug Into Outlet
Plug the Smart Plug into a standard household electrical outlet, then plug in a light or appliance. Ensure that the switch on the actual light or appliance is left in the ON
position. The Status LED should start lashing (indicating that the Smart Plug is looking for a network to join). If the Status LED does not start lashing, press and hold the
switch for 10 seconds.
Step 4. Set Up ZigBee Network
If this is your irst Smart Plug you will need to set up a ZigBee Home Automation
network with your ecobee Smart Thermostat. You can skip this step if you
previously connected any ZigBee devices.
Step 5. Adding Smart Plug to Network
After you have set up your ZigBee network (step 4), you connect your Smart Plug
to the Smart thermostat. The ecobee Smart Thermostat will scan the network
and automatically detect any unconnected Smart Plugs.
The default name is the last 4 digits of the Smart Plug’s MAC address (a
unique number printed on the back of each device). You can give it an easier
to remember name (like “Living Room Light”). Providing your own custom
name makes it easier to identify the plug, especially if you have mulitple plugs
installed.
1. From the Home screen, press
More
.
2. Press
Settings
and select
Home Automation
.
3. Press
Add
.
4. Press and hold the On/Of switch on the Smart Plug for 6 seconds.
The Status LED will start lashing green.
5. On the Smart Thermostat, press
Next
. The Smart Thermostat will
search for the Smart Plug.
6. Press
Done
. Your Smart Plug is now joined with the network.
To add a Smart Plug:
To setup the ZigBee Home Automation network:
!
Status LED
Solid Green
− Communicating with network
Flashing Green
− Searching for network to join
Red
− No communication with joined
network
− Press to quickly power on/of the receptacle
− Press and hold for 6 seconds to join network
(when the LED changes color, you can release it)
ON/OFF Switch
Power Receptacle


