background image


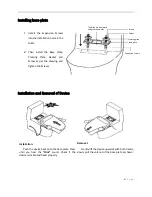
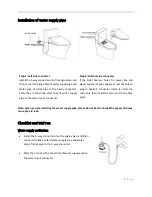
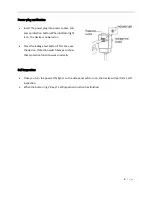
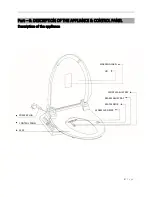
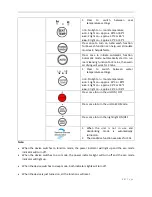
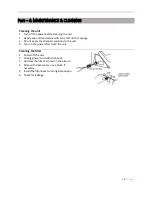
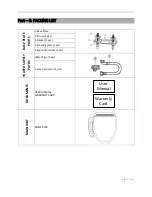
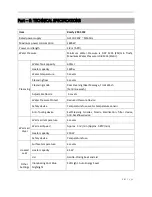
KOMFY200 USER'S MANUAL 


Ecoway Trading (Canada) Inc. 
174 Torbay Rd. L3R 1G6 
Markham, Ontario 

www.eco-way.ca 
service@eco-way.ca


1 833 3ECOWAY (1 833 332 6929)


Summary of Contents for KOMFY200

Page 1: ...KOMFY200 USER S MANUAL Ecoway Trading Canada Inc 174 Torbay Rd L3R 1G6 Markham Ontario www eco way ca service eco way ca 1 833 3ECOWAY 1 833 332 6929 ...

Page 2: ...2 Part 2 INSTALLATION 5 Installation space 5 Installing base plate 6 Installation and Removal of Device 6 Installation of water supply pipe 7 Checklist and trial run 7 Part 3 DESCRIPTION OF THE APPLIANCE CONTROL PANEL 9 Description of the appliance 9 Buttons and Functions 10 Part 4 MAINTENANCE CLEANING 12 Part 5 PACKING LIST 13 Part 6 TECHNICAL SPECIFICATIONS 14 ...

Page 3: ...ns to the appliance is dangerous Do not use any power supply other than the one specified AC 110 120V 60Hz Doing so may cause fire malfunction or excessive heat Never disassemble repair or alter the unit Doing so may void product warranty and may cause fire electric shock over heating or short circuiting This product is classified as Class 1 Equipment and must be grounded Install this equipment wh...

Page 4: ... and pull the power plug from the outlet Periodically remove dust and dirt from the power plug Important safety measures Carefully read all the important safety instructions Otherwise there exists a risk of an accident or a fatal injury Risk of Burns Improper use of the toilet seat may cause irritation or burn When sitting for a long time on the toilet seat switch the toilet seat temperature adjus...

Page 5: ...Plugging too many plugs into the same outlet for example using outlet splitters can cause fire due to heat Never pull on the power cord when disconnecting the appliance from a power socket Never touch the appliance with wet hands or feet Do not allow the water supply hose to touch the power plug or outlet Doing so may cause condensation resulting in a fire electrical shock overheating or a short c...

Page 6: ...g on top of the toilet This may cause the top unit to come loose and fall resulting in injury Do not use the product if the top unit is unstable Risk of flooding To prevent a sudden water leak do not remove the water filter drain valve when the shutoff valve is open Do not fold or crush the water supply hose do not damage by cutting with a sharp object Do not flush anything other than bodily waste...

Page 7: ...your bidet seat into operation and store it in a safe place for future reference The power source must be installed by an authorized electrician Installation space Before proceeding with the installation carefully measure and make sure that the unit measurements match the user s toilet ...

Page 8: ...ten the Screws Installation and Removal of Device Installation Push the device back onto the base plate Press until you hear the Click sound Check if the device is stable and fixed properly Removal Gently lift the device upwards with both hands slowly pull the unit out of the base plate as shown Screws Expansion Screws Base plate Pressing plate Gasket The black pin frontward and groove upwards ...

Page 9: ...r power line and water supply let two supplies across the hole to plug in device s connector which is under the main unit then insert the main unit to the base plate Note when you are installing the water supply pipe please do not bend or break the pipe which may cause pipe to leak Checklist and trial run Water supply verification Install the 3 way connecter onto the angle valve and then connect t...

Page 10: ...vice is powered on Press the leakage test button if first time use the device Protection switch bumps to show that protection function works normally Self inspection Once you turn the power ON lights on the side panel will turn on the device will perform a self inspection When the buzzer rings Beep self inspection function has finished ...

Page 11: ...9 P a g e Part 3 DESCRIPTION OF THE APPLIANCE CONTROL PANEL Description of the appliance WARNING LABEL LID WARM AIR DRYER SEAT SENSOR FRONT WASH SPRAY REAR WASH SPRAY POWER PLUG CONTROL PANEL SEAT ...

Page 12: ...nction 2 When rear cleansing finishes and the user is still seated on the unit the device will turn on the drying function Press to switch between water pressure settings No light on 0 15L min or 0 04 gal min 3 light on 0 75 L min or 0 20 gal min 1 Works during front or rear cleansing schedule 2 Press once to bring the nozzle forward or backward 1 Works when user seating on the unit 2 Press once t...

Page 13: ...oom temperature 1 light on approx 32 C or 89 F 2 light on approx 34 C or 93 F 3 light on approx 36 C or 96 F Press once to turn the unit ON OFF Press once to turn the unit to ECO Mode Press once to turn the night light ON OFF 1 When the unit is not in use and deodorizing mode is automatically turned on 2 The deodorize function executes for 30s Note When the device switches to function mode the pow...

Page 14: ... cloth or sponge 3 Do not apply any chemical solutions to the unit 4 Turn on the power after clean the unit Cleaning the filter 1 Power off the unit 2 Unplug power cord with dry hands 3 Unscrew the filter as shown in the picture 4 Rinse with clean water use a brush if necessary 5 Install the filter back to its original position 6 Check for leakage ...

Page 15: ...LATE PARTS 1 Base Plate 2 Screw 2 pcs 3 Gasket 2 pcs 4 Pressing plate 2 pcs 5 Expansion Screw 2 pcs WATER SUPPLY PATRS Water Pipe 1 pcs 3 way Connector 1 pcs DOCUMENTS USER MANUAL WARRANTY CARD MAIN UNIT KOMFY 200 User Manual Warranty Card ...

Page 16: ...ear Cleaning Rear Massage Front Wash Feminine wash Adjustable Nozzle 5 Levels Water Pressure Protect Reduced Pressure Device Safety device Temperature fuse water temperature sensor Anti fouling device Self Cleaning Nozzles Nozzle Sterilization filter device Anti backflow device Warm air dryer Warm air temperature 4 Levels Warm air Speed Approx 4 m min Approx 5 8ft min Heater capacity 250 W Safety ...

Reviews: