background image

Wielofunkcyjne urządzenie kuchenne MFC2000
Multifunctional kitchen appliance MFC2000

Eldom Sp. z o.o. 

Pawła Chromika 5a, 40-238 Katowice, POLAND

tel: +48 32 2553340 , fax: +48 32 2530412

eldom.eu

PL

EN

Summary of Contents for perfect mix MFC2000

Page 1: ...Wielofunkcyjne urz dzenie kuchenne MFC2000 Multifunctional kitchen appliance MFC2000 Eldom Sp z o o Paw a Chromika 5a 40 238 Katowice POLAND tel 48 32 2553340 fax 48 32 2530412 eldom eu PL EN...

Page 2: ......

Page 3: ...r wnie nasze propozycje W niniejszej instrukcji obs ugi znajd Pa stwo wyja nienie wszystkich funkcji oraz tryb w pracy jak r wnie podstawowe przepisy pozwalaj ce rozpocz przygod z PERFECTMIXEM Smaczn...

Page 4: ...niniejszej instrukcji uprawnienia z tytu u gwarancji wygasaj 3 Urz dzenie mo e by u ywane tylko z oryginalnie do czonymi akcesoriami 4 Przew d przy czeniowy nale y pod czy do gniazdka wyposa onego w...

Page 5: ...az nie prowadzi przewodu zasilaj cego w pobli u r de ciep a 18 Aby zapewni swobodny i bezpieczny dost p do urz dzenia nale y je ustawi na odpowiedniej wysoko ci 19 Nie u ywa na wolnym powietrzu 20 Nie...

Page 6: ...tylko za jego g rn cz 1 Nie dotyka no a 4 przy w czonym urz dzeniu a po wy czeniu mo na go dotkn dopiero po jego zatrzymaniu 2 Urz dzenie nie mo e by u ywane z uszkodzonym no em 4 3 Pod no em 4 musi b...

Page 7: ...7 PL...

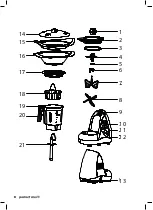
Page 8: ...8 1 2 3 4 5 6 7 8 9 10 11 12 13 14 15 16 17 18 20 19 21...

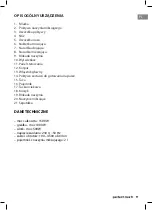
Page 9: ...aczynia 10 Wy wietlacz 11 Panel sterowania 12 Korpus 13 W cznik g wny 14 Pokrywa zestawu do gotowania na parze 15 Taca 16 Pojemnik 17 Tacka ociekowa 18 Koszyk 19 Blokada naczynia 20 Naczynie miksuj ce...

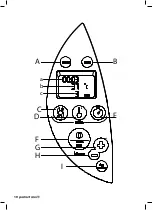
Page 10: ...10 A C D F G H I E B a c b...

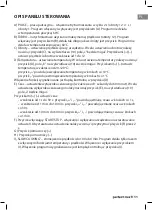
Page 11: ...ratury w krokach co 10 C przycisk powoduje zmniejszanie temperatury w krokach co 1 C W czenie funkcji sygnalizowane jest lapk kontroln w przycisku D E Czas ustawienie wy cznika czasowego w zakresie od...

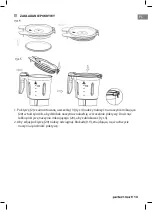
Page 12: ...rwacja MONTA NO A W NACZYNIU MIKSUJ CYM 1 W o y n 4 wraz z uszczelk 5 rys 1 w otw r na dnie naczynia miksuj cego 20 zwracaj c uwag na jego prawid owe po o enie rys 2 2 Od drugiej strony naczynia za o...

Page 13: ...4 nale y na o y na naczynie miksuj ce 20 w taki spos b aby dzi bek naczynia znalaz si w szczelinie pokrywy Docisn lekko pokryw naczynia miksuj cego 20 aby zablokowa rys 5 2 Aby zdj pokryw 20 nale y od...

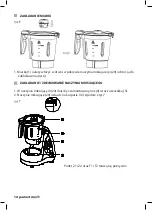
Page 14: ...ynia miksuj cego 20 i obr j do zablokowania rys 6 ZAK ADANIE ZDEJMOWANIE NACZYNIA MIKSUJ CEGO 1 W naczyniu miksuj cym 20 musi by zamontowany n 4 wraz z uszczelk 5 2 Naczynie miksuj ce 20 ustawi na kor...

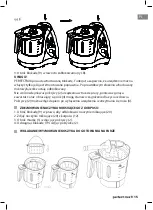
Page 15: ...okrywy 2 urz dzenia w trakcie pracy poniewa gor ca zawarto oraz obracaj cy si n 4 mog stanowi zagro enie dla ycia i zdrowia Pokryw 2 mo na zdj dopiero po wy czeniu urz dzenia i zatrzymaniu si no a 4 Z...

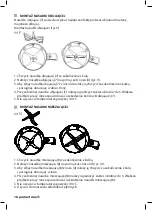
Page 16: ...e y ograniczy zakres obrot w do 5 Wi ksza pr dko pracy mo e spowodowa uszkodzenie ko c wki ubijaj cej 7 5 Nie u ywa w temperaturze powy ej 100 C MONTA NASADKI MIESZAJ CEJ 1 Chwyci nasadk mieszaj c 8 z...

Page 17: ...czeniu urz dzenia nale y odczeka a n 4 si zatrzyma i zdj naczynie miksuj ce 20 z korpusu 12 11 Zdj pokryw 2 i opr ni naczynie miksuj ce 20 przy pomocy szpatu ki 21 UWAGA Twarde sk adniki np ziarna ka...

Page 18: ...szej ilo ci ciasta ni 0 5 kg mo e doprowadzi do uszkodzenia urz dzenia 2 Uwaga N 4 jest bardzo ostry Nie wolno wyjmowa ciasta d oni Do wyj cia wyrobionego ciasta u y szpatu ki 21 PODGRZEWANIE 1 W nacz...

Page 19: ...za czone Ustawienie temperatury powoduje jej utrzymywanie przez urz dzenie 8 Po wci ni ciu przycisku F nast pi uruchomienie urz dzenia i wy cznika czasowego Na 5 s przed zako czeniem odliczania czasu...

Page 20: ...szyka 18 spos b 2 z u yciem koszyka i zestawu do gotowania na parze spos b 3 Spos b 1 1 W naczyniu miksuj cym 20 zamontowa n 4 i wla wod w ilo ci nie mniejszej ni 0 5 l i nie wi kszej ni 2 0 l 0 5 l w...

Page 21: ...ontowa n 4 i wla wod w ilo ci nie mniejszej ni 0 5 l i nie wi kszej ni 2 0 l 0 5 l wody wystarcza do gotowania na parze przez 30 minut 2 Do naczynia miksuj cego 20 w o y koszyk 18 z produktami 3 Za o...

Page 22: ...nia urz dzenia nie wolno stosowa przedmiot w ostro zako czonych albo ostrych poniewa mo na doprowadzi do uszkodzenia cz ci funkcjonalnych albo naruszy bezpiecze stwo urz dzenia 6 Wszystkie ruchome cz...

Page 23: ...e pracy urz dzenia wskutek przegrzania silnika 1 Zmniejszy ilo sk adnik w albo ustawi wy sz pr dko 2 Wy czy urz dzenie na kilka minut E5 Awaria urz dzenia Wymagana naprawa serwisowa Uwaga Je eli adne...

Page 24: ...a Przygotowanie 1 W naczyniu miksuj cym umie ci such bu k pokrojon po aman na mniejsze kawa ki miksowa ok 20 s obroty 10 Rada Bu ka musi by dobrze wysuszona Sk adniki 3 suche bu ki Akcesoria n szpatu...

Page 25: ...zamontowa nasadk ubijaj c motylek 2 W naczyniu miksuj cym umie ci mietan ubija 1 min obroty 5 a do uzyskania wymaganej konsystencji Rada Czas ubijania zale y od wielu czynnik w m in ilo ci i temperat...

Page 26: ...owe Przygotowanie 1 W naczyniu miksuj cym umie ci mleko banany i cukier zmiksowa przez 30 s obroty 12 2 Podawa bezpo rednio po przygotowaniu Rada Smoothie mo na urozmaici innymi bardzo dojrza ymi owoc...

Page 27: ...Po ugotowaniu za o y miark i zmiksowa przez 1 min obroty 10 6 Prze o y do pojemnika Po ostudzeniu przechowywa w lod wce Rada Do przygotowania 500 ml zupy wystarczy 1 2 y eczki pasty Zamiast wody mo na...

Page 28: ...suj cego 2 Doda mleko pieprz s l gotowa przez 16 min 100 C obroty 2 3 Doda mietan i serek miksowa przez 20 s obroty 8 4 Gotowa dalej przez 4 min 100 C obroty 2 Sk adniki 50 g marchwi 30 g cebuli 200 g...

Page 29: ...29 PL a...

Page 30: ...ot only save time but will also be a real pleasure Please find out about the various functionalities of the appliance such as cooking grinding mixing whisking kneading or steaming This instruction exp...

Page 31: ...e to observe these instructions will render the warranty null and void 3 The appliance may only be used with the supplied original accessories 4 Connect the power cord of the appliance only to a wall...

Page 32: ...the power cord near sources of heat 18 To guarantee free and safe access to the appliance position it at appropriate height 19 Do not operate the appliance in the open air 20 Do not operate the appli...

Page 33: ...only by its top section 1 Do not touch the blade 4 if the appliance is switched on After turning the appliance off wait for the blade to stop before handling it 2 Do not operate the appliance if the...

Page 34: ...34 1 2 3 4 5 6 7 8 9 10 11 12 13 14 15 16 17 18 20 19 21...

Page 35: ...Mixing attachment 9 Container lock 10 Display 11 Control Panel 12 Body 13 Main switch 14 Steaming set lid 15 Tray 16 Container 17 Drip tray 18 Basket 19 Container lock 20 Mixing container 21 Spatula...

Page 36: ...36 A C D F G H I E B a c b...

Page 37: ...he range of 20 120oC Use the button to increase of temperature by 10 C Use the button to decrease the temperature by 1 C If this function is active the D button signal lamp is lit E Time setting the t...

Page 38: ...with the gasket 5 Fig 1 into the opening at the bottom of the mixing container 20 Make sure that the blade is positioned correctly Fig 2 2 Attach the fixing piece on the other side of the container an...

Page 39: ...to the mixing container 20 in a manner so that that the beak of the container is in the slot of the lid Slightly press down the lid on the mixing container 20 to lock it Fig 5 2 To remove the lid 20 p...

Page 40: ...the mixing container 20 and lock it by turning Fig 6 ATTACHING REMOVING THE MIXING CONTAINER 1 The blade 4 together with the gasket 5 should be mounted in the mixing container 20 2 Place the mixing c...

Page 41: ...the appliance during operation the hot contents and the rotating blade 4 may pose a hazard to life or health The lid 2 can be detached only if the appliance has been switched off and when the blade st...

Page 42: ...set the speed above 5 when using the whisking attachment 7 Higher speed may damage the whisking attachment 7 5 Do not use at temperatures above 100 C MOUNTING THE MIXING ATTACHMENT 1 Hold the mixing a...

Page 43: ...ce wait for the blade 4 to stop and then remove the mixing container 20 from the body 12 11 Remove the lid 2 and empty the mixing container 20 using the spatula 21 NOTE 1 Do not add any ingredients th...

Page 44: ...kg of dough is kneaded the appliance may become damaged 2 Note The blade 4 is very sharp Do not take out the dough with your hand Use the spatula 21 to remove the kneaded dough HEATING 1 Place the ing...

Page 45: ...commence if the temperature has not been set If the temperature has been set it will be maintained by the appliance at the set level 8 The appliance will start and timer will commence countdown after...

Page 46: ...only the basket 18 method 2 or by using both the basket and the steaming set method 3 Method 1 1 Attach the blade 4 in the mixing container 20 and pour between 0 5 and 2 l of water 0 5 l of water is s...

Page 47: ...in the mixing container 20 and pour between 0 5 and 2 l of water 0 5 l of water is sufficient to steam food for 30 minutes 2 Place the basket 18 with the products into the mixing container 20 3 Attac...

Page 48: ...e cleaned with a damp cloth only 5 Do not use sharp or pointy objects to clean the appliance they might damage mechanical parts of the appliance or compromise its safety 6 Clean all moving parts with...

Page 49: ...ection has tripped after excessively long operation 1 Remove some ingredients or choose a higher speed 2 Turn the appliance off for a few min utes E5 Appliance failure Service repair necessary Note If...

Page 50: ...eparation 1 Put the sliced crushed bread rolls into the mixing container mix for approx 20 s at speed 10 Tip Dry the bread rolls for best results Ingredients 3 dry bread rolls Accessories blade spatul...

Page 51: ...pped cream Preparation 1 Attach the butterfly whisking attachment onto the blade 2 Put the cream into the mixing container whisk for 1 min at speed 5 to get the required thickness Tip Whisking time de...

Page 52: ...basis and depend ing on the type of fruit Banana smoothie 1 Put milk bananas and sugar into the mixing container mix for 30 s at speed 12 2 Serve immediately after preparation Tip Add other very ripe...

Page 53: ...After cooking attach the measuring cup and mix for 1 min at speed 10 6 Pour into a container After cooling keep in a refrigerator Tip 1 2 tsp of paste is sufficient for 500 ml of soup Wine can be adde...

Page 54: ...he mixing container 2 Add the milk pepper salt and cook for 16 min 100 C at speed 2 3 Add the cream and cheese mix for 20 s at speed 8 4 Cook for 4 more min 100 C at speed 2 Ingredients 50 g carrots 3...

Page 55: ......

Page 56: ...Eldom Sp z o o Paw a Chromika 5a 40 238 Katowice POLAND tel 48 32 2553340 fax 48 32 2530412 eldom eu...

Reviews: