background image

Instructions booklet

mod. EK

M 101199 X

Summary of Contents for EKM 101199 X

Page 1: ...Instructions booklet mod EKM 101199 X ...

Page 2: ... the appliance model ATTENTION The use of a gas cooking appliance results in the production of heat and moisture in the room in which it is installed Ensure that the kitchen is well ventilated keep natural ventilation holes open or install a mechanical ventilation device mechanical extractor hood Prolonged intensive use of the appliance may call for additional ventilation for example opening of a ...

Page 3: ... on the base of the oven Keep fingers away from the area of the hinges when closing the door as it is possible to trap them Do not let children sit down on or play with the oven door Do not use the drop down door as a stool to reach cabinets above LOWER DRAWER DO not place inflammable materials or plastic utensils in the warming drawer situated below the ovens 1 1 2 2 4 4 5 5 6 6 7 7 8 8 9 9 3 3 G...

Page 4: ...sing a match ENERGY SAVING TIPS The diameter of the pan bottom should be the same as that of the burner The burner flame must never exceed the pan s diameter Use flat bottomed pans only Whenever possible keep a lid on the pan while cooking This allows you cook using less heat Cook vegetables potatoes etc with as little water as possible to reduce cooking times ATTENTION Always use the oven with th...

Page 5: ...try Fruit flan Meringues Quiches etc Buns Dish Preheating Level Temp Times de from the C cooking bottom minutes 5 no no yes yes yes no no no no yes no no yes no no no no no yes yes yes yes yes yes yes yes yes no 2 2 2 2 2 4 2 2 2 2 2 2 2 1 2 2 3 2 3 2 2 2 4 2 2 3 2 2 2 2 4 190 180 190 200 220 225 250 170 170 170 180 180 190 190 190 190 170 190 170 180 180 170 180 160 180 170 180 200 220 170 200 18...

Page 6: ... thermostat control knob to the 200 C position Oven selector knob It is possible to select one of the following functions turning the selector knob clockwise MULTIFUNCTIONAL OVEN The oven is fitted with a lower heating element an upper heating element a circular heating element surrounding the fan N B Always set the temperature on the thermostat knob before selecting any of the functions Oven ther...

Page 7: ...he heat on the food This function can be used between 60 and MAX C GB Install the grid on the third shelf from the oven bottom at about 12 cm from the surface The shelf position can be changed as required depending on personal taste and the type of food Heat the oven 5 minutes before introducing the food Fig 5 PROGRAMMER WITH COOKING END TIME Fig 8 For a manual operation of the programmer turn the...

Page 8: ...ith a damp sponge using soap and water Grease can be easily removed using hot water or a specific cleansing agent for enamelled surfaces Do not use abrasive cleansers Install shelves by locating them in the horizontal guide rails on the oven walls Before cleaning the appliance turn off the mains gas tap and unplug the appliance or disconnect power at the main circuit breaker of the electrical syst...

Page 9: ...be able to withstand high temperatures min 90 C If the appliance is to be installed near units leave the minimum gaps specified in figure 7 The cooker must not be placed on a pedestal Fig 7 1000 600 960 900 mín 20mm mín 100 mm mín 50 mm mín 50 mm mín 650 mm mín 400 mm mín 20mm The cooker is fitted with 4 legs for an eventual alignment in height with the furniture fig 8 Fig 8 9 REG MAX 15mm INSTRUC...

Page 10: ...ast 100 cm2 For the indispensable entry of fresh air into the room there must be a similar 100 cm2 opening directly to the outside situated at a height near floor level so that it is not blocked either inside or outside the wall and so as not to cause disturbances to correct burners combustion and to the regular removal of spent air and with a difference of height with respect to the outlet openin...

Page 11: ...mperature 5 to ensure that they can be checked for all their length We recommend to check wether the appliance has been foreseen for the kind of gas distributed The appliance must be connected to the gas piping in a workmanlike way and in conformity with the regulations in force which lay down the installation of a safety valve at the end of the piping For butane and propane a pressure reducer con...

Page 12: ...3 change the injector see fig 14 Re assemble everything in reverse order ensuring you position the flame spreader correctly GENERAL INJECTORS TABLE Kind of gas mbar Nozzle Burners Power KW N max BUTANE 28 30 87 Rapid 3 00 G 30 66 Semi rapid 1 75 PROPANE 37 50 Auxiliary 1 00 G 31 96 Triple crown 3 80 12 REPLACEMENT OF COOKTOP INJECTORS C C Fig 13 Fig 14 C Injector triple crown ...

Page 13: ...it has been correctly connected to an efficient earthed power supply as laid down in the regulations for electrical safety Important the manufacturer cannot be held responsible for any damage to persons or objects due to the lack of an earth connection REPLACEMENT OF THE CABLE fig 17 ALWAYS UNPLUG THE PLUG FROM THE CURRENT SOCKET OR SWITCH OFF THE CURRENT ON THE POWER SUPPLY LINE BY MEANS OF THE M...

Page 14: ...when in use as all surfaces will become hot during and after cooking Never allow anyone to sit or stand on any part of the cooker Never heat up unopened food containers as pressure can build up causing the container to burst Never store chemicals food stuffs pressurised containers in or on the cooker or in cabinets immediately above or next to the cooker Never fill a deep fat frying pan more than1...

Page 15: ...L 2 1 3 4 5 N A H05 RR F H05 RN F 10 ...

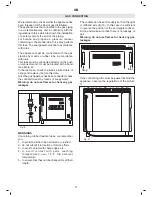
Page 16: ...C C C 9 ...

Page 17: ...8 A ...

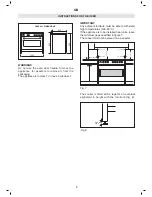
Page 18: ...1000 600 960 900 min 100cm2 C 7 REG MAX 15mm C ...

Page 19: ...B A C 6 10 2 0 3 0 4 0 5 0 6 0 7 0 8 0 9 0 1 0 0 11 0 1 2 0 0 stop ...

Page 20: ...MAX 5 6 0 80 1 0 0 1 2 5 1 5 0 1 7 5 2 0 0 2 2 5 M A X 0 0 ...

Page 21: ...4 ...

Page 22: ...Ø Ø Ø Ø 3 1 1 2 2 4 4 5 5 6 6 7 7 8 8 9 9 3 3 ...

Page 23: ... C 2 ...

Page 24: ...Tip Montagnani Italy Cod 538515 0310 MADE IN ITALY ...

Reviews: