background image

487 05 44 61/EN 

2012.08.21

Installation manual

Tumble dryers

T4290, T4530, T4650

Type N4...

Selecta Control

Installation manual in original language

Summary of Contents for T4290

Page 1: ...487 05 44 61 EN 2012 08 21 Installation manual Tumble dryers T4290 T4530 T4650 Type N4 Selecta Control Installation manual in original language ...

Page 2: ......

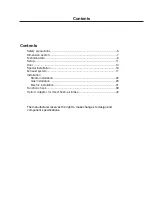
Page 3: ... Door 14 Special installation 16 Exhaust system 17 Installation Steam installation 22 Gas installation 23 Electric installation 31 Function check 39 Option Adaptor for direct fresh air intake 40 The manufacturer reserves the right to make changes to design and com ponent specifications ...

Page 4: ......

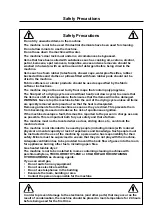
Page 5: ...he machine as soon as they are dried This prevents them from becoming creased and reduces the risk of spontaneous ignition If the machine develops a fault this must be reported to the person in charge as soon as possible This is important both for your safety and that of others The machine must not be located where a door sliding door etc can block the machine s door The machine is not intended to...

Page 6: ......

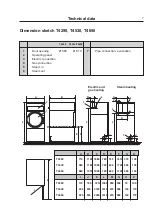
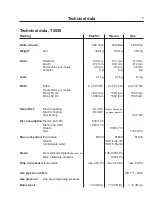
Page 7: ...1120 1880 780 725 1610 470 135 T4530 960 1180 1995 720 650 1725 595 155 T4650 960 1370 1995 720 650 1725 595 155 T4290 170 700 1810 1395 250 500 70 190 T4530 225 950 2120 1510 270 595 140 170 T4650 225 950 2300 1510 270 595 140 170 1 Door opening Ø 580 Ø 810 2 Operating panel 3 Electric connection 4 Gas connection 5 Steam in 6 Steam out 7 Pipe connection evacuation T4530 T4650 T4290 ...

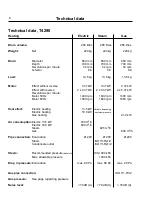
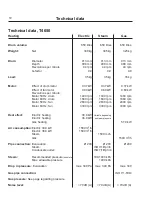
Page 8: ...or 50 Hz 1400 rpm 1400 rpm 1400 rpm Motor 60 Hz 1680 rpm 1680 rpm 1680 rpm Heat effect Electric heating 13 5 kW Variable depending Electric heating 18 0 kW on steam pressure Gas heating 21 0 kW Air consumption Electric 13 5 kW 430 m3 h Electric 18 0 kW 690 m3 h Steam 925 m3 h Gas 690 m3 h Pipe connection Evacuation Ø 200 Ø 200 Ø 200 Steam ISO 7 1 Rp1 2 Condensate outlet ISO 7 1 Rp1 2 Steam Recomme...

Page 9: ...tor 60 Hz 1680 rpm 1680 rpm 1680 rpm Heat effect Electric heating 24 0 kW Variable depending Electric heating 30 0 kW on steam pressure Gas heating 40 0 kW Air consumption Electric 24 0 kW 840 m3 h Electric 30 0 kW 1060 m3 h Steam 1380 m3 h Gas 1160 m3 h Pipe connection Evacuation Ø 200 Ø 200 Ø 200 Steam ISO 7 1 Rp 3 4 Condensate outlet ISO 7 1 Rp 3 4 Steam Recommended pressure absolute 100 1000 k...

Page 10: ...0 rpm 1680 rpm 1680 rpm Motor 50 Hz fan 2800 rpm 2800 rpm 2800 rpm Motor 60 Hz fan 3300 rpm 3300 rpm 3300 rpm Heat effect Electric heating 30 0 kW Variable depending Electric heating 36 0 kW on steam pressure Gas heating 57 0 kW Air consumption Electric 30 0 kW 1500 m3 h Electric 36 0 kW 1500 m3 h Steam 1500 m3 h Gas 1500 m3 h Pipe connection Evacuation Ø 200 Ø 200 Ø 200 Steam ISO 7 1 Rp 3 4 Conde...

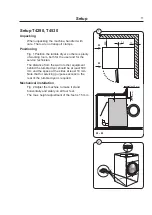
Page 11: ...hnician The distance from the wall or other equipment behind the tumble dryer should be at least 500 mm and the space at the sides at least 10 mm Note that for servicing purposes access to the rear of the tumble dryer is required Mechanical installation Fig 2 Adjust the machine to make it stand horizontally and stably on all four feet The max height adjustment of the feet is 15 mm 2 1 500 10 10 A ...

Page 12: ... by the back plate Mount back plate 3 Place a 1 1 2 steel pipe at the back of the dryer as shown in fig 2 4 Stand behind the dryer and tilt it forward When the dryer rises from the pallet push the pipe under the dryer fig 3 5 Push the dryer from the front so that it hangs off of the back edge of the pallet fig 4 6 Remove the steel pipe by tilting the dryer forward while removing the pipe 7 Install...

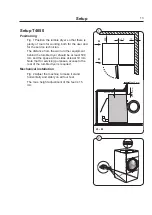
Page 13: ...r equipment behind the tumble dryer should be at least 500 mm and the space at the sides at least 10 mm Note that for servicing purposes access to the rear of the tumble dryer is required Mechanical installation Fig 2 Adjust the machine to make it stand horizontally and stably on all four feet The max height adjustment of the feet is 15 mm 2 1 500 10 10 A A Min 150 mm Min 45 mm Max 50 mm A A ...

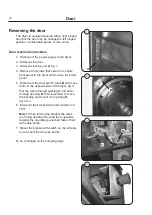
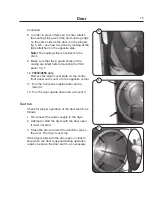
Page 14: ...ove the entire panel 5 Disconnect the door switch wires B and move them to the opposite side of the dryer fig 2 Pull the wires through opening C and down through opening D Also remember to move the bushing and mount it in opening D fig 3 4 6 Dismount the bracket with switch and turn it 180 Note When turning the bracket the wires are facing downwards Lead them upwards towards the operating panel an...

Page 15: ...4650 only Remove the small cover plate on the centre front panel and mount it in the opposite corner 11 Turn the front panel upside down and re mount it 12 Turn the door upside down and re mount it Test run Check for proper operation of the door switch as follows 1 Re connect the power supply to the dryer 2 Attempt to start the dryer with the door open It must not start 3 Close the door and start ...

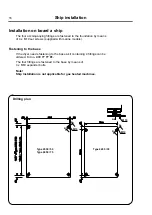
Page 16: ...The four accompanying fittings are fastened to the foundation by means of 4 x M10 set screws supplied with marine models Fastening to the base If the dryer needs fastening to the base a kit containing 4 fittings can be ordered Kit no 472 77 77 01 The four fittings are fastened to the base by means of 4 x M10 expander bolts Note Ship installation is not applicable for gas heated machines Drilling p...

Page 17: ...the cylinder via the heating unit The heated air passes through the garments and the cylinder vents The air then flows out through a lint filter positioned straight below the drum After this the air is evacuated through the blower and exhaust system It is very important that the dryer gets enough fresh air see next section ...

Page 18: ... the air inlet behind the dryer Fig 2 The area of the air inlet opening must be 5 times the size of the exhaust pipe area The area of the inlet opening is the area through which the air can flow without resistance from the grating slatted cover See table on the following page Note Gratings slatted covers often block half of the total fresh air vent area Remember to take this into account The resis...

Page 19: ...lding The exhaust duct must be protected against rain and foreign objects The exhaust duct must have gentle bends fig 1 The exhaust duct must not be a shared duct between dryers and appliances using gas or other fuels as their energy source It applies to the installation of several dryers on a shared exhaust duct that The exhaust duct diameter must increase after each dryer fig 2 The table below s...

Page 20: ...Evacuation system 20 1 Several dryers on a shared exhaust duct 2 Evacuation system Gentle bends ...

Page 21: ... achieve the best result it is important that the dryer has the right volume of air to work with From factory the nonreturn flap is set to be wide open Adjusting the dryer 1 Dismount the back plate 2 Adjust the amount of air by opening closing the damper A fig 1 1 A ...

Page 22: ...sation return 1 It is important that the branch pipe for condensed water on return to the main condensation pipe has a descending gradient and is lower than the outlet connecting branch B 2 Mount a dirt collector D in the return pipe 3 Mount a mechanical water discharger behind the dirt collector E 4 Then mount a plug valve C 5 Mount pressure hoses between branch pipes and dryer Leak test 1 Leak t...

Page 23: ...ry nozzle pressure setting corresponds to the fuel value given on the data label Check that the nozzle pressure and fuel value correspond with the values in the gas tables on the following pages If not contact the supplier Bleed the pipe system before connecting the dryer After connection test all joints for leaks Gas installation general To be carried out by qualified personnel ...

Page 24: ...he appliance This appliance may only be installed in a room if the room meets the appropriate ventilation require ments specified in the national installation regulations 487229348 00 NL Lees de technishe instructies zorgvuldig door voordat u het apparaat installeert Lees de gebruikersin structies zorgvuldig door voordat u de verlichting van het apparaat inschakelt Dit apparaat mag uitsluitend in ...

Page 25: ... that the supplied gas type is correct Following gas conversions are possible 1 Appliances to be installed to run on GNH or GNL in FR BE I2E 2 Appliances to be installed in NL parts of DE and Non European contries I2L 3 Appliances to be installed to run on LPG in DK NO SE FI EE LT SL TR DE NL CH CZ HU GR MT CY LV SK LU BG and Non European contries I3B P 4 Appliances to be installed to run on LPG i...

Page 26: ...es sure mbar Injector pressure mbar Label no fig 10 I2H I2E LL 6 5 Ø32 20 9 5 DEFAULT I2E 5 4 Ø32 20 25 20 25 487266738 I2L LL 6 5 Ø32 20 25 14 487266738 I3B P I3 3 8 Ø40 30 28 37 30 28 37 487266736 I3B P 37 3 5 Ø40 37 37 487266737 I3B P 50 3 8 Ø40 50 30 487266737 Fig 3 T4650 only ...

Page 27: ...measuring branch 2 see Fig 4 7 Connect the power and select a programme with heat 8 Start the dryer 9 See nozzle pressure in table Fig 1 set the nozzle pressure on setting screw 4 under cover screw 3 see Fig 4 10 Check that the gas flame burns evenly and has a bluish colour 11 Mount the cover screw 3 see Fig 4 12 Close the operating panel NOTE After the conversion has been carried out the enclosed...

Page 28: ...Connect the power and select a programme with heat 7 Start the dryer 8 See nozzle pressure in Fig 2 set the nozzle pressure on setting screw 4 under cover screw 3 see Fig 6 9 Check that the gas flame burns evenly and has a bluish colour 10 Mount the cover screw 3 see Fig 6 11 Close the operating panel NOTE After the conversion has been carried out the enclosed sign with the new gas type printed on...

Page 29: ... connect a manometer to the measuring branch 2 see Fig 8 7 Connect the power and select a programme with heat 8 Start the dryer 9 See nozzle pressure in table Fig 3 set the nozzle pressure on setting screw 4 under cover screw 3 see Fig 8 10 Check that the gas flame burns evenly and has a bluish colour 11 Mount the cover screw 3 see Fig 8 12 Close the operating panel NOTE After the conversion has b...

Page 30: ...yer must be updated in order for the data to be correct Place the data label enclosed in the conversion kit on top of the data label as shown below For data label no see Fig 1 T4290 Fig 2 T4530 Fig 3 T4650 If there are more than 1 data label select the label with the correct country code and gas type Fig 10 ...

Page 31: ...nection cable dimension please refer to local guidelines Connecting the cable within the EU and EEA 1 Demount cover plate A fig 1 on the following page 2 Pass the feeder cable through cable gland fig 1 on the following page 3 Turn knob to O OFF 4 Connect the feeder cable as illustrated on the following page 5 Remount cover plate A 6 Function check the dryer The function check is described in the b...

Page 32: ...t the feeder cable as illustrated 4 Remount cover plate A 5 Function check the dryer The function check is described in the back of this manual A A 1 Cable gland for feeder cable Fig 1 Positioning of cable gland for feeder cable On electric heated dryers type T4530 and T4650 the cable gland is not mounted The cable gland is in the drum and has to be mounted on the beam ...

Page 33: ...om the supply unit The cable is led through the cable gland to the terminal block and connected as illustrated If there is a neutral conductor in the power supply line this must be connected to terminal N Fig 1 Gas and steam heated 1 phase Fig 2 Gas and steam heated 1 phase with supply disconnector Fig 3 Gas and steam heated 3 phase To be continued on the following page To be carried out by qualif...

Page 34: ...able dimension For calculation of the connection cable dimension please refer to local guidelines Fuse group and effect The sizes of the fuse group and the effect are shown on the following pages Function check The function check is described in the back of this manual Note Correct direction of rotation is important The dryer must be equipped with supplementary protection in accordance with heavy ...

Page 35: ...tor Max connection 100mA Gnd must not be used for earthing of external board External connection 1 25 A A special connection for an external fan can be chosen on the connection console This connection is only available on 400V 3N machines Mount cable for external connection on contactor K7 in K7 2 and K7 4 fig 2 Connect earth conductor to earth terminal for external connection fig 1 Max connection...

Page 36: ... 10A 400 415V 3AC 50Hz wo reversing 21 kW 1 0 kW 1 0 kW 10A 230 240V 3AC 50 60Hz w reversing 1 5 kW 1 5 kW 10A 230 240V 3AC 50 60Hz wo reversing 1 0 kW 1 0 kW 10A 230 240V 1AC 50 60Hz 1 5 kW 1 5 kW 10A 400 480V 3AC 60HZ w reversing 1 5 kW 1 5 kW 10A 400 480V 3AC 60HZ wo reversing 1 0 kW 1 0 kW 10A 400 415V 3AC 50Hz w reversing 1 5 kW 1 5 kW 10A 400 415V 3AC 50Hz wo reversing 1 0 kW 1 0 kW 10A 230 ...

Page 37: ...415V 3AC 50 60Hz 1 5 kW 1 5 kW 10A 440 480V 3AC 60Hz 1 5 kW 1 5 kW 10A 230 240V 3AC 50 60Hz 24 kW 1 5 kW 25 5 kW 80A 400 415V 3AC 50 60Hz 24 kW 1 5 kW 25 5 kW 50A 440 480V 3AC 60Hz 24 kW 1 5 kW 25 5 kW 50A 230 240V 3AC 50 60Hz 30 kW 1 5 kW 31 5 kW 100A 400 415V 3AC 50 60Hz 30 kW 1 5 kW 31 5 kW 50A 440 480V 3AC 60Hz 30 kW 1 5 kW 31 5 kW 50A Gas Electric installation T4530 Fuse sizes effects and vol...

Page 38: ... 480V 3AC 60Hz 2 kW 2 kW 10A 230 240V 3AC 50 60Hz 30 kW 2 kW 32 kW 100A 400 415V 3AC 50 60Hz 30 kW 2 kW 32 kW 50A 440 480V 3AC 60Hz 30 kW 2 kW 32 kW 50A 230 240V 3AC 50 60Hz 36 kW 2 kW 38 kW 100A 400 415V 3AC 50 60Hz 36 kW 2 kW 38 kW 63A 440 480V 3AC 60Hz 36 kW 2 kW 38 kW 63A Gas Electric installation T4650 Fuse sizes effects and voltages Voltage Heat effect kW Motor effect kW Max effect kW Fuse S...

Page 39: ... For dryers with a 3 phase motor the direction of rotation must be checked If the direction of rotation is not correct swop two phases on the connection terminal Final test Let the dryer work for 5 minutes on a program that requires heat Then check whether the heating is working by opening the front door and feel the heat If the above tests points are in order the dryer is ready for use Safety scr...

Page 40: ...rect fresh air intake dimension sketch Gas and electric heated dryers 1 Adaptor T4290 no 988 80 20 41 T4530 T4650 no 988 80 20 42 2 Diameter T4290 Ø 315 T4530 T4650 Ø 400 1440 T4290 1195 T4530 1255 T4650 1445 T4290 240 T4530 310 T4650 310 1 2 ...

Page 41: ......

Page 42: ......

Page 43: ......

Page 44: ...Electrolux Laundry Systems Sweden AB 341 80 Ljungby Sweden www electrolux com laundrysystems Share more of our thinking at www electrolux com ...

Reviews: