background image

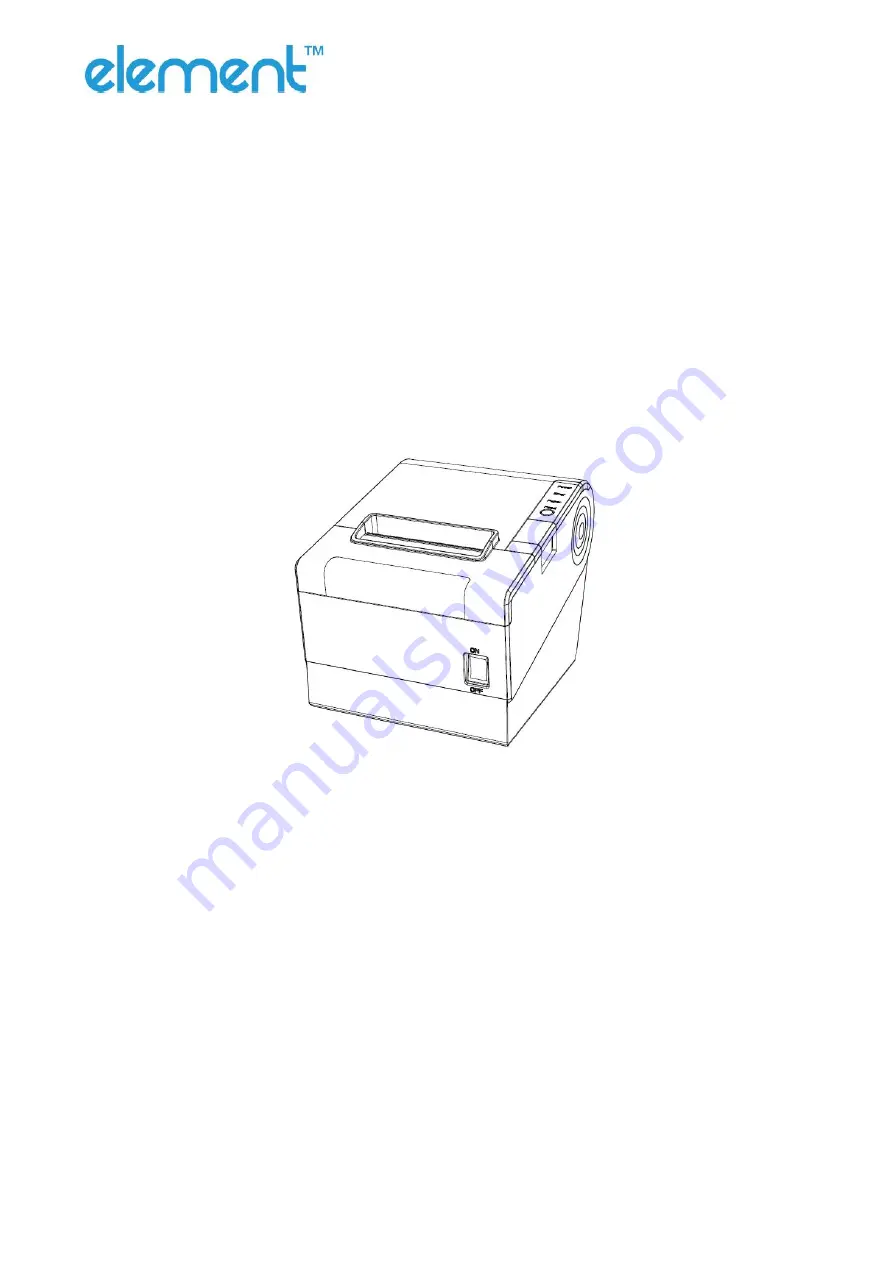
Desktop POS Printer

RW973 Mk

User Manual

Summary of Contents for RW973 Mk2

Page 1: ...Desktop POS Printer RW973 MkⅡ User Manual ...

Page 2: ...allation Site and Direction of Printer 11 4 3 Media Loading 12 4 3 1 Paper Confirmation 12 4 3 2 Paper Installation 12 4 4 LED Indication and Beeper 14 4 4 1 Specification of LED Indicator 14 4 4 2 Beeper 14 4 5 Power Connection 15 4 6 Interface Cable Connection 16 4 7 Cash Drawer Connection 17 4 8 Setting DIP switch 17 4 8 1 Serial interface RS 232C 17 4 8 2 Interfaces of USB and Ethernet 18 4 8 ...

Page 3: ...d or Paper Path 28 8 UTILITY TOOL FOR POS INSTRUCTION 29 8 1 Utility Tool Installation 30 8 2 Using Utility Tool 33 8 2 1 Add Modify Delete Connect Printer 33 8 2 2 Functions 40 8 3 Firmware Update 67 9 WINDOWS DRIVER MANUAL 69 9 1 Manual Information 69 9 2 Operating System OS Environment 69 9 3 Windows Driver Preparation 69 9 4 Windows Driver Installation 70 9 5 Detailed Windows Driver Setting 73...

Page 4: ...arnings This must be complied with in order to avoid any damage to the human body and to the equipment This is showing the important information and tips for the printer operating Note Due to continuous update of product please take in kind of real machine such as accessories programs etc ...

Page 5: ...inter 5 Do not expose the printer to high temperatures direct sunlight or dust 6 Protect the printer from shock impact and vibration 7 Be certain the power source is within the voltage rating and frequency listed for the printer 8 Switch off the printer power supply when won t use it for a long time 9 Do not place the power cord where it can be stepped on If the power cord becomes damaged or fraye...

Page 6: ... the user and or third party We are not legally liable for any damages and or issues resulting from the use of options and or parts that are not authentic or authorized products WEEE Waste Electrical and Electric Equipment This mark shown on the product or its literature indicates that the corresponding item should not be discarded at the end of its working life with others household waste To prev...

Page 7: ...pts RW973 MkⅡ can connect with other equipment through serial USB cash drawer and Ethernet interfaces And the printer drivers are available for the WINDOWS XP WINDOWS 7 WINDOWS 8 WINDOWS 10 Linux operating system 1 2 The Main Features 1 Patent design of unique vertical double auto cutter 2 Low noise 3 High print speed 4 Easy paper loading 5 Support page mode printing 6 Compatible with various widt...

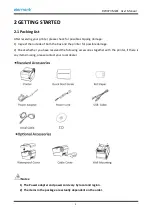
Page 8: ...the outside of both the box and the printer for possible damage 2 Check whether you have received the following accessories together with the printer if there is any items missing please contact your local dealer Notes 1 The Power adapter and power cord vary by local and region 2 The items in the package are actually dependent on the order ...

Page 9: ...RW973 MkⅡ User Manual 6 2 2 Appearance and Components ...

Page 10: ... 2 PC858 Euro KU42 Thai TIS11 Thai TIS18 Thai PC720 Arabic WPC775 Baltic Rim PC855 Cyrillic PC862 Hebrew PC864 Arabic ISO8859 2 Latin2 ISO8859 15 Latin9 WPC1250 Latin 2 WPC1251 Cyrillic WPC1253 Greek PC1254 Turkish WPC1255 Hebrew WPC1256 Arabic WPC1257 Baltic Rim WPC1258 Vietnamese MIK Cyrillic PC755 Latin 2 Iran Iran II Latvian ISO 8859 1 WestEur ISO 8859 3 Latin 3 ISO 8859 4 Baltic ISO 8859 5 Cy...

Page 11: ...90mm Roll paper diameter Max OD ф83mm Paper load Easy loading structure of upward open cover Paper cut Manual tear or Auto cutter Physical Spec Operating condition 0 40 20 85 RH Storage condition 20 70 5 95 RH Dimensions 197 145 146mm Weight 1 8kg Command ESC POS Software Driver Windows XP Vista 7 8 10 POSReady Linux CUPS OPOS JavePOS SDK WinCE Win Mobile Android iOS Reliability TPH Lifetime 150km...

Page 12: ...uality paper otherwise it will influence the printing quality and decrease the thermal printer head life Don t stick the paper on the roll paper mandril If the thermal paper is polluted by chemical or oil the thermal paper heat sensibility decreases which will influence the printing quality Don t use finger nail or hard articles to touch the surface of thermal paper otherwise it will cause color f...

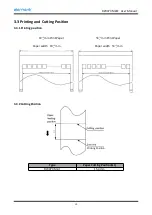
Page 13: ...Printing and Cutting Position 3 3 1 Printing position 0 1 80 mm Print Paper 0 1 58 mm Print Paper 3 3 2 Cutting Position Type Paper Cutting Position L1 RW973 MkⅡ 15 4mm Paper width 0 1 58 mm Printing Position Paper width 0 1 80 mm ...

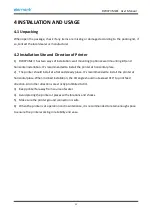
Page 14: ...he printer at horizontal place 2 The printer should install at a flat and steady place It s recommended to install the printer at horizontal place When inclined installation the tilt angle should not exceed 10 to print feed direction And other directions are strictly prohibited to tilt 3 Keep printer far away from source of water 4 Avoid placing the printer at places with vibrations and shocks 5 M...

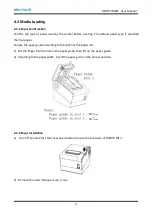
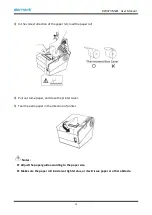
Page 15: ...ose the paper guide according to the width of the paper roll 1 Put the finger into the hole in the paper guide then lift up the paper guide 2 According to the paper width insert the paper guide in the proper position 4 3 2 Paper Installation 1 Turn off printer Press the cover open button to open the top cover of RW973 MkⅡ 2 Remove the used roll paper core if any 0 1 80 mm 0 1 58 mm ...

Page 16: ... load the paper roll 4 Pull out some paper and close the printer cover 5 Tear the extra paper in the direction of printer Notes Adjust the paper guide according to the paper size Make sure the paper roll inside is at tight status or it will issue paper or other obstacle ...

Page 17: ... printer is in a normal state 4 4 2 Beeper Notes The printer uses a thermistor to detect the temperature of the print head If the temperature of print head is higher than 65 C printer will send a warning If the temperature of print head is higher than 80 C printer will stop working until the temperature is lower then 60 C Description POWER LED ERROR LED PAPER LED Beeper Cover Open ON ON ON Beep Be...

Page 18: ...power cord to the outlet Note The Power adapter and power cord vary by local and region When pulling out the adapter please pinch the shell of power adapter and pull the switch up when the switch is fully opened then pull out the power adapter Don t put forth your strength to pull the plug by squeezing any place of power adapter Because it is more difficult to pull it out and easy to damage the ca...

Page 19: ...ll damage the cables causing fire and shock 4 Avoid putting power adapter around a heating device otherwise the cable may melt causing fire and shock 5 If you do not use the printer in a long time disconnect the power supply of printer power adapter 4 6 Interface Cable Connection 1 Make sure the printer s power switch is turned off 2 Connect the interface cable to the matched interface and fixed w...

Page 20: ...be connected to a voltage of 24V cash drawer device It can t be connected to the phone line etc 4 8 Setting DIP switch 4 8 1 Serial interface RS 232C DIP Switch 1 Switches Functions ON OFF Default 1 1 Automatic line feed Enable Disable OFF 1 2 Handshake XON XOFF DTR DSR OFF 1 3 Bit length 7 bits 8 bits OFF 1 4 Parity check Yes No OFF 1 5 Parity selection EVEN ODD OFF 1 6 Baud rate selection bps Re...

Page 21: ...r Disable Enable OFF 2 4 Busy conditions Receive buffer full Printer off line Receive buffer full OFF 2 5 Printer density Reference form 2 OFF 2 6 OFF 2 7 OFF 2 8 Printing dots quantity 512 576 OFF Open the DIP Switch Cover 4 8 2 Interfaces of USB and Ethernet DIP Switch 1 Switches Function ON OFF Default 1 1 Automatic line feed Enable Disable OFF 1 2 1 8 Reserve OFF ...

Page 22: ...e buffer full OFF 2 5 Printer density Reference form 2 OFF 2 6 OFF 2 7 OFF 2 8 Printing dots quantity 512 576 OFF Form 1 Baud Rate Selection Baud rate 1 6 1 7 1 8 Default 2400 ON OFF OFF 9600 4800 ON OFF ON 9600 OFF ON OFF 19200 OFF OFF OFF 38400 OFF ON ON 57600 OFF OFF ON 115200 ON ON ON Form 2 Print Density Selection 2 5 2 6 2 7 Printer density Default ON ON Reserve 1 light 2 OFF OFF Reserve 2 s...

Page 23: ...has any problem 1 Make sure the power is connected and paper is loaded properly 2 Make sure the printer is off and top cover is closed properly 3 Press the paper feed button and power button simultaneously to turn the printer on The printer is ready to receive data as soon as it completes the self test 4 9 2 Printing of Windows Driver Program 1 Install the Windows Driver program Please refer to th...

Page 24: ...Close the cover and then the printer enters the hexadecimal dump mode 4 Select the hexadecimal printing function in the mode selection menu to move to the hexadecimal printing mode 5 Run any software program that sends data to the printer The printer will print all the codes it receives in a two column format The first column contains the hexadecimal codes and the second column gives the ASCII cha...

Page 25: ...drawer interface and many other communicating interfaces such as serial interface USB interface and Ethernet interface 5 1 USB Figure 5 1 PIN SIGNAL NAME 1 VBUS 2 D 3 D 4 GND 5 2 Serial Interface Figure 5 2 PIN SIGNAL NAME 1 2 TXD 3 RXD 4 5 GND 6 DTR 7 CTS 8 RTS 9 ...

Page 26: ...printer is equipped with an Ethernet interface and use the network connection router switch and other network communication equipment which meet RJ45 interface standard When connecting directly with PC it is suggested that the cross network line in accordance with RJ45 interface standard should be adopted ...

Page 27: ...awer 2 6 GND Electrical characteristics Driving voltage DC 24 V Driving current Maximum 0 8 A In 510 ms Drawer check signal L 0 0 5 V H 3 5 V 5 5 Power Supply Interface Figure 5 5 PIN No Signal Name 1 24V 2 GND 3 N C SHELL F G Printer end Unetop DC 002 or similar products user end Unetop DC 002 or similar products ...

Page 28: ... alarms Printer cover is open Close the printer cover Paper LED and Error LED always on and beeper alarms Paper end Reload the roll paper Error LED blinks and beeper alarms Thermal print head is over heated Turn the printer off and resume when it cools Over voltage Print with specified voltage Low voltage Print with specified voltage Problem Description Probable Reason Solution Coloured stripe in ...

Page 29: ...n Probable Reason Resolution Cutter jam the movable cutter cannot go back Cutter abrasion insufficient cutting Replace the cutter Worn gear and worn wheel abrasion Replace the worn gear and worn wheel Motor is burnt Replace the motor Paper scraps Clean the paper scraps on the transmission system Insufficient cutting Cutter edge abrasion paper is too thick Replace the cutter Paper jam Thermal print...

Page 30: ...nd you cannot open the printer cover please open the cutter cover as shown below 1 Turn the printer off and open the front cover 2 Turn the knob until the cutter returns to the normal position tip tag 3 Close the front cover 4 Open the top cover and remove jammed paper ...

Page 31: ...ecome scratched or damaged in any way 7 1 Cleaning Head 1 Open the Printer cover and then use the cotton swab with medical alcohol to clean the head in the direction from the center of the head to the edges 2 After cleaning the head do not use the printer until the alcohol used for cleaning evaporates completely 1 2 min and the printer is completely dry 7 2 Cleaning Sensors Roller and or Paper Pat...

Page 32: ...he following operating system Microsoft Windows 10 32 bit 64 bit Microsoft Windows 8 32 bit 64 bit Microsoft Windows 7 SPI 32 bit 64 bit Microsoft Windows Vista SP2 32 bit 64 bit Microsoft Windows XP Professional SP3 32 bit Microsoft Windows Server 2012 64 bit Microsoft Windows Server 2008 R2 ...

Page 33: ...Ⅱ User Manual 30 8 1 Utility Tool Installation The following screen shots are based on Win 7 1 Double click the installation package and click Next 2 click Browse to select a folder that you want and click Next ...

Page 34: ...RW973 MkⅡ User Manual 31 3 Click Next 4 Click Install ...

Page 35: ...RW973 MkⅡ User Manual 32 5 Click Finish Utility is installed successfully ...

Page 36: ...tility Tool Warning In different operating system screen has a slight difference Please operate it according to the tips Take RW973 MkⅡ Windows 7 for example 8 2 1 Add Modify Delete Connect Printer 8 2 1 1 Add printer 1 Click Add Printer ...

Page 37: ...RW973 MkⅡ User Manual 34 2 Choose the appropriate printer type and port Then click OK Take RW973 MkⅡ for example ...

Page 38: ...RW973 MkⅡ User Manual 35 8 2 1 2 Modify printer 1 Choose the printer you want to modify in the list Click Modify Printer ...

Page 39: ...RW973 MkⅡ User Manual 36 2 Choose the new printer and new port Then click OK 3 The new printer is added successfully ...

Page 40: ...RW973 MkⅡ User Manual 37 8 2 1 3 Delete printer 1 Choose the printer you want to delete in the list and click Delete Printer 2 Click Yes then the printer is deleted ...

Page 41: ...RW973 MkⅡ User Manual 38 8 2 1 4 Connection Test Make sure printer is connected to computer and it is powered on 1 Choose the printer Click Connection Test ...

Page 42: ...the following window If the connection is unsuccessful please connect the printer with computer Notes 1 Make sure printer is connected with computer and power on 2 Make sure printer is loaded with paper 3 Before using the following function carry out the Connection Test first ...

Page 43: ...er Manual 40 8 2 2 Functions Printer Test contains the following items Printer Test Command Test Manage Images Download Image in Compatible Mode Code Page Setting Download Fonts Parameter Setting Advanced Settings ...

Page 44: ...e if the printer will print properly 2 Cutter Test Click the cutter test and the paper will be cut automatically Cutting method is partial cut Partial cut the paper is not fully cut off It leaves connection point between the cut off paper and the left paper As shown in the figure ...

Page 45: ...xt content Such as Print Text Test Note The language option in the lower right corner is checked according to the input text For example The input is Simplified Chinese the language is checked for Simplified Chinese the printer prints the input text according to the setting options and if you check other languages the printer does not print the text ...

Page 46: ... barcode information 5 2D Code Click the QRCode mode Model 1 2 Module size 1 16 The larger the module value the larger the printed QR code is and the smaller the opposite Error correction level 7 30 The higher the error correction level the more intensive the module graphics ...

Page 47: ...the codepage test information Columns 0 30 Rows 0 90 Width of the module 2 6 The larger the module value the wider the width of the printed PDF417 barcode and the smaller the opposite Row height 2 8 The larger the module value the longer the printed PDF417 barcode and the smaller the opposite Error connection level 0 40 ...

Page 48: ...User Manual 45 8 2 2 2 Command Test In the command test you can send command to the printer Input text or hexadecimal data Select a file or enter a command in the input box 1 Click Send by Text input text content ...

Page 49: ...973 MkⅡ User Manual 46 Sending Recycle When the interval is set to 3000ms you can set the interval as needed then click Send the printer starts to recycle printing Click Stop to stop the recycle printing ...

Page 50: ...RW973 MkⅡ User Manual 47 2 Click Send by Hex input the content Convert text to HEX or send ESC command ...

Page 51: ...l 48 8 2 2 3 Manage Images 1 Click Download to add the image if you want to print the picture set the print location before clicking Download mode of G to print the picture It is recommended to use a picture in BMP format ...

Page 52: ...RW973 MkⅡ User Manual 49 2 Select the print location center left and right Such as left print Note Total memory 256K each bitmap should be below 40K C Users 1993 Desktop 01 bmp ...

Page 53: ...ote Each time click Download mode of G an image list number will be generated Click the image list select Delete selected image will delete the image click Delete all Images without clicking the list option to delete all the images in the list ...

Page 54: ...RW973 MkⅡ User Manual 51 8 2 2 4 Code Page Setting Select the code page from the list and click Set Note This code page is only valid in multiple languages ...

Page 55: ...d Fonts Select the font from the existing file and click Download Note After downloading the font successfully you need to restart the printer to take effect 8 2 2 6 Parameter Setting You can set Arabic Character Transform for example WPC1256 ...

Page 56: ...RW973 MkⅡ User Manual 53 8 2 2 7 Advanced Setting Click the button and printer will execute the appropriate action The change will take into effect after restarting the printer ...

Page 57: ...RW973 MkⅡ User Manual 54 Function Setting Choose the item and click Setting ...

Page 58: ... or 4 milliseconds etc The following setting is set as an example When cutting one piece of paper each time the printer will emit the Beep for one time and the beeping time is two milliseconds and beeping interval is three milliseconds Note 100ms 0 1s 1s 1000ms Buzzer Volume The Very Low is the minimum sound and the Loud the maximum sound You can select a volume level and click Setting to print De...

Page 59: ...RW973 MkⅡ User Manual 56 Reduction Paper Setting Choose the item and click Setting DIP Setting Click Read to get the printer parameters click Write to send the modified parameters to the printer ...

Page 60: ...the serial port parameter is set click Write Note When DIP setting is set in soft the DIP switch in the bottom of printer is disable After setting the DIP successfully you need to restart the printer to take the settings into effect ...

Page 61: ...rean mode default Multi language mode COM Setting 1 Baud Rate 2400 4800 9600 19200 38400 57600 115200 2 Data Length 7bits 8bits 3 Parity Check No EVEN ODD 4 ADDC DTR DSR XON XOFF Note The value of the serial port parameter can be obtained according to the value of the Self test page information E g Self test page Serial 115200 None 8 1 DTR DSR Baud Rate 115200 Parity Check None Data Length 8bits S...

Page 62: ...ed click Write and restart the printer 2 After restarting the printer open the main menu screen of the tool and click Modify Printer 3 Select the port category COM and set the baud rate to the value 57600 as shown above and parity None This port allows you to print after setup is complete ...

Page 63: ...click Setting Note Select the paper width above according to the paper print width Ethernet Setting This mode is divided into Auto Assignment IP and Static IP Mode select one of the modes to connect as needed Note IP addresses can be obtained from the Self test page ...

Page 64: ...ic IP Mode 1 Change the printer IP address so that the printer IP address such as 192 168 0 33 is the same segment as the host IP address such as 10 0 21 89 Here is the illustration Figure Printer IP Address Figure Host IP Address ...

Page 65: ...RW973 MkⅡ User Manual 62 Figure Host IP Address 2 Set the same network segment Figure Printer IP Address ...

Page 66: ...3 Auto Assignment IP This mode automatically assigns the IP address to the printer When the settings are complete click Write then restart the printer USB Port Setting Click Virtual serial port setting and restart the printer ...

Page 67: ...RW973 MkⅡ User Manual 64 Check the Virtual Serial Port 1 Right click the computer and select Manage 2 Click Device Manager to view the virtual port such as COM7 ...

Page 68: ...RW973 MkⅡ User Manual 65 3 Return to the printer utility and click Modify Printer 4 Change the port to COM7 7 7 ...

Page 69: ... the print head of the printer has printed Cut Paper Config 1 Cut paper after the cover is closed the printer automatically cuts the paper after closing the cover 2 Do not cut paper after the cover is closed the printer does not automatically cut the paper after closing the cover ...

Page 70: ...RW973 MkⅡ User Manual 67 8 3 Firmware Update 1 Click FW Update ...

Page 71: ...RW973 MkⅡ User Manual 68 2 Add the dfu file When the device appears in the list click Update 3 Click Update 4 Update success 5 Restart the printer Printer ...

Page 72: ... manual content may be changed without prior notice 9 2 Operating System OS Environment The following operating systems are supported for usage Microsoft Windows 10 32 bit 64 bit Microsoft Windows 8 32 bit 64 bit Microsoft Windows 7 SPI 32 bit 64 bit Microsoft Windows Vista SP2 32 bit 64 bit Microsoft Windows XP Professional SP3 32 bit Microsoft Windows Server 2012 64 bit Microsoft Windows Server ...

Page 73: ...Warning Under different operating system the screen has slight difference Please operate it according to the tips Take Element RW973 MkⅡ Windows 7 as example 1 Double click Windows Driver and choose the language 2 Choose I accept the agreement and click Next ...

Page 74: ...MkⅡ User Manual 71 3 Click Next 4 Choose the matched type and port USBxxx is for USB port COMx is for serial port LPTx is for parallel port Choose the type and port of driver such as RW973 MkⅡ COM1 Click Next ...

Page 75: ...talled automatically Otherwise proceed to the next step 5 Click Finish POS printer driver is installed successfully 6 After installation the icon will be found in Start Devices and Printers Note If you already installed the driver No matter what kind of port when you connect the printer to computer it will create a USB port automatically ...

Page 76: ...iled Windows Driver Setting 9 5 1 Printing Preferences 1 Click Start Devices and Printers Right click Element RW973 MkⅡ and choose Printing preferences 2 According to the different needs choose Paper Offset Rotate Effect Copies in Page ...

Page 77: ...RW973 MkⅡ User Manual 74 Click on Manager add or delete paper Click on Advanced to set Custom Command Logo Buzzer Code Page Save Paper Cut Paper Feed Paper Cash Drawer Save paper ...

Page 78: ...RW973 MkⅡ User Manual 75 Cut Paper ...

Page 79: ...RW973 MkⅡ User Manual 76 Feed paper Cash drawer ...

Page 80: ...RW973 MkⅡ User Manual 77 Custom command ...

Page 81: ...RW973 MkⅡ User Manual 78 Logo Note this setting need to be set in utility Open the utility and click Manage Images ...

Page 82: ...RW973 MkⅡ User Manual 79 Click Download Click Add to add a logo BMP format is recommended ...

Page 83: ...al 80 Select the print location and then click Download mode of G Such as left print Return to image list to view the image number Note each time click Download mode of G an image list number will be generated Picture bmp ...

Page 84: ...RW973 MkⅡ User Manual 81 Select Printer properties click Print Test Page to view the printing effect ...

Page 85: ...RW973 MkⅡ User Manual 82 Click the Advanced then click Logo ...

Page 86: ...3 MkⅡ User Manual 83 Set the printing time to print and click OK Such as Start Document Return to the logo setting in driver also select Print left Set the key Code according to the image number Such as 0 0 ...

Page 87: ...RW973 MkⅡ User Manual 84 Then click OK ...

Page 88: ...RW973 MkⅡ User Manual 85 Click Print Test Page to view the printing effect ...

Page 89: ...RW973 MkⅡ User Manual 86 Buzzer Note this setting need to be set in utility Code Page ...

Page 90: ...RW973 MkⅡ User Manual 87 3 Click Watermark Set watermark to print Only BMP file can be selected 4 Click Halftone to set the halftone ...

Page 91: ... Barcode Assuming the font type of the main document is Italics if you want to convert the data 123456 to the barcode printing the steps are as follows Sets the data 123456 font type to a different font from the main document Such as Arial ...

Page 92: ...RW973 MkⅡ User Manual 89 Open the Preference If the document is open you can set it in the document file print preferences ...

Page 93: ...RW973 MkⅡ User Manual 90 1 Add Barcode firstly ...

Page 94: ...RW973 MkⅡ User Manual 91 2 Set the Font Name and the Barcode Option ...

Page 95: ...RW973 MkⅡ User Manual 92 3 Click the Printer Setting Choose the Display Language for Properties ...

Page 96: ... on the Font Substitution select the system text need to be replaced for example Arial and then select the font you want to replace for example 01 and click Settings and the replacement font will display 01 the steps are as follows ...

Page 97: ...RW973 MkⅡ User Manual 94 1 ...

Page 98: ...RW973 MkⅡ User Manual 95 2 3 ...

Page 99: ...RW973 MkⅡ User Manual 96 ...

Page 100: ...RW973 MkⅡ User Manual 97 If you do not have a barcode set the action is as follows 1 Suppose you change the size of the data 123456 for example 2 Set the Printing preferences ...

Page 101: ...RW973 MkⅡ User Manual 98 3 Click the Printer Setting Choose the Display Language for Properties 4 Turn on the Font Substitution ...

Page 102: ...RW973 MkⅡ User Manual 99 5 Select the System Font for example Arial ...

Page 103: ...RW973 MkⅡ User Manual 100 6 Select the font to that you went to replace ...

Page 104: ...RW973 MkⅡ User Manual 101 7 Click Set ...

Page 105: ...RW973 MkⅡ User Manual 102 ...

Page 106: ...kⅡ User Manual 103 9 5 2 Other Settings 1 Click Start Devices and Printers Right click RW973 MkⅡ and choose Printer properties 2 Choose General click on Print Test Page then it will print the current settings ...

Page 107: ...RW973 MkⅡ User Manual 104 3 Click Port to change the other connecting port ...

Page 108: ...RW973 MkⅡ User Manual 105 4 Click Advanced to set the available time for using ...

Page 109: ...RW973 MkⅡ User Manual 106 9 6 Uninstall Windows Driver 1 Double click Windows Driver and then click OK 2 Choose Uninstall printer driver then click Next ...

Page 110: ...RW973 MkⅡ User Manual 107 3 Choose RW973 MkⅡ then click Next 4 Then it is complete to uninstall 9 7 Specification Resolution 203 203dpi Paper Size 80 297mm 80 3276mm 80 420mm 80 550mm ...

Reviews: