
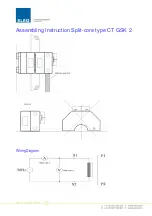

Assembling Instruction Split-core type CT GSK 1
Ref. 1.1
Disassembling of the CT:
To split the CT into two halves, remove the for hex socket-head screws (2) and the spring (3). Be sure to lift the upper part of the ct
horizontally when disassembling, otherwise plug or socket can be damaged. Place the upper part of the split core CT at the side.
Attention:
Prevent split core surfaces from any damage when mounting!
Assembling:
Place the lower part of the split core CT at its mounting position and fix the base plate with screws. Clean the surfaces of the split
core with a duster and apply vaseline on the surfaces. Keep the primary conductor in the window and replace the upper part of the
split core CT to enclose the conductor completely. The position „ face to face“ of the two rating plates and of the indications „P1“
gives the correct mounting of the two parts of the split core CT. When mounting several split core CTs the serial number indicates
the assembling of the two matching parts of each split core CT. Replace springs (3) and hex socket-head screws and tighten the
screws crosswise only by hex socket-head screw driver under manual force ( 8-10 Nm ).
In case of horizontal mounting of the split core CT an additional support shall be installed to prevent the split core from air gaps.
Check measurement:
To check the perfect fitting of both CT halves the measuring of the magnetization curve has to be realized. One relevant
magnetization value is indicated on the rating plate ( exp. U0= 50V / I0= 12 mA ).
1a. upper part of split core CT
1b. lower part of split core CT
2. hexagon sokert head cap screws M8
3. spring
4. split core
5. rating plate
Dimensions


