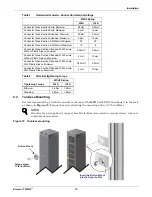
background image

Emerson Network Power

®

 MPH2

™ 

Rack PDU

User Manual

MPH2

121.1V

359W

2.96A

2kWh

i

TX

MPH2

Managed Rack

Power Distribution

RX

L1

L2

L3

1

Summary of Contents for Network Poewr MPH2

Page 1: ...Emerson Network Power MPH2 Rack PDU User Manual MPH2 121 1V 359W 2 96A 2kWh i TX MPH2 Managed Rack Power Distribution RX L1 L2 L3 1 ...

Page 2: ......

Page 3: ...3 2 3 2 Safety Earth Ground Connection 14 2 3 3 Recommended Electrical Backup Protection 15 2 4 Connecting Rack Equipment 16 2 5 Installing Optional Items 17 2 5 1 RPC Basic Display Module 17 2 5 2 Temperature Humidity Sensor 18 3 0 OPERATION 19 3 1 Controls and Indicators 19 3 1 1 Getting Information Through the Onboard LCD 20 3 1 2 Adjusting the Onboard LCD s Contrast 21 3 1 3 Adjusting the Onbo...

Page 4: ... Earth ground connection 14 Figure 13 RPC BDM 17 Figure 14 Inserting the spring nut into a T slot 18 Figure 15 MPH2 onboard LCD and control keys 20 Figure 16 MPH2 onboard LCD layout 20 Figure 17 Adjust LCD contrast 21 Figure 18 Flip LCD 22 Figure 19 MPH2 rack PDU information screen 22 Figure 20 IP address in MPH2 Onboard LCD 23 Figure 21 Input level screen 23 Figure 22 Alarm icon 24 Figure 23 Alar...

Page 5: ...and is controlled by the authority responsible for the location The MPH2 rack PDU has no user serviceable parts Under no circumstances attempt to gain internal access due to the risk of electric shock or burn Refer any unexpected behavior or unusual fault conditions to your local dealer Emerson representative or Emerson Network Power Applications Engineering Emerson recommends powering only device...

Page 6: ...toll free number 39 0298250222 toll number based in Italy ROHS Compliance The MPH2 rack PDU modules comply with the Restriction of Hazardous Substances directive ROHS prohibiting use of six hazardous materials manufacturing of electronics including lead free solder FCC Compliance This unit complies with the limits for a Class A device pursuant to Part 15 of the FCC Rules Operation is subject to th...

Page 7: ... maintenance servicing instructions in the literature accompanying the appliance Dangerous Voltage Warns about the presence of uninsulated dangerous voltage within the product s enclosure that may be of sufficient magnitude to constitute a risk of electric shock to persons Power On Indicates the principal On Off switch is in the On position Power Off Indicates the principal On Off switch is in the...

Page 8: ... limited to 80 continuous loading as required by UL in accordance with the National Electric Code Low profile circuit breakers are used on all MPH2 rack PDU s with two or three branch circuits Standard profile circuit breakers are used on MPH2 rack PDU s that have six branch circuits or have a 240VAC rating Each type of circuit breaker is a flush mount rocker style see Figure 29 Integrated Monitor...

Page 9: ...et Metered Outlet Switched Supports metering of the overall input individual branches and individual outlets also supports individual On Off control of each outlet Type M Outlet Metered Supports metering of the overall input individual branches and individual outlets Type C Rack PDU Metered Outlet Switched Supports metering of the overall input and of individual branches and supports individual On...

Page 10: ...t features 1 3 2 Controls and Indicators LED s The MPH2 rack PDU also has LED s that indicate outlet and branch status and system information The LED s flash pulse or change colors to indicate an event or alarm condition for details on how LED s respond to events and alarms refer to 5 0 Troubleshooting 1 3 3 Controls and Indicators Onboard LCD Emerson s MPH2 has an integrated onboard LCD that can ...

Page 11: ...n Units with no monitoring Figure 5 Branch and outlet identification Units with individually monitored and managed outlets MPH2 121 1V 359W 2 96A 2kWh i TX MPH2 Managed Rack Power Distribution RX L1 L2 L3 1 Onboard LCD Left Arrow Key Right Arrow Key Select Key Line Input Status LED s Type B Models Branch B Outlets Not shown Branch Identification Outlet Identification Type C R and M Models LED s at...

Page 12: ...ofile circuit breakers are used on MPH2 rack PDU s with six branch circuits or have a 240VAC rating Each type of circuit breaker is a rocker style see Figure 29 The branch circuit breaker labeling A B C and so on shows which outlets are protected by each specific breaker Outlets on Branch A are protected by the circuit breaker labeled A Three phase PDU s may also have labeling showing the phase as...

Page 13: ...the power cord exits either the top or bottom of the rack Disconnect Required for Hard Wired MPH2 Units A readily accessible input power disconnect device must be installed near the MPH2 rack PDU Input Power Location for MPH2 Units with Factory Installed Power Cords The input power socket or outlet must be installed near the MPH2 and must be easily accessible NOTE Follow all local and national ele...

Page 14: ...r MPH2 s rated or higher 11mm 5 Slip the power cord through the hole in the end cap and through the strain relief collar 6 Loosen the terminal block screws 7 Insert the wires into the terminal block according to the labeling inside the MPH2 tighten each terminal block screw after inserting a wire Refer to Table 2 for tightening torque 8 Tighten the strain relief collar around the input power cord ...

Page 15: ...k screw after inserting a wire Refer to Table 2 for tightening torque 8 Install the cover plate spacer by either sliding it on or snapping it into place and sliding it firmly against the main body of the MPH2 9 Install the cover plate by either sliding it on or snapping it into place and pressing it against the cover plate spacer 10 Attach the metal end plate to the MPH2 with four screws provided ...

Page 16: ...oss Section AWG kcmil Minimum 24 20 Conductor Cross Section AWG kcmil Maximum 10 6 Conductor Cross Section Stranded With Ferrule Without Plastic Sleeve Minimum 0 25mm 0 5mm Conductor Cross Section Stranded With Ferrule Without Plastic Sleeve Maximum 4mm 10mm Conductor Cross Section Stranded With Ferrule With Plastic Sleeve Minimum 0 25mm 0 5mm Conductor Cross Section Stranded With Ferrule With Pla...

Page 17: ... Attach a bracket to each end of the PDU 2 If mounting on horizontal frame members attach the brackets in line or If mounting on a vertical frame member attach the brackets at a right angle to the PDU 3 Insert two spring nuts into the appropriate T slot on the frame member Position the spring nuts to accommodate screws inserted through slots in the brackets To move the spring nuts press down on ea...

Page 18: ...re available as an option from Emerson 3 Use a second field supplied screw washer and lock washer to secure the ground wire to the MPH2 The connection point is marked with an earth ground symbol see Figure 12 Figure 12 Earth ground connection NOTE The grounding strap may be used with MPH2 rack PDU s that have integral input power cords and units that have hard wired input power cords The strap sup...

Page 19: ...t be sized according to the input rating of the PDU The circuit breaker rating must meet the values in Table 3 The external circuit breaker serves as the primary input power disconnect for the MPH2 Table 3 Upstream circuit breaker rating Maximum Input Current Per Pole Rated Current of Upstream CB 16A 20A North America 16A EU WW 24A 30A NA 32A 32A EU WW 40A 50A NA 48A 60A NA 63A 63A EU WW ...

Page 20: ... on the MPH2 rack PDU 7 Post the connection information on or near the rack and at any remote monitoring location 8 Connect input power to the MPH2 rack PDU On Types R C and M models all LED s will begin pulsing 9 Verify that input power is present and the line status LED s are illuminated 10 Close the branch circuit breakers The receptacle LED s will glow green 11 Turn on the connected devices on...

Page 21: ...e BDM The RPC BDM is connected by cable to the MPH2 rack PDU allowing the user to install the display to suit the local reading requirements A 6 5ft 2m cable and general mounting provisions are provided A single display can be used for up to four rack PDU s connected in a Rack PDU Array The RPC BDM can be mounted in the rack with either the included hardware or with a cable tie through the slot on...

Page 22: ...ty levels Each connects to the RPC2 communications module which makes readings available to other monitoring methods To install a sensor in a rack 1 Insert the sensor bracket base into one end of the sensor support 2 Snap the sensor into the other end of the sensor support 3 Choose where in the rack to install the sensor assembly 4 Hold the sensor bracket on a T slot on the Emerson rack frame wher...

Page 23: ...ating model number and serial number LED s on the MPH2 and an audible alarm also assist in monitoring performance with alerts about events and alarm conditions The keys under the onboard LCD are used to navigate to various information and to silence alarms 3 1 Controls and Indicators The MPH2 rack PDU also has LED s that indicate outlet and branch status and system information LED s flash pulse or...

Page 24: ...outlet names numbers 1 8 Press the Select key and the screen displays information about the selected branch or outlet The screen retains the view if no key is pressed for 5 minutes After 5 minutes of inactivity the onboard LCD returns to the main screen Figure 15 MPH2 onboard LCD and control keys Figure 16 MPH2 onboard LCD layout MPH2 121 1V 359W 2 96A 2kWh i TX MPH2 Managed Rack Power Distributio...

Page 25: ...y to activate the LCD 2 Press either the Right or Left arrow key to highlight the contrast icon a circle half dark and half white 3 Press the Select key 4 Use the Right or Left arrow key to highlight the Up or Down contrast icon each is an arrow Use the pattern to determine when the contrast is acceptable 5 Press Select until the screen s contrast is satisfactory Figure 17 Adjust LCD contrast NOTE...

Page 26: ... Information 1 Use the Left or Right arrow key to move the cursor to the information icon the letter i in the lower right corner 2 Press the Select key The onboard LCD shows information about the MPH2 model number serial number firmware version power rating and number of outlets See Figure 19 After 5 minutes of no activity no key pressed the onboard LCD returns to the main screen Figure 19 MPH2 ra...

Page 27: ...PDU s IP address and MAC address as shown in Figure 20 Figure 20 IP address in MPH2 Onboard LCD 3 1 6 View Input Level Information The input level is the main screen shown by the onboard LCD The LCD will show the input level screen if the cursor and arrow keys are not used for 5 minutes The input screen is shown in Figure 21 Figure 21 Input level screen IP 162 1 30 57 MAC ID 00 00 84 47 31 49 RPC2...

Page 28: ...to scroll to the Alarm icon a large exclamation point Figure 22 Alarm icon 4 Press the Select key The onboard LCD will display a list of active alarms on the MPH2 rack PDU as shown in Figure 23 5 Moving the cursor to an alarm and pressing the select key displays information about the alarm Figure 23 Alarm list screen MPH2 121 1V 359W 2 96A 2kWh 1 i Alarm Indication Low Humidity Sensor The most rec...

Page 29: ...o move the cursor to the outlet icon in the lower right corner of the screen 2 Press the Select key 3 Use the Left or Right arrow key to scroll to the number of the outlet to be viewed 4 Press the Select key The outlet number will begin flashing and remain flashing until a new outlet is selected The onboard LCD will display information about the outlet as shown in Figure 25 Figure 25 Outlet level ...

Page 30: ... Right arrow key to scroll to the sensor to be viewed 4 Press the Select key The onboard LCD will display information about the sensor similar to that shown in Figure 27 Figure 27 Sensor information Sensor 1 2 1 T 7B0000024241431 H 8A000095173G6B62 T C3000000122G6431 Two temperature and one humidity sensors are connected to the MPH2 The sensors default names are their serial numbers This can be ch...

Page 31: ...breakers The circuit breakers are designed to prevent accidental trips To manually trip a circuit breaker to the Off position insert a flat blade screwdriver or similar tool into the slot on the breaker as shown in Figure 29 To reset the breaker press the end nearest ON until it clicks into place Figure 29 Turning Off or resetting a circuit breaker MPH2 V kWh i A W The onboard LCD will shift to th...

Page 32: ...oubleshooting tells how the LED interface signifies events and alarms NOTE During a firmware upgrade the Line Input Status LED s on the MPH2 will flash red and green but the rack PDU will continue receiving and distributing power without interruption IP 10 301 36 28 MAC ID 00 00 40 86 68 70 1 Press any of the navigation keys momentarily to silence an audible alarm ...

Page 33: ...n UL489 Listed CSA TUV CCC Overcurrent Circuit Breaker 20A 5000A A I C Operating Temperature Range F C 32A or Less Input Models 32 to 140 0 to 60 40A and 48A Input Models without case ventilation 32 to 122 0 to 50 40A and 48A Input Models with case ventilation 32 to 140 0 to 60 Storage Temperature Range F C 13 to 185 25 to 85 Humidity 10 to 90 non condensing Altitude ft m 6562 2000 Mounting Factor...

Page 34: ...input voltage range on the nameplate it cannot be changed Red Fast Line or Receptacle Overcurrent Alarm Check for changing load conditions Check overcurrent alarm threshold settings Green Slow Line or Receptacle Overcurrent Warning Check for changing load conditions Check overcurrent warning threshold settings Red Fast Line or Receptacle Undercurrent Alarm Check for removal of load Check undercurr...

Page 35: ......

Page 36: ...ert com Monitoring liebert monitoring emerson com 800 222 5877 Outside North America 00800 1155 4499 Single Phase UPS Server Cabinets liebert upstech emerson com 800 222 5877 Outside North America 00800 1155 4499 Three Phase UPS Power Systems 800 543 2378 Outside North America 614 841 6598 Environmental Systems 800 543 2778 Outside the United States 614 888 0246 Locations United States 1050 Dearbo...

Reviews: