
R4C776/824_UK
Rev. C
SETUP.FM
A2 size
8/2/01
Proof Sign-off:
M.Otsuka CRE Nakano
H.Kimura
H.Jackson
Setting Up the Printer Hardware
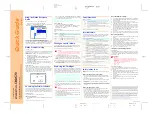
1. Unpack
2. Remove protective materials
3. Attach the printer parts
c
Caution:
If the printer comes on when you plug in the power cord, turn off the
printer by pressing down the
P
power button until the printer lights
go out.
4. Connect the printer
Connect the printer cable to the ports on the computer and the printer.
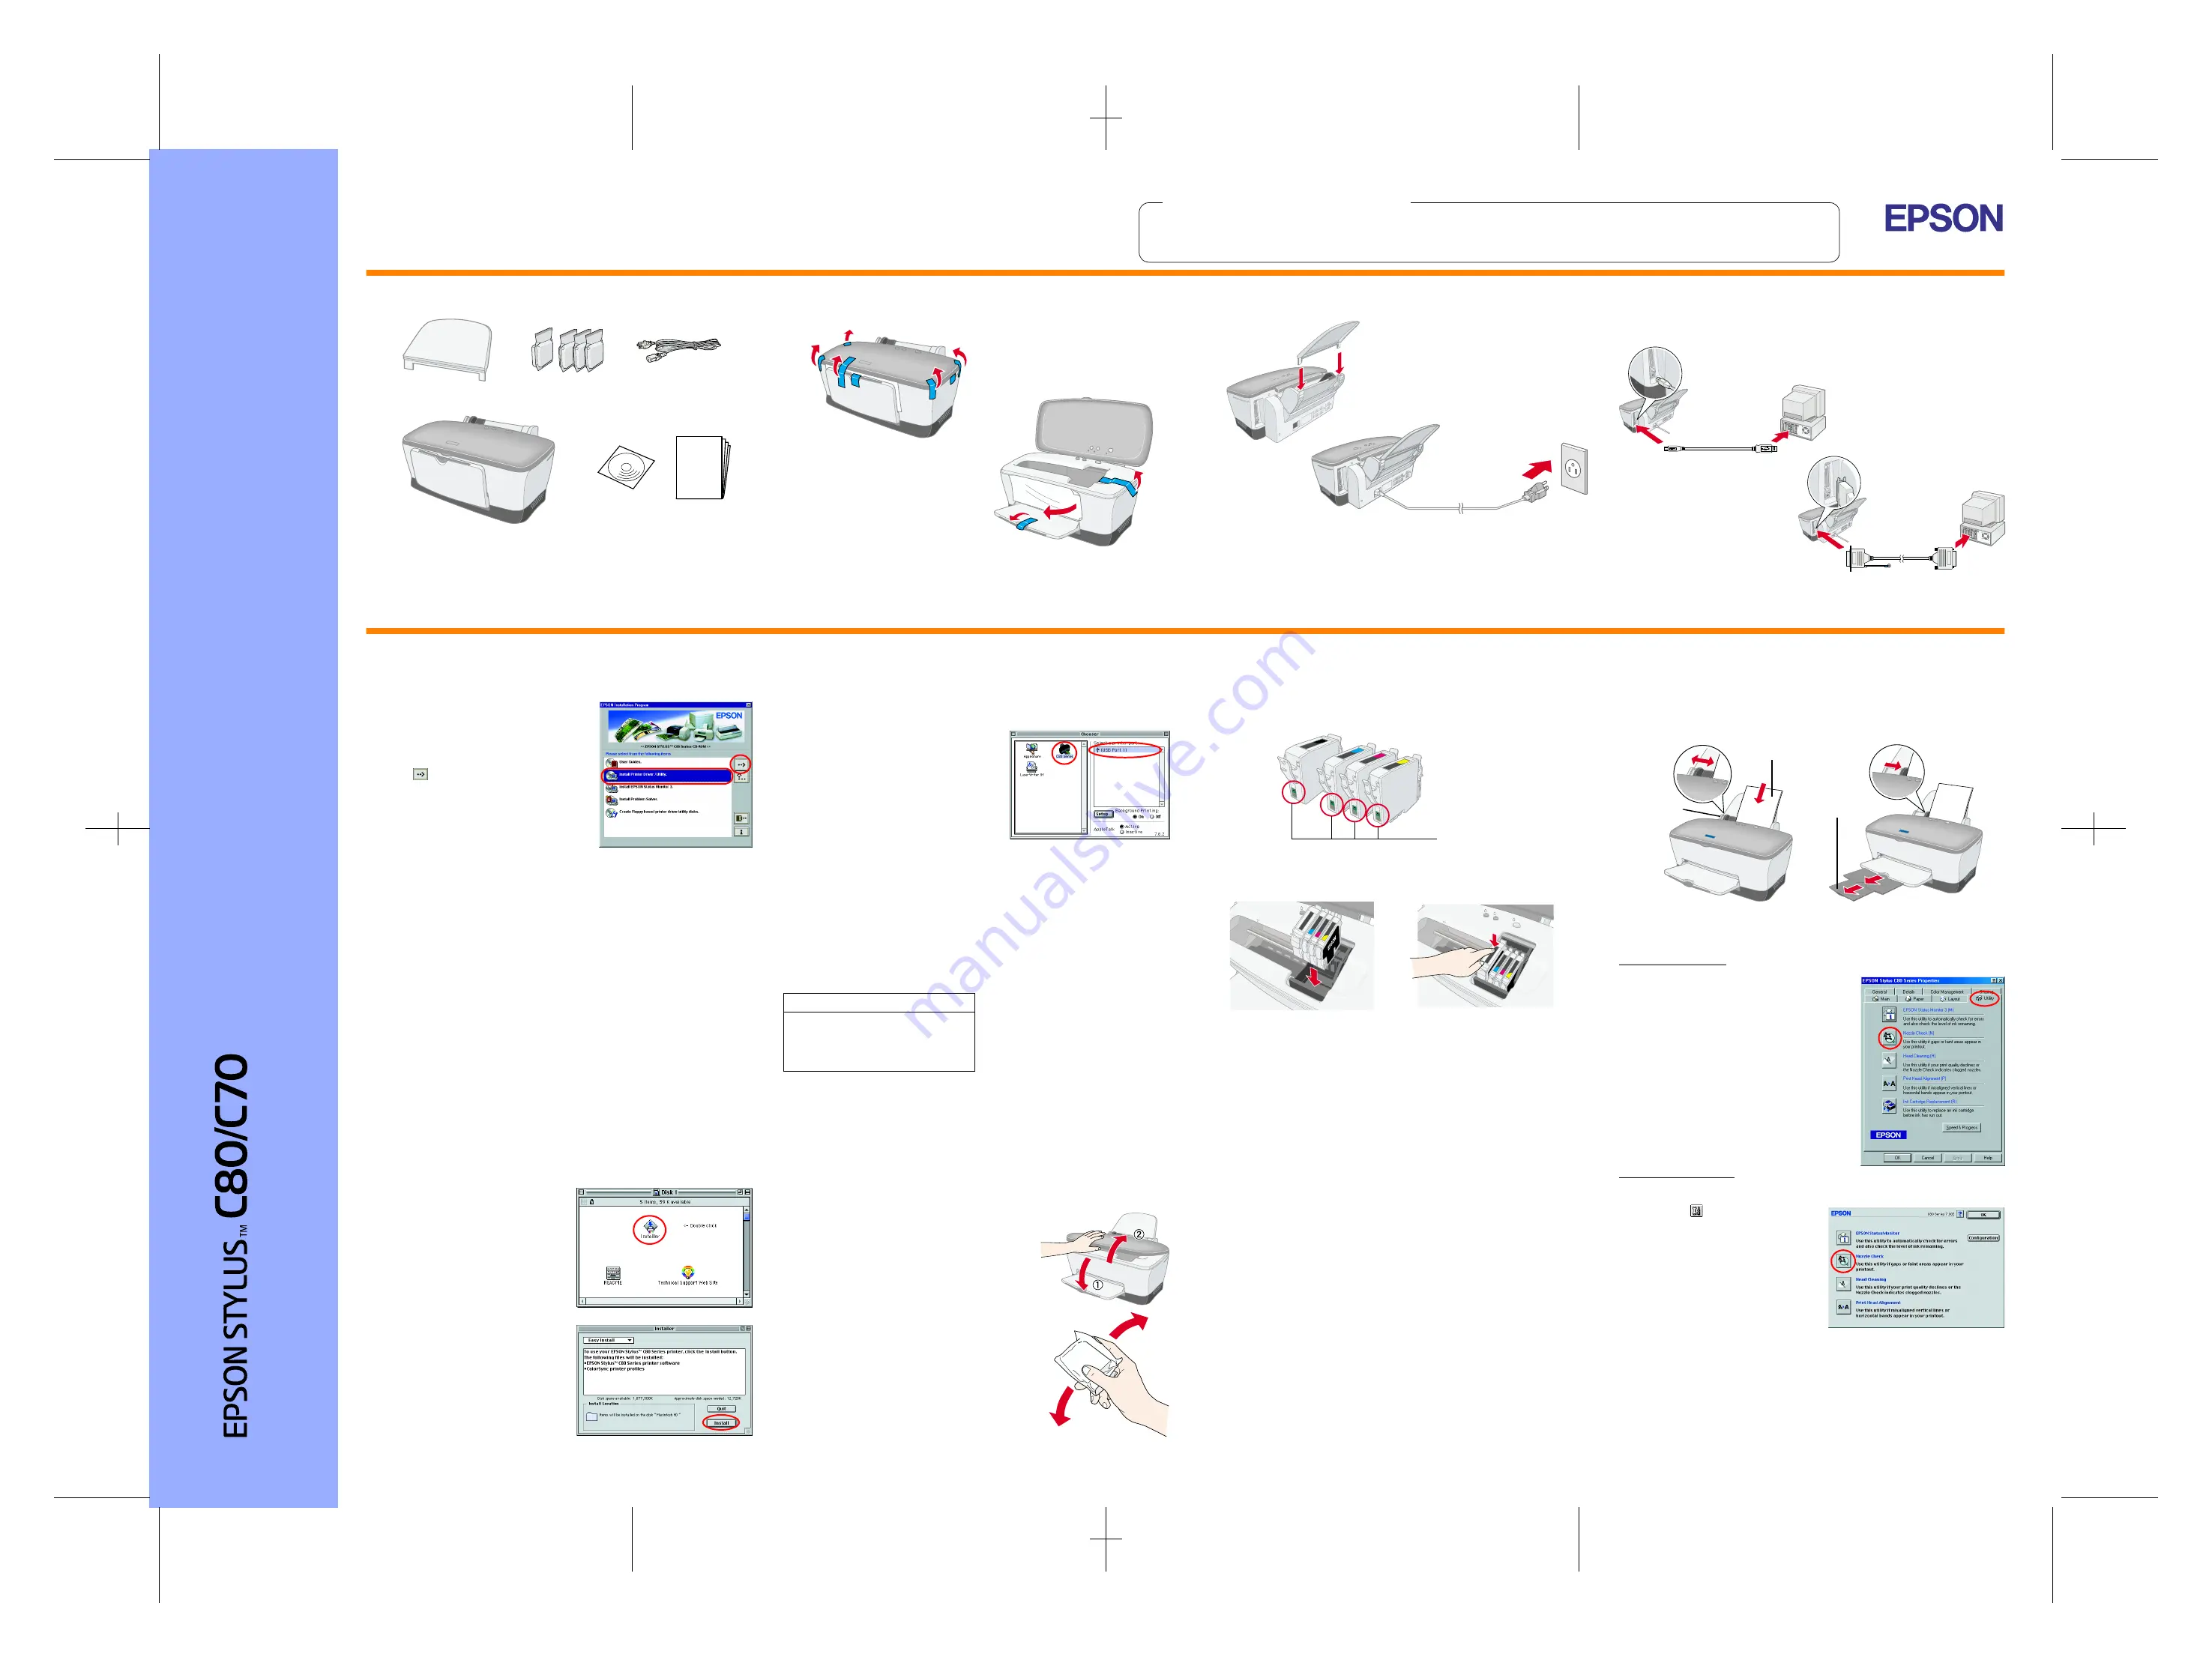
Installing the Printer Software and the Ink Cartridges
For Windows
1. Make sure that printer is off, then turn on your computer.
2. Insert the printer software CD in the
CD-ROM drive. If the Installer dialog box
does not appear, double-click
SETUP.EXE
in the CD-ROM.
3. Select
Install Printer Driver/Utility
, and
click .
4. Click
OK
in the dialog box that appears.
5. When a message appears prompting
you to turn on the printer, press the
P
power button. The print head moves
to the ink cartridge installation position
and the Setup utility starts automatically.
c
Caution:
Do not move the print head by hand, as this may damage the
printer.
6. Follow the Setup utility’s on-screen instructions to install the ink
cartridges.
Note:
If the Setup utility does not start, follow the instructions of this sheet,
beginning from “ Install the ink cartridges.”
When ink cartridge installation is complete, proceed to “Load paper and
check the print head nozzles” on this sheet.
For Macintosh
1. Install the printer software
c
Caution:
Turn off all virus protection programs before you install the printer
software.
1. Make sure that printer is off, then turn on your Macintosh and insert the
printer software CD in the CD-ROM drive.
2. Double-click the
Install Software
folder, then double-click the
Installer
icon inside it.
3. Click
Continue
.
4. After accepting the license
agreement, Installer appears.
5. Make sure that the Install Location
box displays the correct drive, then
click
Install
.
6. Follow the on-screen instructions to
install the printer software.
2. Select the printer
After you have installed the printer software, you need to select your printer.
1. Press the
P
power button to turn on the printer. The print head moves
to the ink cartridge installation position.
2. Choose
Chooser
from the Apple
menu. Then, select the icon for your
printer and the port that your printer is
connected to.
3. Close the Chooser.
For DOS Programs
Most DOS software programs include a list of drivers including one for
EPSON ESC/P 2™ Printers. In order to install the appropriate printer driver
and enable your printer's advanced, built-in, scalable fonts and graphics
handling, you must select the EPSON ESC/P 2™ printer from the list.
If your printer is not included in the list, contact your software manufacturer
to obtain an updated version of the software.
If the manufacturer does not have an updated printer driver for your printer,
select an alternative printer from those listed below, choosing the printers
listed at the top first.
Note:
The drivers for the printers listed above do not allow access to all of the
features offered by the EPSON STYLUS C80, such as 720-dpi printing and
1440-dpi printing.
DOS software varies greatly. See the printing section of your software
manual for information on accessing the printer driver settings.
Install the ink cartridges
1. Lower the output tray, then open the printer
cover.
c
Caution:
Do not move the print head by hand,
as this may damage the printer.
Note:
For best results, shake the ink cartridge four
or five times before opening the package.
2. Remove the new ink cartridges from their
protective bag.
c
Caution:
❏
Do not remove or tear the label on the cartridge; this can
cause leakage.
❏
Do not touch the green IC chip on the side of the cartridge.
Doing so may prevent normal operation and printing.
3. Place the ink cartridges vertically into the cartridge holders. Without
applying excessive force, push the ink cartridges down until they click
into place.
Note:
Install all ink cartridges. The printer will not work unless all cartridges
are installed properly.
4. Close the printer cover.
5. Press the
H
ink button. The printer moves the print head and begins
charging the ink delivery system. This process takes about one and half
minutes. While charging, the
P
power light flashes and the printer
produces a variety of mechanical sounds. This is normal.
c
Caution:
❏
Do not turn the power off during the ink charging process.
❏
Do not load paper until ink charging is complete.
Note:
If the ink end error occurs after the print head moves to its home position,
the ink cartridge may not be installed properly. Press the
H
ink button
again, and reinstall the ink cartridge until it clicks into place.
When the ink charging process is finished, the
P
power light stops flashing
and remains on.
When ink cartridge installation is complete, proceed to “Load paper and
check the print head nozzles” on this sheet.
Load paper and check the print head nozzles
Make sure that the computer is turned on. Load paper into the sheet feeder
making sure that the side of the paper that you wish to print onto is facing
up and that the right edge of the paper is against the right edge guide. Next,
slide the left edge guide so that it is against the left edge of the paper.
Once paper is loaded, follow these steps to check the print head nozzles.
For Windows users
1. Click the
Start
button, point to
Settings,
and click
Printers
.
2. Select the icon for your printer, then click
Properties
on the File menu. Then click
the
Utility
tab.
3. Click the
Nozzle Check
button, and follow
the on-screen instructions.
4. When you are finished, click
OK
to close
the Properties dialog box.
Your printer is now set up and ready to use.
For Macintosh users
1. Select
Page Setup
in the Finder’s
File
menu.
2.
Click the
utility icon.
3. Click the
Nozzle Check
button, and
follow the on-screen instructions.
4. When you are finished, click
OK
to
close the utility dialog box. Then
click
OK
to close the Page Setup
dialog box.
Your printer is now set up and ready to
use.
The contents may vary in certain locations.
Power cord may come
attached in some countries.
Setup
Quick Guide
When printing in black only:
LQ-870/1170
LQ-570 (+)/1070(+)
SQ-870/1070
LQ-850
LQ-500
Do not touch this part.
printable side up
left edge guide
output tray
extension
Print quality is determined by the driver settings and the paper. See the online
Reference Guide
for details on driver settings and available media. Also visit the EPSON Web Site for the latest information.
Setup
Re
ad
t
h
e S
a
fet
y
I
n
st
ruc
tio
ns on t
h
e
b
a
c
k
of
th
is she
e
t
whe
n
set
ting
up
a
n
d using t
h
is
p
rint
e
r.
English
C
o
lo
r Ink Jet Pr
inter
w
Warnings
must be followed
carefully to avoid bodily injury.
c
Cautions
must be observed to
avoid damage to your
equipment.
Notes
contain important information
and useful tips on the operation of your
printer.
Warnings, Cautions, and Notes
4014246-00
C01
Read this side first!
4014246
Rev.0
1-F
BK
4014246
Rev.0
1-F
Y
4014246
Rev.0
1-F
M
4014246
Rev.0
1-F
BK2
4014246
Rev.0
1-F
C


