The Intelligent Cloud Connect smart terminal enables you to simply,
easily and securely connect your
thing
to Amazon Web Services
(AWS) from anywhere in the world over cellular networks. This
enables you to remotely extract data from your thing for a variety of
industrial and commercial applications, such as metering, monitoring,
transportation, security, and so on.
Getting Started
Before you can use the Intelligent Cloud Connect smart terminal,
refer to the
AnyNet IRIS Quick Start Guide (PDF)
to complete the
following steps:
1.
Create an Amazon Web Services (AWS) account.
2.
Subscribe to AnyNet Cellular Connectivity for AWS IoT in the
AWS Marketplace.
3.
Create a mandatory, dedicated AWS IAM user with specific
permissions.
4.
Install and configure AnyNet IRIS.
Creating a thing in AWS IoT Core
Do not create things until you have verified the
advisory and alert email addresses that you supplied
during AnyNet IRIS configuration. Receiving a
verification link may take up to 30 minutes. If you
have not received an email, contact Eseye Support:
Before you begin
•
Ensure that the AnyNet Secure Cellular Connectivity
configuration process is complete on your AWS account.
•
Eseye connects your thing to AWS over a cellular network.
To purchase the requisite SIM cards, search for
•
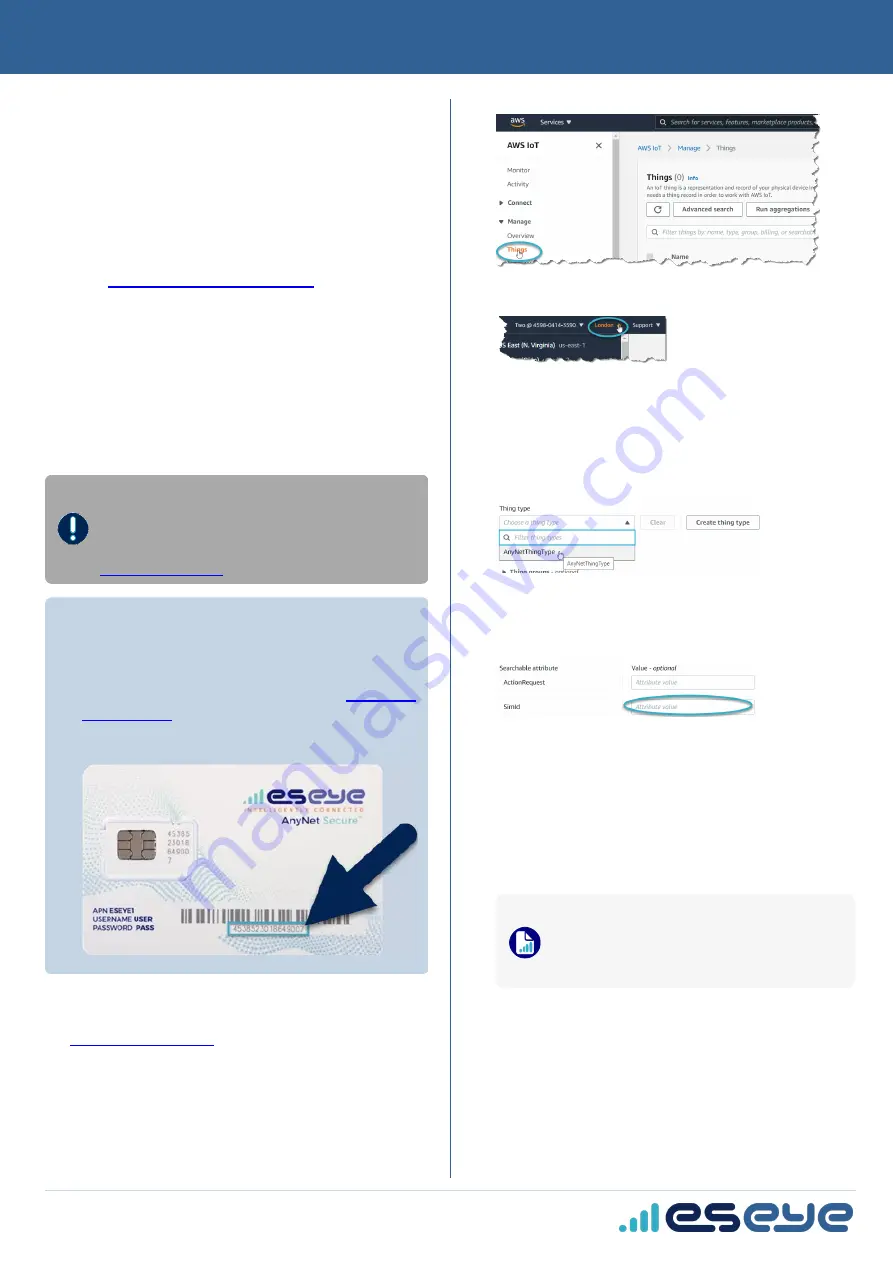
You need a AnyNet Secure SIM number, which is the unique
serial number printed on the back of the SIM card.
To create a thing in AWS IoT Core:
1.
Sign in to the AWS Management Console:
2.
In the
AWS Services
section, find the
IoT Core
service.
3.
In the left-hand
AWS IoT
menu, select
Manage
>
Things
.
4.
In the top right corner, select the correct AWS
Region
you want
to use.
5.
In the
Things
section, select
Create things
.
The Create things page appears.
6.
Select
Create single thing
, then select
Next
.
The Specify thing properties page appears.
7.
Type a
Thing name
.
8.
In the
Thing Type
drop-down box, select
AnyNetThingType
.
9.
In the
Searchable attribute
section, leave the
ActionRequest
Value
field blank.
10.
In the
SimId Value
field, type the SIM number (described
above).
11.
If required, add the thing to a group.
12.
In the
Device Shadow
section, select
Unnamed shadow
(classic)
.
13.
Select
Next
.
The Configure device certificate – optional page appears. Eseye
manages the certificate process so you don't have to.
14.
Select
Skip creating a certificate at this time
.
15.
Select
Create thing
.
When you use AWS IoT in your AWS account for the
first time, an AWS error may appear because Device
Gateway endpoint provisioning is not complete on
your account. If this occurs, allow AWS services 5-10
minutes to complete, and try again.
The new thing appears on the Things page.
8582 Intelligent Cloud Connect Quick Start Guide v1.10
©2021 Eseye Ltd. All rights reserved.
1
Intelligent Cloud Connect QSG


