background image

74140I 2014-06-09

Twin

Manual English

Summary of Contents for 13160101

Page 1: ...74140I 2014 06 09 Twin Manual English...

Page 2: ...Accessories 9 7 Settings Seat 10 11 8 Brake 12 9 Backrest 13 10 Legrests 14 11 Driving technique Manoeuvring 15 20 12 Assembly instructions Accessories 21 22 13 Care and maintenance Fault finding char...

Page 3: ...wheelchair and the user are secured in the vehicle and also describe how tests should be carried out and how the test results should be interpreted Etac s wheelchairs are crash tested at the Technical...

Page 4: ...the legrests in under the seat or remove them completely Lift by holding the push handles and the front part of the frame by the legrest mounting point Wheelchair with lockable legrests Lift using the...

Page 5: ...in vehicles that permit transport with a wheelchair facing in the opposite direction of travel If this means of travel is used the user carer must be aware while travelling prepared for sudden moveme...

Page 6: ...hub alternative quick release 5 Knob footrest lock 15 Armrest attachment 6 Legrests 16 Armrest 7 Castor wheel 17 Handrim 8 Front fork 18 Rear wheel 9 Front fork attachment 19 Back tube 10 Protective...

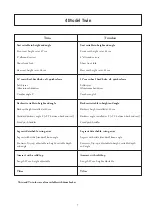
Page 7: ...epth and angle Armrest with a solid top Length 25 cm height adjustable Tilter Twin low Seat settable in height and angle Front seat height set at 42 cm 6 allround castors Short front fork Rear seat he...

Page 8: ...installation on right or left side Legrest with narrow or short narrow angle Lockable legrest wide knee angle Angle adjustable legrest model 1 with calf support adjustable in height depth angle and si...

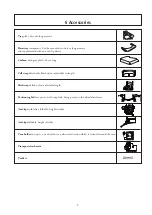
Page 9: ...Calf strap detachable black nylon adjustable in length Heel straps black nylon adjustable length Positioning belt two pieces with snap lock fixing points on the wheelchair frame Anti tips with tilter...

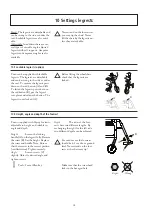
Page 10: ...ng Settable height and angle Also adjust the angle of the front fork attachment see point 7 3 7 2 Adjusting the height of the front fork attachment Risk of tipping Always check the position of the ant...

Page 11: ...ct order with the spring washer B on top Tighten the retaining nut until it cannot be turned any more Loosen it 1 2 1 turn The spring washer then has the correct tension It reduces the risk of the cas...

Page 12: ...plied during use 8 1 Adjusting the brakes 8 4 Drum brake brake settings When adjusting the brake loosen nut A and adjust the brake by mov ing B up down When the brake has a reasonable ef fect tighten...

Page 13: ...ing the backrest angle The angle is infinitely variable be tween 0 and 6 0 Loosen the nut install the desired angle and tighten the nut again Tools 13 mm ring spanner Check that the angle is the same...

Page 14: ...ow locked A Before lifting the wheelchair check that the legrests are locked Fixed The legrests are detachable and can be swung to the side or under the seat Lockable legrests are also avail able Adju...

Page 15: ...t by the push handles to help the rear wheels up Be sure to turn the anti tips back to the down position 11 Driving technique manoeuvring 11 1 Driving technique Parking Increase the overall support ba...

Page 16: ...wards Reverse to the edge of the kerb Reverse carefully down while at the same time leaning forwards Care giver driving up backwards Reverse the chair to the edge of the kerb threshold Tilt the wheelc...

Page 17: ...mise the risk of tipping Avoid turning round in the middle of a hill Always drive as straight up down as possible It is better to ask for help than to take a risk on your own Uphill driving Lean forwa...

Page 18: ...to take place as possible Apply the brakes remove or swing up armrest side guard and legrest on the side where the transfer is to take place Always ask for help Never use an escalator even if a care...

Page 19: ...The wheelchair should be as easy to handle as possible It must therefore be adapted individually to the user s capacities Weight distribution is the decisive fac tor when it comes to operating condi...

Page 20: ...s options Cellular rubber plastic coated handrims increases the friction It is therefore important to remember that when stop ping suddenly friction burns e g blisters may occur Be aware that when pas...

Page 21: ...car We recommend the front position B 12 2 Positioning belt The positioning belt is in two parts is adjustable in length and has a snap lock It can be mounted either on the backrest joint A or in the...

Page 22: ...d at the desired height see illus A 3 7 cm To allow you to negotiate thresholds and the edges of thick carpets a distance of 3 7 cm from floor level is recommended Tools 5 mm Allen key After adjusting...

Page 23: ...ons the attachments should be installed at 90 Check also that the front forks are tightened according to instructions see point 7 4 Brakes The braking effect is dependent on the air pressure in the ty...

Page 24: ...when propelling the chair Inflate the tyres Rear wheel mountings are incorrectly fitted Clean the castor axles from hair and dirt Too much weight over the castors Adjust the centre of balance Inflate...

Page 25: ...ee against material and manufacturing defects For terms and conditions see www etac com Special adaptations comprise everything that falls outside the instructions and settings in this Manual Wheelcha...

Page 26: ...ance rear wheel seat Front seat height is adjustable between 45 49 cm Front seat height is adjustable between 40 44 cm 22 Rear wheel in position Seat height rear Seat angle 3 Distance rear wheel seat...

Page 27: ...m 47 cm Seat height front 47 cm 47 cm 47 cm 47 cm Seat height rear 46 cm 46 cm 46 cm 46 cm Seat height rear 46 cm 46 cm 46 cm 46 cm Backrest height 40 47 5 cm 40 47 5 cm 40 47 5 cm 40 47 5 cm Backrest...

Page 28: ...1 72 547 13 05 info holland etac com www etac com Etac UK Limited 29 Murrell Green Business Park London Road Hook Hampshire RG27 9GR United Kingdom Tel 01256 767 181 Fax 01256 768 887 info etacuk com...

Reviews: