background image


DOMINATOR 

SERIES 

User, installation and servicing instructions 


FLEXI PAN 

E3741


Read these instructions before use 


T101031


Rev No: 1 

Published: 10/10/2019


DATE PURCHASED: 

 
MODEL NUMBER: 

 
SERIAL NUMBER: 

 
DEALER: 

SERVICE PROVIDER: 


Summary of Contents for Dominator Series
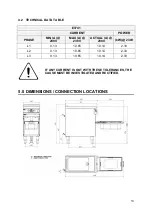
Page 1: ...R SERIES User installation and servicing instructions FLEXI PAN E3741 Read these instructions before use T101031 Rev No 1 Published 10 10 2019 DATE PURCHASED MODEL NUMBER SERIAL NUMBER DEALER SERVICE...

Page 2: ...iance and any replacement parts in a safe manner via a licensed waste handler Appliances are designed to be dismantled easily and recycling of all material is encouraged whenever practicable Dear Cust...

Page 3: ...2 SYMBOLS SCREWDRIVER SPANNER COOKING OIL GREASE WARNING SPARK IGNITION FLAME VIEWPORT ALLEN KEY IGNITER C SPANNER REMOVE DEVICE PLUG REMOVER...

Page 4: ...ssional use only and must be used by qualified persons The installer must instruct the responsible person s of the correct operation and maintenance of the appliance Unless otherwise stated parts whic...

Page 5: ...health and safety of your business you must control any risks identified in your commercial kitchen To do this you need to think about what might cause harm to people and decide whether you are taking...

Page 6: ...LOCATIONS 13 6 0 INSTALLATION 14 SITING CLEARANCES 14 6 1 ASSEMBLY 15 6 2 ELECTRIC SUPPLY CONNECTION 16 6 3 COMMISSIONING 17 7 0 SERVICING 18 7 1 GASTRONORM AND SLIDE REMOVAL 19 7 2 CONTROL AND INFILL...

Page 7: ...elevant EU directives for the heat inputs gas pressures and voltages stated on the data plate A Serial No B Model No C Flue Type D Gas Category E Gas Pressure F Gas Type G Gas Rate H Total Heat Input...

Page 8: ...7 2 0 OPERATION 2 1 COMPONENT PARTS A Pan F Gastronorm Slide B Heat Demand Neon Amber G Gastronorm Tray C Power Neon Red H Control Knob D Level Gauge I Runner E Plug J Plug Removal Tool...

Page 9: ...8 2 2 CONTROLS A Power Neon Red F Simmer Position B Temperature Control Knob G Steaming Position C Griddle Position D Heat Demand Neon Amber E Constant Boil Position...

Page 10: ...unexpectedly turns off the safety thermostat might have activated Call a qualified technician to carry out an investigation 2 4 USING THE APPLIANCE BOILING BRAISING 2 4 1 Before use clean the applianc...

Page 11: ...site www hse gov uk document ref manual handling at work INDG143 International customers should default to the health and safety guidelines provided by your government body The cleaning of fryers or o...

Page 12: ...leaning process When rubbing stainless steel with a cloth always rub in the direction of the grain 3 1 CLEANING AND MAINTENANCE 3 1 1 Switch appliance off and cool down 3 1 2 Ensure a Gastronorm Tray...

Page 13: ...clean cloth and rub away any stubborn staining with a non abrasive pad 3 1 10 Remove Plug using the Tool to empty the water into a Gastronorm Tray 3 1 11 Clean the drain 3 1 12 Rinse pan and drain and...

Page 14: ...HASE MIN A 230V MAX A 230V ACTUAL A 230V kW 230V L1 9 13 10 65 10 14 2 33 L2 9 13 10 65 10 14 2 33 L3 9 13 10 65 10 14 2 33 IF ANY CURRENT IS OUT WITH THESE TOLERANCES THE CAUSE MUST BE INVESTIGATED A...

Page 15: ...ed by the appliance data label The electrical installation and connections should meet the necessary requirements to the local electrical wiring regulations and any electrical safety guidelines We rec...

Page 16: ...1 Position the appliance and level using feet adjusters as shown below TAKE CARE WHEN MOVING AN APPLIANCE FITTED WITH CASTORS 6 1 2 Fix appliance to the floor using the anti tilt device as shown below...

Page 17: ...s Live 1 Phase 1 Brown Live 2 Phase 2 Black Live 3 Phase 3 Grey Neutral Blue Earth Yellow Green Install an appropriate three phase mains supply cable rated to at least 80 C with a 32A plug To install...

Page 18: ...17 THIS APPLIANCE MUST BE EARTHED 6 3 COMMISSIONING Refer to section 2 0 for operation If Safety Thermostat is activated refer to section 7 3 to reset it Carry out the following operation...

Page 19: ...minal is an effective electrical contact with all fixed exposed metal parts of the appliance and shall allow the connection of conductor having a nominal cross section area of up to 10mm It is located...

Page 20: ...m tray as section 3 1 5 7 1 2 To remove gastronorm slide push down on left hand catch as shown and push up on right hand catch 7 2 CONTROL AND INFILL PANEL REMOVAL 7 2 1 Remove control and infill pane...

Page 21: ...ure Control to Off Position 7 3 3 Allow unit to cool 7 3 4 Isolate unit 7 3 5 Remove Control Panel as shown in 7 2 1 7 3 6 Depress reset switch 7 3 7 Replace Control Panel taking care not to trap wire...

Page 22: ...N REMOVAL 7 4 1 Remove control panel as shown in 7 2 1 7 4 2 Remove temperature control as shown 7 4 3 Remove neon as shown above 7 5 CONTACTOR REMOVAL 7 5 1 Remove control panel as shown in 7 2 1 7 5...

Page 23: ...ls as section 6 2 7 6 2 Remove bolts from safety thermostat stop bracket Thus enables bracket to sit loosely on the capillary and not attached to insulation tray 7 6 3 Undo four nuts with washers on i...

Page 24: ...23...

Page 25: ...ition Ensure when re fitting phial clamp fixing screws that these are not over tightened and stand proud of bracket as shown above Ceramic tape must be reinstalled with this operation 7 6 6 The Phial...

Page 26: ...ETY THERMOSTAT REMOVAL 7 7 1 Follow step 7 6 2 7 7 2 Undo screws on mounting rail as shown above Pull safety stat from sleeve as shown Ensure when refitted the tip of the thermostat is tight up agains...

Page 27: ...26 7 8 HEATING ELEMENTS REMOVAL 7 8 1 Follow steps 7 6 1 to 7 6 6 7 8 2 Remove the element clamping plates as shown above 7 8 3 Remove the elements as shown above 7 8 4 Replace in reverse order...

Page 28: ...27 7 9 CIRCUIT DIAGRAMS 7 9 1 E3741Circuit diagram...

Page 29: ...28 WIRING DIAGRAMS 7 9 2 E3741 Wiring diagram...
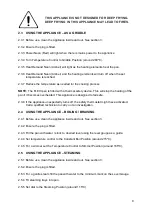
Page 30: ...t turn ON No power to unit Check mains power is connected and turned on Safety Thermostat activated Overheating Allow plate temperature to cool below 300o C Reset safety stat as per section 7 3 Heatin...

Page 31: ...tronorm Slide Runners Pair 733700006 Drain Plug 733700007 Plug Removal Tool 733700008 When ordering spare parts please quote the following Model Number Serial number This information will be found on...

Reviews: