background image

Giselle

Day Bed

fantasticfurniture.com.au

Version 1.0

.

.

Summary of Contents for Giselle

Page 1: ...Giselle Day Bed fantasticfurniture com au Version 1 0 ...

Page 2: ...ove it Share it Fantastic buy Share how it looks at home on Instagram for your chance to win a 250 Fantastic Furniture Gift Card fantasticfurniture fantasticfurniture com au Page 2 to help create a home you ll love Look like you ve found your Fantastic ...

Page 3: ...s back to front Always use a soft surface such as carpet or cardboard when assembling your product to avoid scratching or damaging the surface of the product Bulky items such as wardrobes and bunk beds should be assembled in the room they will be used as they may not fit through a door once assembled Never use any glue until you are certain that the parts belong together Periodically check and re ...

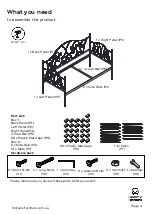
Page 4: ...hort Bolts H1 Page 4 1 x Allen Key H3 13 x Slats P7 26 x Plastic Slat Caps P6 What you need Please make sure you have all these parts before you start fantasticfurniture com au 4 x Long Bolts H2 1 x Back Panel P1 1 x Left Panel P2 1 x Right Panel P3 2 x Side Rails P4 1x Cross Bar P5 2 x Medium Bolts H4 2 x Hex Nuts H5 1x Spanner H6 to assemble the product ...

Page 5: ...1 P4 P4 P5 You will need 4 x Short Bolts H1 2 x Medium Bolts H4 1 x Allen Key H3 2 xHex Nuts H5 1 x Spanner H6 H4 H3 H5 H6 P3 P2 Attach the 2 x side rails P4 to the left panel P2 and right panel P3 Slot the side rails onto the bolts on the left and right panels P2 P3 as shown Then insert 4 x short bolts H1 into the top holes with the allen key H3 Attach cross bar P5 onto 2 x side rails P4 using 2 ...

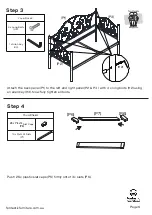
Page 6: ...tep 4 Page 6 You will need 26 x Plastic Slat Caps P6 Push 26 x plastic slat caps P6 firmly onto 13 x slats P6 13 x Flat LVL Slats P7 P7 P6 P6 P1 P2 P3 H2 Attach the back panel P1 to the left and right panel P2 P3 with 4 x long bolts H2 using an allen key H3 Now fully tighten all bolts ...

Page 7: ...d pressure until the plastic caps are fully inserted into the rails Repeat for every bed slat until finished Step 5 IMPORTANT Fully tighten all bolts on bed Periodically check to ensure all bolts remain tight In the interest of our environment please dispose of all packaging thoughtfully Step 6 Job Complete fantasticfurniture com au Page 7 ...

Reviews: