background image

IOM-F-860_860U

I N S T A L L A T I O N ,   O P E R A T I O N ,   M A I N T E N A N C E

Maintenance Manual

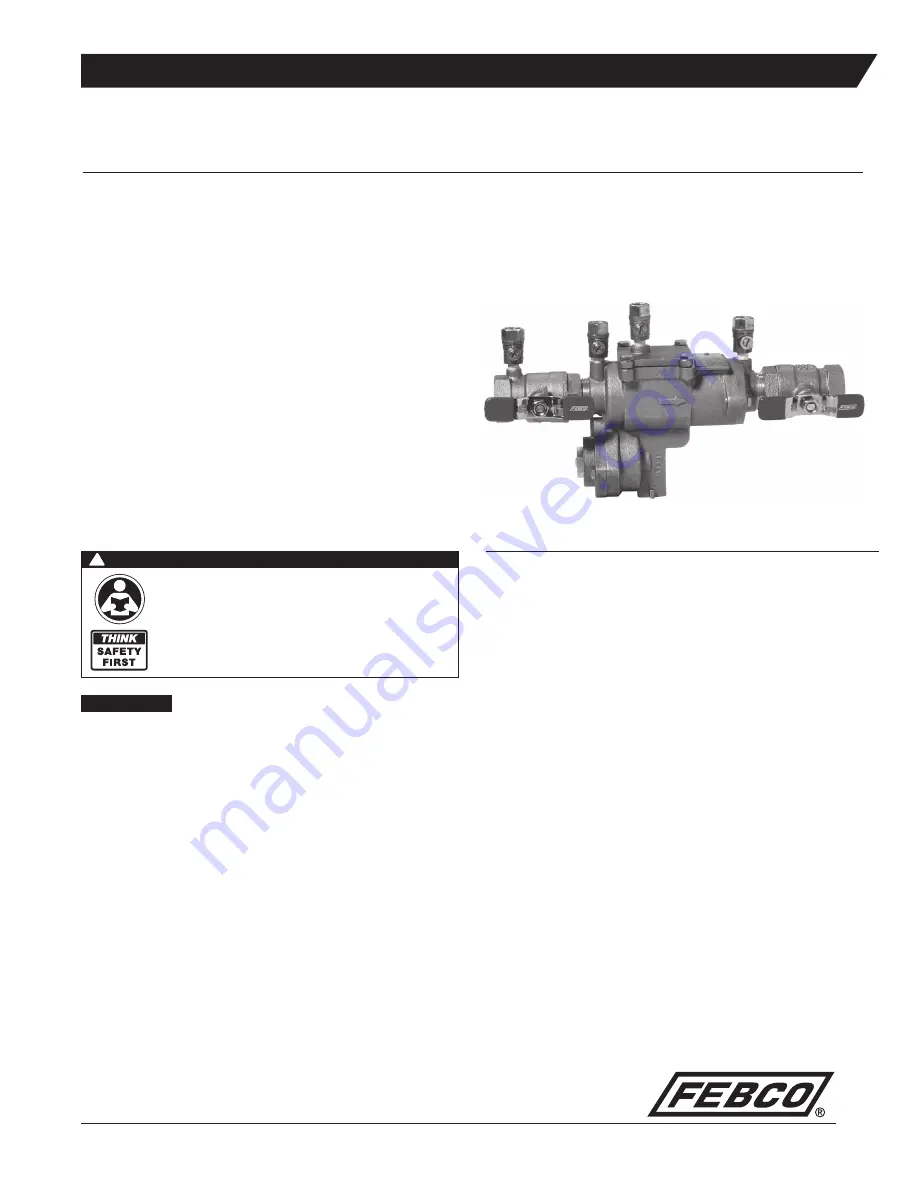
Series 860 Reduced Pressure Zone Assemblies 

Models 860, LF860, 860U & LF860U  

1

/

2

"- 2" (15 – 50mm)

Read and understand this manual prior to installing, 

operating or servicing this equipment.

Series 860

Table of Contents

Feature and Operating Procedures .  .  .  .  .  .  .  .  .  .  .  .  .  .  .  .  .  .  .  .  .  .  .  .  .  .  .  .  .  .  .  . 2
Vandalism .  .  .  .  .  .  .  .  .  .  .  .  .  .  .  .  .  .  .  .  .  .  .  .  .  .  .  .  .  .  .  .  .  .  .  .  .  .  .  .  .  .  .  .  .  .  .  .  .  .  .  . 2
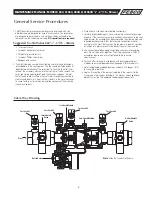
General Service Procedures   .  .  .  .  .  .  .  .  .  .  .  .  .  .  .  .  .  .  .  .  .  .  .  .  .  .  .  .  .  .  .  .  .  .  .  .  . 3
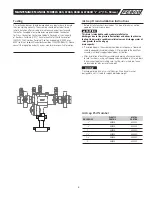
Cut-A-Way Drawing .  .  .  .  .  .  .  .  .  .  .  .  .  .  .  .  .  .  .  .  .  .  .  .  .  .  .  .  .  .  .  .  .  .  .  .  .  .  .  .  .  .  .  . 3
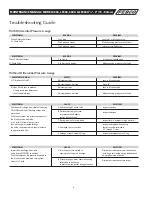
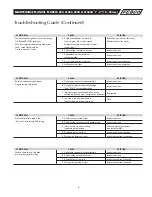
Troubleshooting Guide   .  .  .  .  .  .  .  .  .  .  .  .  .  .  .  .  .  .  .  .  .  .  .  .  .  .  .  .  .  .  .  .  .  .  .  .  .  .  .  .  . 4
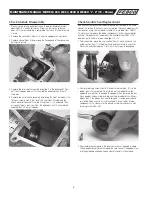
Check Module Disassembly   .  .  .  .  .  .  .  .  .  .  .  .  .  .  .  .  .  .  .  .  .  .  .  .  .  .  .  .  .  .  .  .  .  .  .  .  . 6
Check Module Seal Replacement .  .  .  .  .  .  .  .  .  .  .  .  .  .  .  .  .  .  .  .  .  .  .  .  .  .  .  .  .  .  .  .  . 6
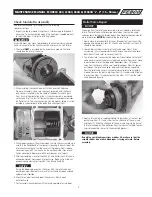
Check Module Re-Assembly .  .  .  .  .  .  .  .  .  .  .  .  .  .  .  .  .  .  .  .  .  .  .  .  .  .  .  .  .  .  .  .  .  .  .  .  . 7
Relief Valve Repair .  .  .  .  .  .  .  .  .  .  .  .  .  .  .  .  .  .  .  .  .  .  .  .  .  .  .  .  .  .  .  .  .  .  .  .  .  .  .  .  .  .  .  .  . 7
Testing  .  .  .  .  .  .  .  .  .  .  .  .  .  .  .  .  .  .  .  .  .  .  .  .  .  .  .  .  .  .  .  .  .  .  .  .  .  .  .  .  .  .  .  .  .  .  .  .  .  .  .  .  .  . 9
Air Gap Drain Installation Instructions .  .  .  .  .  .  .  .  .  .  .  .  .  .  .  .  .  .  .  .  .  .  .  .  .  .  .  .  .  . 9
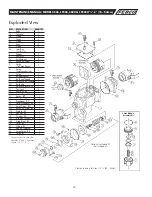
Exploded View .  .  .  .  .  .  .  .  .  .  .  .  .  .  .  .  .  .  .  .  .  .  .  .  .  .  .  .  .  .  .  .  .  .  .  .  .  .  .  .  .  .  .  .  .  .  . 10
Parts List   .  .  .  .  .  .  .  .  .  .  .  .  .  .  .  .  .  .  .  .  .  .  .  .  .  .  .  .  .  .  .  .  .  .  .  .  .  .  .  .  .  .  .  .  .  .  .  .  .  .  . 10
Repair Kits   .  .  .  .  .  .  .  .  .  .  .  .  .  .  .  .  .  .  .  .  .  .  .  .  .  .  .  .  .  .  .  .  .  .  .  .  .  .  .  .  .  .  .  .  .  .  .  .  .  . 11
Freeze Protection .  .  .  .  .  .  .  .  .  .  .  .  .  .  .  .  .  .  .  .  .  .  .  .  .  .  .  .  .  .  .  .  .  .  .  .  .  .  .  .  .  .  .  .  . 11
Main Valve Draining Procedure (

1

/

2

" - 2") .  .  .  .  .  .  .  .  .  .  .  .  .  .  .  .  .  .  .  .  .  .  .  .  .  .  . 11

Warranty .  .  .  .  .  .  .  .  .  .  .  .  .  .  .  .  .  .  .  .  .  .  .  .  .  .  .  .  .  .  .  .  .  .  .  .  .  .  .  .  .  .  .  .  .  .  .  .  .  .  .  . 12

WARNING

!

Read this Manual BEFORE using this equipment.
Failure to read and follow all safety and use information 

can result in death, serious personal injury, property 

damage, or damage to the equipment.
Keep this Manual for future reference.

NOTICE

If the unit is installed where a protective device is recommended may be 

a problem, the assembly should be protected and secured . On 

1

/

2

" through 

2" (15 – 50mm) units the handles of shutoff valves can be removed to 

discourage tampering . A protective enclosure can be installed over the unit 

to discourage vandals . If an enclosure is used, it should be installed so that 

adequate clearance is available for maintenance and testing . Consult local 

codes before installing any type of protective enclosure .

Summary of Contents for 860 Series

Page 1: ...pair Kits 11 Freeze Protection 11 Main Valve Draining Procedure 1 2 2 11 Warranty 12 WARNING Read this Manual BEFORE using this equipment Failure to read and follow all safety and use information can...

Page 2: ...uctions and product safety information before begin ning the installation of this product FAILURE TO COMPLY WITH PROPER INSTALLATION AND MAINTENANCE INSTRUCTIONS COULD RESULT IN PRODUCT FAILURE WHICH...

Page 3: ...heck local codes 3 Rinse all parts with clean water before reassembly 4 Carefully inspect diaphragms seals and seating surfaces for damage or debris If the check valve seat disc has been severely cut...

Page 4: ...spect and replace If necessary than discharge is created through D Damaged seat or seat disc seat disc can be reversed in the valve the pressure drop should increase 1 2 through 2 sizes to approximate...

Page 5: ...d during field testing B Plugged low pressure hydraulic passage Inspect and clean from ZONE to inner diaphragm C Improper alignment of internal parts during Reassemble reassembly causing high resistan...

Page 6: ...ernal components with clean water Replace disc retainer and secure with retaining screw Item 5 2 3 Reassemble check module in the reverse manner as indicated in above When reassembling the check modul...

Page 7: ...l all test cocks have been closed and pressure stabilized 6 Check for external leaks and repair if necessary Slowly open outlet ball valve 7 Test assembly in accordance with the locally approved test...

Page 8: ...en CAUTION Do not twist the internal parts when the cylinder is tightened The small diaphragm may become folded or creased if the internal assembly is restricted while tightening the cylinder 7 Replac...

Page 9: ...e in some areas CAUTION This drain is intended to catch moderate relief valve discharges due to line pressure fluctuations and minor check valve fouling Under certain conditions relief valves can disc...

Page 10: ...4 11 2 4 Poppet 2 5 Seat Disc 2 5 1 Disc Retainer 2 5 2 Round HD Screw 2 6 Spring 1 1st Check Spring 6 1 Spring 1 2nd Check Spring 7 Guide 2 8 Retainer Spacer 1 9 Ball Valve Tapped 1 Union End BV Tapp...

Page 11: ...Kit 905342 ALL 1 2 3 4 15 20 905343 ALL 1 25 905344 ALL 1 1 4 2 32 50 Both checks Kit Includes Item 2 2 2 ea of items 3 1 5 Relief Valve Rubber Kit 905345 ALL 1 2 3 4 15 20 905345 ALL 1 25 905346 ALL...

Page 12: ...one year from the date of original shipment In the event of such defects within the warranty period the Company will at its option replace or recondition the product without charge THE WARRANTY SET F...

Reviews: