

2561155A
REV. A 794
Printed in U.S.A.
INSTRUCTION SHEET
FOR
SIGNALMASTER™ MODELS SMC14 and SML4-30
SAFETY MESSAGE TO INSTALLERS AND USERS
People’s lives depend on your safe installation of our
products. It is important to read, understand and follow all
instructions shipped with the products. In addition, listed
below are some other important safety instructions and
precautions you should follow:
•
To properly install this light: you must have a
good understanding of automotive electrical
procedures and systems, along with proficiency
in the installation and use of safety warning
equipment.
•
When drilling into a vehicle structure, be sure
that both sides of the surface are clear of any-
thing that could be damaged.
•
In order for the light to function properly, a
good ground connection must be made. At a
minimum, it must be attached to a solid metal
body or chassis part that will provide an effec-
tive ground path as long as the light system is
to be used.
•
Locate light control so the VEHICLE and
CONTROL can be operated safely under all
driving conditions.
•
Do not attempt to activate or deactivate light
control while driving in a hazardous situation.
•
You should frequently inspect the light to en-
sure that it is operating properly and that it is
securely attached to the vehicle.
•
File these instructions in a safe place and refer
to them when maintaining and/or reinstalling
the product.
Failure to follow all safety precautions and instruc-
tions may result in property damage, serious injury, or
death to you or others.
I.
GENERAL.
The Federal SignalMaster™ Model SMC14 is an
economical, low profile, solid state, directional light control
that is designed to operate with two Federal Signal four-
lamp directional light assemblies (Model SML4-30). The
unit is reversed polarity protected to avoid damage if the
positive and negative power connections are connected
incorrectly.
This model provides three distinctive directional
signals: left arrow, right arrow, and center out. In addition,
an alternating flash pattern produces a warning signal for
use when a directional signal may not be appropriate.
When a directional signal is selected, the lamps are
individually illuminated in a sequential sweeping motion
until all eight lamps are illuminated.
II.
SPECIFICATIONS.
Input Voltage
11VDC to 16VDC.
Polarity
Negative ground only.
Operating Temperature
-30
°
C to +65
°
C.
Range
Standby Current
Zero amperes.
+BAT Fuse
25 amperes.
+IGN/BAT Fuse
1 ampere.
Output Drive
8, 27 watt lamps.
Capability (Total)
Flash Rate:
Directional
35 patterns/min.
Warn
60 patterns/min.
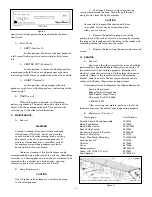
Dimensions:
Height
1-1/2"
Width
6-1/8"
Depth
5"
Shipping Weight
2.0 lbs
III. INSTALLATION.
WARNING
These lights are intended for
secondary
warn-
ing only. They are
not
intended for use as a
primary warning system.
A.
SignalMaster Light Assembly (Model SML4-30).
Install the light assembly as described in the
instructions packed with the mounting kit. Route the cable
near the eventual location of the control unit.
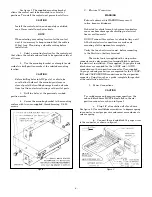
B.
Control Unit.
WARNING
When installing equipment inside air bag equipped
vehicles, the installer MUST ensure that the equip-
ment is installed ONLY in areas recommended by
the vehicle manufacturer.
Failure to observe this warning will reduce the
effectiveness of the air bag, damage the air bag, or
potentially damage or dislodge the equipment,
causing serious injury or death to you or others.


