background image


Fenix Mistral 3.3


Rev.    0.1


 Fenix 

Mistral 3.3


Rev. 0.1 

Oct 2021 


Summary of Contents for Mistral 3.3

Page 1: ...Fenix Mistral 3 3 1 Rev 0 1 Fenix Mistral 3 3 Rev 0 1 Oct 2021...

Page 2: ...hare the same frequency with somebody else at the same time Ensure that others are aware of the operating frequency you are using and when you are using it Use a transmitter designed for ground use wi...

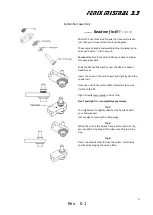
Page 3: ...Head Screw Insert the screw in the carbon part and tight by hand the special nut Once the nut hit the carbon fibre it will start to secure itself into the CF Tight it slowly very slowly until it stop...

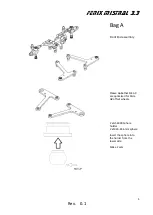
Page 4: ...3 3 4 Rev 0 1 Bag A Front End assembly Please note that M33 9 are optimized for Ride GR offset wheels 2 x G56038 Sphere holder 2 x M20 K3 6mm sphere Insert the sphere into the holder from the lower si...

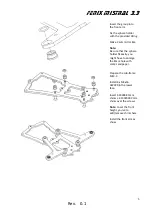
Page 5: ...ke Note Be sure that the sphere holder fit easily you might have to enlarge the 8mm hole with some sandpaper Prepare the sub frame M33 3 Install 4 x M3x16 HW020 in the lower face Insert 4 FX0088 5mm s...

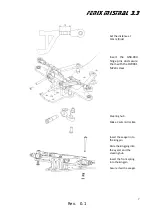
Page 6: ...Note the position of G56039 the knob should face forward Active caster settings 5 Degrees are default setting Secure the G56 030 upper arm mount to the M20 16 using 2 HW004 M3x10mm Hex button screw Sl...

Page 7: ...ert the G56 034 hinge pins and secure them with the HW031 M2x4 screw Steering hub Make 2 sets mirror like Insert the seeger into the kingpin Slide the kingping into the eyelet and the steering hub Ins...

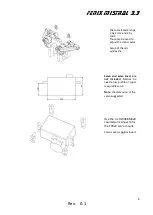
Page 8: ...to adjust the static caster Setup of them is symmetric Servo and servo saver are not included Mistral 3 3 need a low profile or super low profile servo Note the dimension of the servo suggested Use t...

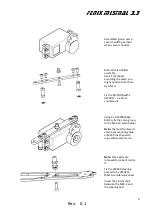
Page 9: ...Fix the FX FU48 with 1 HW0012 3 x 6mm countersunk Using 2 x HW008 M3x6 Button fix the servo group to the M33 10 servo holder Note the most frontward servo hole mounting hole in M33 10 is shaped to cop...

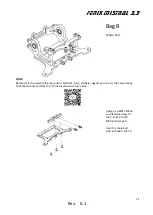
Page 10: ...n fibre Note you might have to enlarge the 8mm hole with some sandpaper Do not exceed Note Take some time when aligning the carbon plates If necessary use the provided shims to remove the vertical pla...

Page 11: ...rvo and the other 2 to the steering hubs Ball male stud should be used on the servo horn Use one HW003 M3x8 button screw to fix the M33 10 to the steering post A certain amount of vertical play is nee...

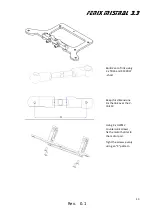
Page 12: ...sembly the rear end of Mistral 2 0 we strongly suggest you to visit the Fenix Racing Youtube channel and look the V link suspension setup video Using 3 x HW012 M3x6 countersunk screw fix the V link F2...

Page 13: ...1 Build 2 set of link using 2 x TR16 and 4 FX0037 short Keep this dimensions Fix the link over the V link F2 Using 4 x HW012 countersunk screws fix the motor holder to the motor pod Tight the screws...

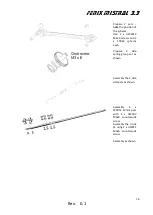
Page 14: ...ride height adjuster and the flanged bearings bearings are in the differential bag Use the provided HW006 M3x8 button screw to fix the M33 5 shock holder to the Motor holder Note Wait to install the s...

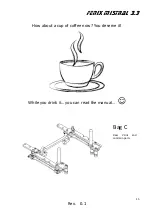
Page 15: ...Fenix Mistral 3 3 15 Rev 0 1 How about a cup of coffee now You deserve it While you drink it you can read the manual Bag C Rear V link and common parts...

Page 16: ...e 2 x HW0014 M2x 6 screws and 2 x FX002 spheres each Prepare 2 side spring group set as shown Assembly the 2 side dampers as shown Assembly 4 x FX0052 12mm post with 4 x HW007 M3x8 countersunk screw A...

Page 17: ...cial attention when thread the grub screw in the carbon fibre lubricate the grub screw often during the operation and insert it slowly You might want to thread the carbon fibre using an M3 tap Install...

Page 18: ...sphere Note Newer G56042A allow to set the angled link in the easiest way Install the side link you ve prepared Use 2 x 6mm allen to tight the sphere link V link setting Now lay the car on a flat set...

Page 19: ...using 4 by HW008 3x6 button screw Side links can be installed using 2 x HW012 M3x6 Install now the side dampers To assembly the front wing First secure the front body post to the body holder using 1...

Page 20: ...x HW007 M3x8 countersunk screw fix 2 FX0054 26mm posts to the chassis Fix the M33 7 mini shock holder using 1 x HW003 M3x8 button screw 1 x HW034 M3x15 grub screw and one FUFX48 as show The second FUF...

Page 21: ...ested and then insert a second seeger into the proper seat Insert the o ring into adjusting ring Lubricating it before using a drop of oil shock Insert the shaft into the shock housing Lubricate the o...

Page 22: ...he spring holder as shown Please note Pistons are supplied in 2 versions Standard cylindrical holes and conical holes Conical allows to choose harder softer direction Bag E Wing to chassis Assembly 2...

Page 23: ...th some rear wing this is not possible To assembly the rear wing use the HW016 M3x20 screws and the M3 Nylock nuts provided We ve add also an M20 11 small brace This can provide extra safety to the M2...

Page 24: ...r the time and dedication they put in this project Front End On the front end you can find an easy system to change the front track according the tires you re using and very user friendly system to al...

Page 25: ...ix Mistral 3 3 25 Rev 0 1 Most of the time you ll find a very comfortable setting using A2 or A3 position Of course the 2 connection link must have the same length Here you can see how to set the V li...

Page 26: ...Fenix Mistral 3 3 26 Rev 0 1 Stay in touch with us Facebook Instagram Twitter Youtube Fenix Racing Fenix racing shop...

Reviews: