background image

NZ AU

Installation instructions 

and

 User guide

Professional grill cart

CAD36 and CAD48 models

Summary of Contents for DCS CAD-36

Page 1: ...NZ AU Installation instructions and User guide Professional grill cart CAD36 and CAD48 models ...

Page 2: ......

Page 3: ...is not responsible for shipping damage DO NOT discard any packing material box pallet straps until the unit has been inspected A MESSAGE TO OUR CUSTOMERS WARNING 1 Do Not store or use gasoline or other flammable vapours and liquids inside or in the vicinity of this or any other appliance 2 An LPG cylinder not connected for use shall not be stored inside or in the vicinity of this unit FOR YOUR SAF...

Page 4: ...injured if they should climb onto or into the cart to reach these items SAFETY PRACTICES PRECAUTIONS 2 MODEL IDENTIFICATION DIMENSIONS 3 BEFORE INSTALLING YOUR APPLIANCE Shipping Inspection 3 INSTALLATION Locating the Cart 4 Cart Assembly Instructions 4 Optional Attaching Side Shelf 9 USING THE CART Removing Drawers 11 Re installing Drawers 12 CARE AND MAINTENANCE 14 SERVICE 15 WARRANTY 16 WARNING...

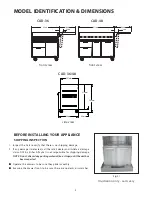
Page 5: ...S by Fisher Paykel is not responsible for shipping damage NOTE Do not discard any packing material box straps until the unit has been inspected Operate the drawers to be sure they glide smoothly Examine the drawer fronts to be sure there are no dents or scratches Fig 01 610 mm 1219 mm 610 mm 114 mm 114 mm 914 mm 816 mm 902 mm 648 mm 86 mm 597 mm CAD 36 CAD 48 front view front view CAD 36 48 side v...

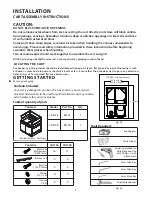
Page 6: ...kaged in one box The box contains your cart and a universal hardware kit to be used for grill installation and may contain extra hardware for your convenience Tools Required Contents CAD 36 CAD 48 16 17 2 4 2 2 4 4 2 2 Machined Phillip screws 10 24X12mm Eye Goggles Work Gloves 4mm Allen Key 5mm Allen Key Power Screwdriver or Variable Speed Drill with Phillips tip 2 Attachment Contents Model Part N...

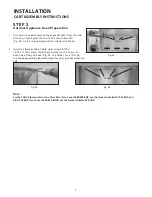
Page 7: ...g 8 of the 10 24 x 12mm screws Install each bracket with 4 screws on each side of the grill head Fig 04 05 and 06 For a CAD 48 use the appropriately labeled bracket for your grill head and cart side Note For the CAD 48 there are two sets of brackets If you have the BGB48 BQR use the brackets labeled LEFT 48 BQR and RIGHT 48 BQR If you have the BGB48 BQAR use the brackets labeled 48 BQAR Fig 04 Fig...

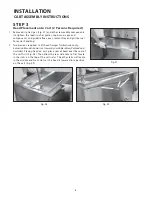
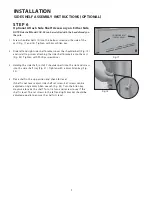
Page 8: ...ired to lift head images for illustration only burner sink model shown is not currently available in New Zealand and Australia Placing head on cart place rear of head over the rear of the cart first Fig 08 Then allow the rear side tabs to first locate in the slots on the top of the cart sides The other tabs will locate in the middle and front slots as the head is lowered into position on the cart ...

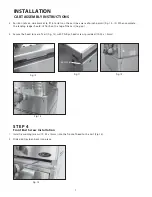
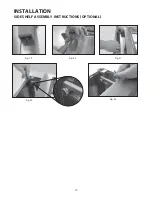
Page 9: ...ace Fig 14 INSTALLATION CART ASSEMBLY INSTRUCTIONS 3 Position tabs on side bracket to fit into slots on the cart be aware of pinch points Fig 10 12 When complete the landing ledge should sit flush on the top of the cart no gap 4 Secure the head to rear of cart Fig 13 with Phillips head screws provided 10 24 x 12mm Fig 12 PINCH POINT Fig 13 Fig 10 Fig 11 ...

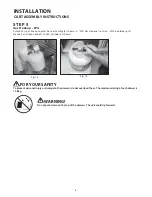
Page 10: ...n LPG Gas Hookup section of the outdoor grill manual and then connect to LPG cylinder as shown Fig 15 Fig 16 FOR YOUR SAFETY To prevent personal injury or damage to the drawers do not overload them The maximum rating of each drawer is 15 8 kg WARNING Do not push down on the top of the drawers The unit could tip forward ...

Page 11: ...ips screwdriver 3 Holding the side shelf install 2 shoulder bolts into the slot and screw into the side shelf tray Fig 21 Tighten with a 5mm Allen key Fig 22 4 Place shelf in the up position and check for level If shelf is not level adjust side shelf set screw Set screws can be adjusted using a 2mm Allen wrench Fig 23 Turn the Allen key clockwise to raise the shelf Turn 1 4 turn and review to see ...

Page 12: ...Fig 21 Fig 22 Fig 23 INSTALLATION SIDE SHELF ASSEMBLY INSTRUCTIONS OPTIONAL Fig 19 Fig 20 10 ...

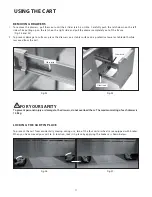
Page 13: ...stable surface on a protective towel or tablecloth while removed from the cart Fig 25 Fig 27 FOR YOUR SAFETY To prevent personal injury or damage to the drawers do not overload them The maximum rating of each drawer is 15 8 kg LOCKING THE CART IN PLACE To prevent the cart from accidentally moving during use two of the four castor wheels are equipped with brakes When you have moved your cart to its...

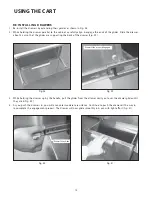
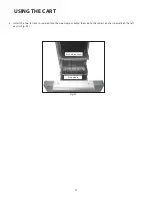
Page 14: ... drawer all the way in to complete the engagement process The drawer will now glide smoothly in out with light effort Fig 31 Drawer Cavity Glide Drawer Glide properly Engaged RE INSTALLING DRAWERS 1 Re install the drawers by extending their guides as shown in Fig 28 2 While holding the drawer parallel to the cabinet carefully align engage the ends of the glides Slide the drawer about 3 cm so that ...

Page 15: ...USING THE CART 5 Install the two 2 racks provided into the opening by sliding them onto the rollers on the sidewalls of the left cavity Fig 32 Fig 32 Drain drawer Rack Rack Cover 13 ...

Page 16: ... first Caution should be taken to keep the regulator free from any cleaning soaps or water 2 To avoid marring the surface always rub metal finishes in the direction of the stainless steel polish lines grain The cleaner will be more effective when used in the direction of the polish lines 3 Use only clean sponges soft cloths paper towels plastic non metal soap pads for cleaning or scouring as recom...

Page 17: ...inside left wall of the cylinder drawer CONTACT US THROUGH OUR LOCAL WEBSITE New Zealand www fisherpaykel co nz customercare Australia www fisherpaykel com au customercare CALL US TOLL FREE 24 7 New Zealand 0800 372 273 Australia 1300 650 590 WRITE TO US New Zealand Fisher Paykel Appliances Limited PO Box 58732 Botany Auckland 2163 fax 09 273 0656 email customer care fp co nz Australia Fisher Payk...

Page 18: ...e for any labour costs including applicable call out or service fees and freight THIS WARRANTY DOES NOT COVER A Service calls which are not related to any defect in the Product The cost of a service call will be charged if the problem is not found to be a Product fault For example 1 Correcting the installation of the product 2 Instructing you how to use the product 3 Replacing house fuses or incor...

Page 19: ... Australian Consumer Law You are entitled to a replacement or refund for a major failure and for compensation for any other reasonably foreseeable loss or damage You are also entitled to have the goods repaired or replaced if the goods fail to be of acceptable quality and the failure does not amount to a major failure To view full terms and conditions visit www fisherpaykel com au DCS You must ret...

Page 20: ...18 ...

Page 21: ...his booklet apply to the specific products and models described at the date of issue Under our policy of continuous product improvement these specifications may change at any time You should therefore check with your Dealer to ensure this booklet correctly describes the product currently available NZ AU 02 2012 F P PN 590432 A ...

Reviews: