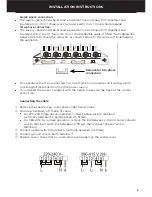
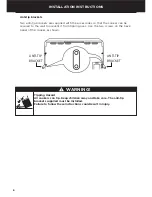
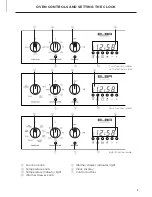
background image

Freestanding cooker

OR61 models

NZ

INSTALLATION INSTRUCTIONS

USER GUIDE

Summary of Contents for Elba OR61 Series

Page 1: ...Freestanding cooker OR61 models NZ INSTALLATION INSTRUCTIONS USER GUIDE...

Page 2: ......

Page 3: ...ooking 19 Using the ceramic glass cooktop 20 Using the radiant cooktop 21 Cookware 22 Care and cleaning 23 Troubleshooting 30 Warranty and service 33 IMPORTANT SAVE THESE INSTRUCTIONS The models shown...

Page 4: ...the controls are turned off and the appliance is cool before using any type of aerosol cleaner on or around the appliance Chemicals in such cleaners could in the presence of heat ignite or cause meta...

Page 5: ...food handling Food should be left in the oven for as short a time as possible before and after cooking This is to avoid contamination by organisms which may cause potential food poisoning Particular c...

Page 6: ...cted by a suitably rated Miniature Circuit Breaker M C B but not connected to a Residual Current Device R C D or an Earth Leakage Breaker E L C B In New Zealand this appliance must be connected to the...

Page 7: ...ould be at least equivalent to an ordinary PVC sheathed and insulated min 2 5 mm2 four core min 1 m long flexible cable If fitted the bridging link between 2 and 3 should be removed as shown Failure t...

Page 8: ...sories so that the cooker can be secured to the wall to prevent it from tipping over Use the two screws on the back panel of the cooker as shown WARNING Tipping Hazard All cookers can tip Keep childre...

Page 9: ...model with electronic clock Four function model Eight function model 1 Function knob 2 Temperature knob 3 Temperature indicator light 4 Warmer drawer knob 5 Warmer drawer indicator light 6 Clock displ...

Page 10: ...after a power failure 0 00 and AUTO will flash in the display 1 Press 2 Press and until you have the correct time of day IF THE DISPLAY SHOWS IT MEANS THAT FOR MORE INFORMATION A U T O flashing with 0...

Page 11: ...ontrols and setting the clock for instructions IMPORTANT The oven will not work until the clock has been set 5 Check the side racks are correcly in place on both sides and fit the oven accessories as...

Page 12: ...are the right way up as in the illustrations 2 For each side rack the two wire ends at the top shall be correctly inserted into the two openings on the side wall and 3 the fixing screw at the bottom s...

Page 13: ...intains the temperature Set the temperature back to o OFF before changing functions When you have finished cooking Turn both the function and temperature knobs to the o OFF position Warmer drawer some...

Page 14: ...s For best results when grilling leave the oven door open at the first stop position FOUR FUNCTION EIGHT FUNCTION MODELS ADD FAN GRILL The fan circulates heat from the grill element around the oven FA...

Page 15: ...BAKE once the oven is at the desired temperature ECO GRILL ECO GRILL is suitable for single servings or small pieces of food By using it you can save energy because you heat a smaller portion of the...

Page 16: ...ke Sponge Meringues Scones Muffins Pizza Single shelf baking Multi shelf baking Pastry pies Bacon egg pie Lemon meringue Quiche Meats Beef roast Steak Lamb roast Lamb chops Pork roast Pork chops Poult...

Page 17: ...0 175 20 25 2 160 180 20 25 Meringues 2 3 100 120 55 65 2 100 120 60 70 Sponge 1 165 185 20 30 2 170 190 20 30 Chicken whole per 500g 1 175 180 30 35 1 180 30 35 Custard tart pastry case 1 170 190 14...

Page 18: ...ium 160 170 35 45 65 75 Well done 160 170 45 60 75 80 Mutton Well done 160 170 45 60 80 85 Hogget lamb Medium 160 170 30 40 79 82 Well done 160 170 45 60 82 85 Pork Well done 180 185 40 45 78 Chicken...

Page 19: ...cator light turns off This is particularly important when baking Grilling The length of time your food takes to grill will be affected by its thickness and temperature When grilling thicker items such...

Page 20: ...time of day with the symbol steadily lit The timer is now counting down To check the remaining time Press To cancel the timer 1 Press 2 Press until the time is reset to 0 00 After a few seconds the c...

Page 21: ...ff automatically by setting the stop time step 3 above When automatic cooking is set If there is time before cooking starts the oven will turn off and the current time of day and AUTO will show in the...

Page 22: ...cooking Turn the knob of the cooking zone you wish to use to HI then adjust as necessary When using the dual cooking zone you may choose to use the inner zone only or the full dual cooking zone On ind...

Page 23: ...These will glow when the corresponding element is on When you have finished cooking When you have finished using an element turn its knob to the o OFF position When you have finished using your cookto...

Page 24: ...minium and copper cookware can leave a metallic residue on the glass surface Clean this off with ceramic glass cleaner after every use If it is left it becomes difficult to remove See section Care and...

Page 25: ...ild detergent 2 Dry thoroughly with a soft cloth Take particular care when cleaning the control panel Make sure that all the knobs are turned o OFF and that the cloth is not too wet IMPORTANT Always d...

Page 26: ...or baking soda and hot water then wipe dry 2 Wipe with a glass cleaner and dry with a soft lint free cloth Don t use oven cleaners or any other harsh abrasive cleaners cloths scouring pads steel wool...

Page 27: ...cess cleaner and wipe dry with a clean cloth or paper towel 3 Apply ceramic cooktop conditioner or protector following the instructions on the dispenser A microfibre cloth is ideal for this Heavy duty...

Page 28: ...the bowl liner 2 Remove the bowl liner and place it in a mixture of warm water and vinegar 3 Clean with a non abrasive sponge or dishwashing brush 4 Rinse clean under running water then dry 5 Replace...

Page 29: ...lots 4 Lift the door and push it from the bottom to engage the hinges 5 Close the door firmly and check if it is properly in place Drop down grill element IMPORTANT Before lowering the grill element m...

Page 30: ...ever use screwdrivers or other utensils to remove the lamp cover as doing so could damage the surrounding enamel Only use your hands 4 Unscrew and replace the bulb with a new one suitable for high tem...

Page 31: ...use cover in place and remove the fuse cover 4 Open the fuse housing as shown and remove the blown fuse cartridge 5 Slide in the replacement fuse cartridge Ensure that it is rated 16 A Two replacement...

Page 32: ...paced on the shelves Stagger baking tins so that there s at least 3 cm between the tin and the oven wall This is to allow hot air and radiant energy to circulate better Baking not evenly sized on tray...

Page 33: ...enamel Shiny tins trays being used from older style oven with unconcealed bottom element oven slow to cook Rather than absorbing the heat and heating food shiny baking tins trays reflect the heat back...

Page 34: ...ovens speed up cooking and distribute heat more evenly they also increase the rate of browning Cake has fallen in the centre Baking temperature too low Raise the temperature Opening the door too early...

Page 35: ...installed 2 You are familiar with its normal operation If after checking these points you still need assistance or parts please refer to the Service Warranty book for warranty details and your neares...

Page 36: ...ifications in this booklet apply to the specific products and models described at the date of issue Under our policy of continuous product improvement these specifications may change at any time You s...

Reviews: