background image


1


Summary of Contents for accumet BASIC AB 15

Page 1: ...1 ...

Page 2: ......

Page 3: ...5 4 1 11 Clear Stored Data Only available in AB15 27 5 STANDARDIZATION 29 5 1 Standardization Procedure 29 5 2 pH Electrode Diagnosis Indicator 33 5 3 Standardizing with buffers from different buffer sets 34 6 MEASUREMENT 36 6 1 Measurement Procedure 36 7 mV OR RELATIVE mV OPERATION 38 7 1 Absolute mV 38 7 2 Relative mV 39 7 3 Temperature Calibration Only available in AB15 40 8 MEMORY Only availab...

Page 4: ...ation necessary to guide you through the process of measuring pH or mV with a series of prompts on the screen You will find this symbol appearing in this manual it indicates useful tips that ease your meter operation The Accumet AB 15 15 meter provides microprocessor precision in a compact benchtop design that is easy to use This meter allows you Measure pH absolute mV relative mV or temperature S...

Page 5: ...2 GETTING STARTED 2 1 Connectors 1 Review the layout and arrangement of the rear connector panel 2 ...

Page 6: ...2 Connect the electrode arm to the base 3 Connect the power cable to the connector cable to the rear connector panel power jack and to a power source 3 ...

Page 7: ...on pH 4 buffer or KCI solution 2 Remove the shorting cap on BNC connector Connect the combination pH electrode in to the BNC input connector If a combination electrode isn t used connect the indicating pH electrode into the BNC input connector Plug the reference electrode into the reference pin jack Also install the ATC probe into the ATC jack Note be sure to connect all probes to the appropriate ...

Page 8: ...tion Always leave the filling hole of liquid filled combination electrodes open Refill when the level of solution gets below the manufacturer s recommended level Proper electrode care is fundamental to obtaining reliable pH measurements Improper care of the electrode may cause the meter reading to drift respond slowly or produce erroneous readings For this reason the electrode should always be con...

Page 9: ...red data from memory or current reading to a PC or printer depending on meter setup Press enter key to confirm selection or change being made Press save key to increment value or scroll up selection Press view key to decrement value or scroll down selection Press save key to store displayed data into memory Press view key to recall and select memory location of stored data Press stdby key to start...

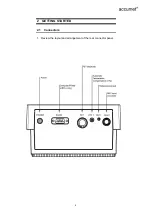
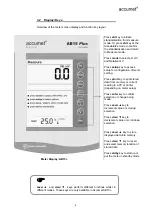
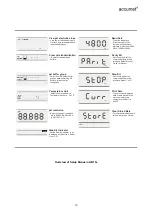
Page 10: ...Meter Display AB15 7 ...

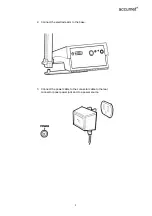
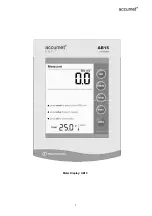
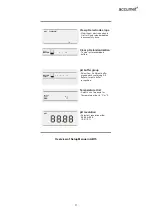
Page 11: ...3 3 Screen Display Familiarize yourself with the layout of the digital screen display 8 ...

Page 12: ...ode you may mode setup print enter Press the mode key to return to the Measure screen without making a change or selection in the setup mode Press the setup key to scroll through the remaining selection options available Press the enter key to accept a change or selection in the displayed parameter The meter will then return to the measurement mode 9 ...

Page 13: ...lity indicator to be displayed on the screen Select On or OFF Baud Rate To set the baud rate bits of second of the communication protocol interface Select from 4800 9600 19200 or 38200 Parity Bit Set the parity bit of the communication protocol interface Select 0 none 1 odd or 2 even Stop Bit Set the stop bit of the communication protocol interface Select 1 or 2 Print Data To print current display...

Page 14: ...group Select from 3 different buffer groups each containing 5 6 buffers for auto buffer recognition pH resolution Select pH resolution either 88 88 or 88 8 0 01 0 1 Temperature Unit Select unit of measure for Temperature either in C or F 2 4 7 10 12 C 4 7 10 clear BUFFER Clear pH standardization To clear pH standardized buffers Overview of Setup Menus in AB15 ...

Page 15: ...on is successfully done 1 Press setup to view the pH electrode slope in pH press to select options press to accept setup enter E L E C T R ODE S L OP E 2 If the unit has not been standardized a series of dashes will appear on the display rather than a number S L OP E pH 3 Press enter or mode to return to measurement 12 ...

Page 16: ...the previously entered buffers clear BUFFER 4 7 10 press to select options press to accept setup enter 3 Press enter to clear all existing buffers 4 Press enter key to confirm selection OR press mode key to exit to measurement OR press setup key to access other setup options NOTE If no buffers have been entered the meter will skip this screen You can escape setup mode at any time by pressing mode ...

Page 17: ... Buffer Group menu from the pH Measure screen by pressing the setup key and the screen will display the BUFFER select icon BUFFER select 2 4 7 10 12 press to select options press to accept setup enter 2 Press enter to accept the group and return to the Measure screen or 3 Continue to press setup until the desired buffer group is displayed 1 3 6 8 10 13 BUFFER select 1 68 4 01 6 86 9 18 12 46 BUFFE...

Page 18: ...t menu from the pH Measure screen by pressing the setup key 2 Press setup to scroll until screen displays as follows Press setup to display the select TEMP UNIT icon select 3 Press enter to accept the C temperature unit and return to the Measure screen or 4 Press setup again to display the F unit select 5 Press enter to accept the F unit and return to the Measure screen 15 ...

Page 19: ...Press setup to scroll until screen displays as follows Press setup to view the three decimal point resolution selection Three decimal resolution only available in Accumet AB15 pH press to select options press to accept setup enter 3 Press enter to accept this resolution and return to the Measure screen OR 4 Press setup again to display two one resolution setup options pH pH 5 Press enter to accept...

Page 20: ...be displayed on the screen whenever reading has stabilized thus minimizes guesswork To Set Stability Indicator 1 Access the Set Stability Indicator menu from any Measure screen by pressing the setup key 2 Use the setup key to scroll until the screen displays the stable icon is shown ST AB L E press to select options press to accept setup enter 3 Press enter to enable the STABLE OR press setup agai...

Page 21: ...ST AB L E press to select options press to accept setup enter 5 Press enter key to confirm selection OR press mode key to exit to measurement OR press setup key to access other setup options 18 ...

Page 22: ...rate bits per second of the communication protocol interface To Set Baud Rate 1 Access the Set Baud Rate menu from any Measure screen by pressing the setup key 2 Use the setup key to scroll until the screen display as shown P rint press to select options press to accept setup enter 19 ...

Page 23: ...exit to measurement OR use the setup key to go to other baud rate selection 4800 9600 19200 and 38400 P rint setup P rint setup P rint 4 Press enter key to confirm selection OR press mode to exit from this page and return to measure screen 20 ...

Page 24: ...nication protocol interface To Set Parity Bit 1 Access the Set Parity Bit menu from any Measure screen by pressing the setup key 2 Use the setup key to scroll until the screen display as shown pres s to s et value pres s to accept enter P rint Print press to select options press to accept setup enter 21 ...

Page 25: ... to make selection and return to measurement OR use the setup key to go to other parity setting 0 none 1 odd or 2 even Default 2 even setup 4 Press enter key to confirm selection OR press mode to exit from this page 22 ...

Page 26: ...nication protocol interface To Set Stop Bit 1 Access the Set Stop Bit menu from any Measure screen by pressing the setup key 2 Use the setup key to scroll until the screen display as shown pres s to s et value pres s to accept enter P rint Print press to select options press to accept setup enter 23 ...

Page 27: ...3 Press enter key to make selection and return to measurement OR use the setup key to go to Stop Bit 2 option 4 Press enter key to confirm selection OR press mode to exit from this page 24 ...

Page 28: ...l the communication protocol for both the meter and computer printer must match before successful printing can be performed To Select Print Data Option Current Memory 1 Access the Select Print Data Option menu from any Measure screen by pressing the setup key 2 Use the setup key to scroll until the screen display as shown pres s to s et value pres s to accept enter P rint Print press to select opt...

Page 29: ... key to make selection and return to measurement OR 4 Press setup key again to print stored data option pres s to s et value pres s to accept enter P rint Print press to select options press to accept setup enter 26 ...

Page 30: ...ld data sets will be overwritten by any new data sets in the event when the stored locations have exceeded To Clear Stored Data 1 Access the Clear Stored Data menu from any Measure screen by pressing the setup key 2 Use the setup key to scroll until the screen displays as shown pres s to s et value pres s to accept enter P rint press to select options press to accept setup enter clear 27 ...

Page 31: ...nter key to clear the memory OR Press mode setup to exit to measurement clear When enter key is pressed meter displays the blinking clear icon Once the clearing process is over meter returns to measure screen 28 ...

Page 32: ...ate results The Accumet AB 15 15 meter has auto buffer recognition for up to 5 6 buffer values from choice of either 1 of the 3 buffer groups available or 6 custom pH buffer values selected from any of these 3 buffer groups Depending on buffer selection 1 Press and release the mode key until your digital display indicates pH mode This key toggles between pH mV and Rel mV modes 2 Press the setup ke...

Page 33: ...oggles between pH mV and Rel mV modes 2 Press the setup key twice and then press enter key to clear an existing standardization See USING SETUP on Pg 9 if the calibration done AB15 screen display keys 3 Immerse the rinsed electrode s into a buffer from the selected group Stir moderately 30 ...

Page 34: ...ER select 5 Do wait for reading to stabilize 6 Press std again to initiate standardization The meter will automatically recognize the buffer pH S tandardize and then meter returns to the Measure screen Press mode key while in the standardization mode to return to measurement without accepting calibration 31 ...

Page 35: ...d buffer it will briefly display the percent slope associated with the electrode s performance prior to returning to the Measure mode S L OP E If the electrode is within the range of 90 102 the GOOD ELECTRODE message will appear GOODELECTRODE If the electrode is outside this range the meter will display the ELECTRDOE ERROR message and will not return to the Measure screen until the user presses en...

Page 36: ...r is calibrated with 2 or more points then meter displays the electrode characteristic indicator bar with appropriate segments All 3 segments lighted 102 Slope 90 2 segments lighted 90 Slope 80 1 segment lighted 80 Slope 70 None lighted Slope 70 or 102 STABLE icon will only appear provided that it has been set yo On mode in setup See Section 4 1 6 Stability Indicator Only available in AB15 Pg 17 3...

Page 37: ...er groups To standardize with buffers from different buffer sets 1 Press setup to select a buffer group that includes the desired buffer See page 14 2 4 7 10 12 BUFFER select 2 Press std to standardize the meter with the selected buffer s see pages 29 32 pH S tandardize 3 After the standardization meter returns to measurement mode 34 ...

Page 38: ...er s See page 14 1 3 6 8 10 13 BUFFER select 5 Press std key to standardize the meter with the selected buffer s see pages 29 32 pH S tandardize 6 Repeat steps 1 2 until standardization with all desired buffers is completed It is better if the selected buffers will be at least 2 pH units apart 35 ...

Page 39: ...tely Make sure that the meter is in the Measure mode 2 When the meter senses that the reading has stabilized the stable icon will appear under the reading The reading may be recorded at this time STABLE icon will only appear provided that it has been set to On mode in setup See Section 4 1 6 Stability Indicator Only available in AB15 Pg 17 AB15 screen display keys 36 ...

Page 40: ...AB15 screen display keys Stirring with a magnetic stir bar and stirrer provides faster electrode response 3 The reading may be recorded at this time by saving into meter s memory using save key 37 ...

Page 41: ...s Calibration of ORP is not necessary However it is essential to cross reference using known Quinhydrone or Pre treatment ORP solutions to ensure good working condition and response of ORP electrode being used from time to time 1 Access the mV mode by pressing mode key until your meter displays screen shown below 2 Immerse the electrode in a sample solution 3 The stable icon appears when reading s...

Page 42: ...pressing mode until your meter displays screen shown below 2 Immerse the electrode in a sample solution 3 If you press std and mV on the screen will change to 0 0 mV reading Subsequent mV readings will be displayed relative to this 0 0 mV setting 4 Reading may be recorded by storing into meters measuring using save key SAVING function only available in AB15 39 ...

Page 43: ...absolute mV measure screen 2 Press std This will take you to the temperature calibration MTC or ATC 3 Press save or view to adjust the temperature S tandardize press to set value press to standardize std 4 Press std to confirm the reading Maximum adjustable temperature offset is For ATC 5 C 9 F For MTC 5 to 105 C 23 F 221 F 40 ...

Page 44: ...e in AB15 8 1 Store Value Into Memory In any Measure mode press save key to store the displayed reading into the meter s non volatile memory A memory location is shown momentarily and the meter returns to the Measure mode 41 ...

Page 45: ...In First Out LIFO basis The screen displays the last stored memory location To view stored data in that particular memory location press enter key If you wish to view data at specific memory location use save or view key to scroll and select View 1 Press enter key to view data contents press to accept enter View pH 42 ...

Page 46: ...eatedly allows you to view data contents until a series of dashes appear on the display which indicates an empty data location View Pressing mode key allows you to return to the Measure mode in any sequence of memory recall 43 ...

Page 47: ... a RS232 communication cable Ensure that both meter and peripheral have the same configuration in terms of baud rate parity bit and stop bit Please check with the printer s or peripheral s manufacturers for details of any specific settings of the device in use If there is an error message during operation the screen displays Err1 This indicates a communication error due to incorrect baud rate pari...

Page 48: ...in a solution By using a pH meter you can most precisely determine exact pH levels of solutions For example rather than saying that lemon juice is quite acidic you can say that lemon juice has a pH of 2 4 an exact pH value is often required to control or optimise acidity levels for manufacturing processes or for basic research pH values generally range from 0 to 14 with a pH value of 7 being the n...

Page 49: ... can be separated or they can be joined to create a combination electrode The combination glass electrode makes a single connection to the pH meter which converts the electrodes millivolts output to pH unit and displays the result This meter can also use a field effect transistor FET electrode for measuring pH This type of electrode employs an ion sensitive solid state membrane as part of a transi...

Page 50: ... To test the meter for correct operation install the BNC input shorting cap Press the mode key to access the mV mode and note the mV reading If the meter reads 0 1 mV it is measuring correctly 2 The meter will display Electrode Error when it detects an error in electrode response During standardization the message indicates that the electrode has a slope of less than 90 or more than 102 The Electr...

Page 51: ... to 19 999 Resolution 0 1 0 01 0 1 0 01 0 001 Relative Accuracy 0 01 0 002 Automatic Buffer Recognition Yes Calibration Points 5 6 FET Yes mV Mode Range 1800 0 to 1800 0 Resolution 1 0 1 Accuracy 1 0 2 Temperature Mode Range 5 to 105 C 23 F or 221 F Resolution 0 1 Accuracy 0 5 C General Inputs outputs BNC Pin ATC DIN For FET Electrical Requirements 12 VDC centre negative Impedance 10 12 ohms Meter...

Page 52: ...on or warranty concerning any product sold Any oral representation or warranty made prior to purchase of any product and not set forth in writing and signed by a duly authorized officer of Fisher shall not be enforceble by the purchaser FISHER EXPRESSLY DISCLAIMS ALL OTHER WARRANTIES EXPRESS OR IMPLIED WARRANTY OF MERCHANTABILITY AND FITNESS FOR A PARTICULAR PURPOSE Fisher s sole responsibility an...

Page 53: ...dential area may cause interference in which case the user at his own expense will be required to take whenever measures may be required to correct the interference This product is to be used only as described in the manual This product is for indoor use only and must be used in a well ventilated area Warning To meet or exceed FCC regulations and comply with CE requirements the Fisher Scientific s...

Page 54: ...3 636 AB15M BNC Shorting cap 13 636 99 16 2 Accessories pH Electrodes Fisher Catalog Number Accumet 3 in 1 pH ATC combination electrode single junction Calomel reference glass body BNC connector 13 620 531 Accumet pH combination electrode single junction calomel reference glass body BNC connector 13 620 286 AccupHast pH combination electrode double junction glass body BNC connector 13 620 296 Accu...

Page 55: ...m Hydroxide 500 ml SB115 500 Fisher Buffer Pac 500 ml ea Of colour coded pH 4 7 and 10 buffers 3 X 500 ml SB105 4 00 Red Individual Tear open pH Packets 20 box SB4 7 00 Yellow Individual Tear open pH Packets 20 box SB7 10 00 Blue Individual Tear open pH Packets 20 box SB10 Gray Electrode Rinse Individual Tear open pH Packets 20 box SB15 Electrode Storage Solution 1 L SE40 1 To place an order call ...

Page 56: ...mical Questions Call our Technical Specialists at Email accumet fishersci com 1 888 358 4706 MODEL NUMBER_________________ SERIAL NUMBER__________________ PURCHASE DATE_________________ 68X295801 Rev 3 AUG 06 53 ...

Reviews: