1
Flinn Compact Microscope
Owner’s Manual
Please read and adhere to all recommendations in this manual to ensure the best experience and to maintain your microscope in
good working order.
The Flinn Compact Microscope (MS1171) has the features of a full-sized microscope in a convenient and compact size.
Unpacking, Assembly and Storage
1. The Flinn Compact Microscope has been carefully packed to assure it reaches you in the best possible condition. Retain
the styrofoam container in case you need to transport, store, or return the microscope for service. If it becomes neces-
sary to ship the microscope for any reason, pack it in the styrofoam container and in another box, secured for transport.
Inadequate shipping may result in damage to your microscope.
2. Lay the molded microscope container in the UP position. Remove the top piece and inspect the contents and container.
Each microscope comes with the following:
a. The pre-assembled microscope.
b. Power supply.
c. Two eye pieces—10X and 25X
d. Dust cover.
e. Accessory LED light
3. Connect the included power supply and install the three AA batteries. Many similar looking power supplies have different
voltages. Before each use, examine the power supply to ensure the voltage is correct. Flinn Compact Microscopes all have
an output voltage rating of 5V. This microscope uses either the power supply or the batteries. The power supply does not
charge rechargeable batteries.
4. Always handle and move microscope carefully by securely holding the arm and base of the microscope. Avoid impact or
abrupt movements during transport.
5. Store microscopes in a dry, clean place away from direct sunlight and protected from dust and dirt. A microscope stor-
age cabinet such as Flinn’s Mobile Microscope Storage Cabinet (Catalog No. FB1031) or Microscope Storage Cabinets
(Catalog No. AP7133 and AP7142) will protect microscopes from dust and damage from UV rays.
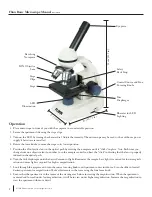
Description of Components
(Refer to diagram on the following page.)
1. Eyepiece (ocular lens): Lens closest to the eye, magnifies the primary image formed by the objective lens. This model
comes equipped with a widefield 10X eyepiece and a widefield 25X eyepiece.
2. Revolving nosepiece: Round, rotating piece that holds objective lenses. Rotating the nosepiece changes the magnification
by moving different powered objective lenses into the optical path.
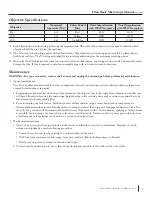
3. Objective lens: Lenses that magnify the object from low to high magnification. The Flinn Compact Microscope comes
with three DIN objective lenses: 4X, 10X, and 40X magnification, respectively.
4. Stage clips: Metal spring-mounted clips that hold the specimen slide in place.
5. Stage: Platform of the microscope where the specimen slide is placed.
6. Disk diaphragm: A plastic disk below the stage with various sized openings to adjust the amount of light on the specimen
from below.
7. Safety rack stop: When properly adjusted, controls maximum upward travel of stage. This stop has been pre-adjusted at
the factory.
8. Coaxial focusing knobs: Integrated course and fine focus knobs moves the stage up and down to get the specimen in
clear focus.
9. Illumination: Built-in adjustable LED lighting above and below the stage with a positionable LED accessory light.
© 2016 Flinn Scientific, Inc. All Rights Reserved.
Publication No. 1171
MS1171 / 032916


