M-18183-S1 and M-18183-S2
Caster Camber Plates – 1979-1993 Mustang
INSTRUCTION SHEET
NO PART OF THIS DOCUMENT MAY BE REPRODUCED WITHOUT PRIOR AGREEMENT AND WRITTEN PERMISSION OF
FORD RACING PERFORMANCE PARTS
IS-1850-0068
Page 1 of 4
Tech “Hot Line” (586) 468-1356
Factory Ford shop manuals are available from Helm Publications, 1-800-782-4356
Please contact the Tech “Hot Line” for the most current instruction information (586) 468-1356
! ! ! PLEASE READ THE FOLLOWING INSTRUCTIONS CAREFULLY PRIOR TO INSTALLATION ! ! !
INSTALLATION INSTRUCTIONS:
Step 1:
Raise the front of the vehicle, support it on jack stands, and remove the front wheels. Consult your
owners’ manual for proper jacking points.
Step 2:
Raise one front control arm slightly with a floor jack. Support it just enough to take the weight off the strut.
Step 3
:
Remove the large nut on the top of the strut and the three nuts which hold the factory strut adjustment
plate. There may be a rivet holding the plate in place. Remove the rivet with a chisel or drill. Remove the
top washer and strut bushing.
Step 4:
Slowly and carefully
lower the control arm with the jack until there is room to remove the stud-plate from
under the fender. Do not lower the arm too far or the spring will come out. Compress the strut for more
clearance by pushing down on the rod. You will have to push hard because the struts are under pressure.
Step 5:
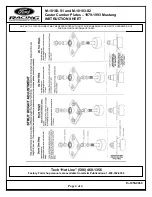
Study the “Strut Height Adjustment” diagrams to determine which combination of bushings to use on the
top and bottom of the caster/camber plate.
Place the appropriate spacer (if needed) and steel bushing over the strut with the small end of the
bushing facing up.
NOTE: It is the responsibility of the customer/installer to determine the correct strut height
setting. The manufacturer is not responsible for damage to struts or camber plate
bearings due to incorrectly set strut height.
NOTE:
These caster camber plates are designed to be used with the factory dust cover and bump stop
on the strut. If you are installing new struts
, the dust cover and bump stop must be
transferred to the new strut
to prevent damage to the strut.
Step 6
:
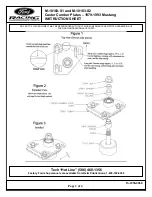
Refer to Figure 1 and Figure 2 for the following steps:
Pre-assemble the bearing plate and top plate. The bearing plate should be on the bottom, with the
bearing itself coming up through the center of the top plate. Make sure the top side of the top plate is
facing up. On 1979-89 Mustang plates, the top side is stamped with the letter “T.”
! ! ! CAUTION! Installing this product requires disassembly of some components of the suspension. If
you are not confident you can complete the job safely, have the work performed by a certified
technician who is familiar with the front suspension of a Mustang. Failure to reassemble the
suspension properly can lead to serious injury ! ! !

