background image

Pictures are for reference only

please adhere 

to the original products as standard

!

M o d e l

DK-MT550

A g e   R a n g e :   3 7 - 9 6   M o n t h

M a x i m u m  W e i g h t :   3 5   K G S

E x e c u t i o n   S t a n d a r d :  

G B 6 6 7 5 & G B 1 9 8 6 5

E N 7 1 & E N 6 2 1 1 5

Summary of Contents for RANGER DK-MT550

Page 1: ...Pictures are for reference only please adhere to the original products as standard Model DK MT550 Age Range 37 96 Month Maximum Weight 35 KGS Execution Standard GB6675 GB19865 EN71 EN62115 ...

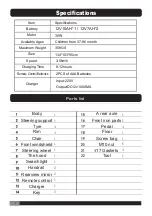
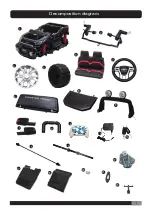
Page 2: ...le Ages Children from 37 96 month 35KGS 134 103 95cm 3 5km h 8 12hours 2PCS of AAA Batteries Input 220V Output DC12v1000MA Maximum Weight Specifications Specifications Body A rear axle Front iron parts Pedal Floor Screw bag M10 nut 17 Gaskets Tool Steering support Tyre Rim Chair Front windshield Steering wheel The hood Searchlight Handrail Rearview mirror Remote control Charger Key ...

Page 3: ...1 2 3 5 6 7 4 8 9 10 11 15 17 18 20 21 22 19 16 12 13 14 Decomposition diagram ...

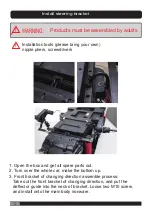
Page 4: ...bracket of changing direction assemble process Take out the front bracket of changing direction and put the deflector guide into the neck of bracket Loose two M10 screw and install onto the main body ironware W Installation tools please bring your own nipple pliers screwdrivers ARNING Products must be assembled by adults ...

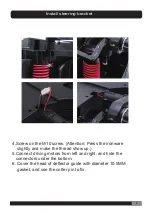
Page 5: ...ew Attention Press the ironware slightly and make the thread show up 5 Connect driving motors from left and right and hide the connectors under the bottom 6 Cover the head of deflector guide with diameter 10 5MM gasket and use the cotter pin to fix ...

Page 6: ...l front bottom panel Connect car front and front bottom panel with 9 PCS of M4 12 thumb head screw 2 Install front ironware plate Insert the axle into the front bracket and use 8 PCS of thumb head screw to fix It is better to wipe some lubricant 1 2 3 4 5 6 7 8 9 1 ...

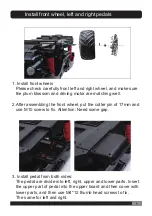
Page 7: ...atching well 2 After assembling the front wheel put the cotter pin of 17mm and use M10 screw to fix Attention Need some gap 3 Install pedal from both sides The pedal are divide into left right upper and lower parts Insert the upper part of pedal into the upper board and then cover with lower parts and then use M4 12 thumb head screws to fix The same for left and right ...

Page 8: ...shaped from left and right sides Assemble back driving motors and make sure left and right and then hide the connectors into the bottom board 2 Install back wheels Please also note that there are left back wheel and right back wheel and make sure the plum blossom match well with the plum blossom of driving motors ...

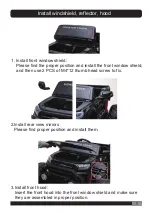
Page 9: ...sition and install the front window shield and then use 2 PCS of M4 12 thumb head screw to fix 2 Install rear view mirrors Please find proper position and install them 3 Install front hood Insert the front hood into the front window shield and make sure they are assembled in proper position ...

Page 10: ...l steering wheel Take out of the steering wheel and loose the screws and then connect the power of button and then assemble to the steering rod Installation of diversion rack and main power supply connection 1 Install searching lights Connect the power first under the seat and then install the searching lights 2 Connecting the main power Connect the main power under the seat ...

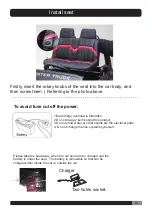
Page 11: ... be charged and the battery is under the seat The battery is removable so that can be charged either inside the car or outside the car To avoid fuse cut off the power 1 Max 35kgs overload is forbidden 2 Do not drag ay item behind this product 3 Do not allow water or other liquids dip the electrical parts 4 Do not change the line systemby yourself Charger Two holes socket ...

Page 12: ... the steering wheel for horn or music Operation Guide For first time use or after replacing the battery select not to pair The car will power on after turning the ignition key If you choose to pair the remote control with the car please follow the instructions below Step1 Insert two AAA 1 5V batteries into the battery compartment of the remote control Ensure the battery polarity is matched correct...

Page 13: ...contains sulfuric acid electrolyte Dropping the battery could result in serious injury Before charging the battery check for wear or damage to the battery charger the connectors and other parts If any damage found the charger should be repaired or replaced immediately Do not use a damaged charger It is normal for the adaptor to feel warm during charging but if the charger feels too hot stop chargi...

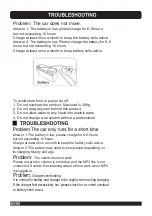
Page 14: ... replaced depending on its charging history and age Problem The sound does not work To avoid short fuse or power cut off 1 Do not overload the product Max load is 30Kg 2 Do not drag any item behind this product 3 Do not allow water or any liquid into electric parts 4 Do not change wire system without a professional Please ensure the volume is turned up and the MP3 line is not connected Sounds from...

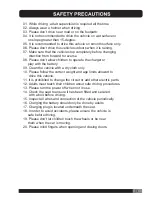
Page 15: ...vehicle with a dry cloth only 10 Please follow the correct weight and age limits allowed to drive this vehicle 11 It is prohibited to change the circuit or add other electric parts 12 Adults must teach their children about safe driving procedures 13 Please turn the power off when not in use 14 Check the seat to ensure it has been fitted and secured with a bolt before driving 15 Inspect all wires a...

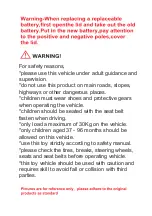
Page 16: ...icle children should be seated with the seat belt fasten when driving only load a maximum of 30Kg on the vehicle only children aged 37 96 months should be allowed on this vehicle use this toy strictly according to safety manual please check the tires breaks steering wheels seats and seat belts before operating vehicle this toy vehicle should be used with caution and requires skill to avoid fall or...

Reviews: