background image

FortiGate 1000

Installation Guide

Esc

Enter

INTERNAL

EXTERNAL

1

2

3

4 / HA

Version 2.80 MR4

30 August 2004

01-28004-0025-20040830

Summary of Contents for FortiBridge 1000

Page 1: ...FortiGate 1000 Installation Guide Esc Enter INTERNAL EXTERNAL 1 2 3 4 HA Version 2 80 MR4 30 August 2004 01 28004 0025 20040830 ...

Page 2: ...ation Guide Version 2 80 MR4 30 August 2004 01 28004 0025 20040830 Trademarks Products mentioned in this document are trademarks or registered trademarks of their respective holders Regulatory Compliance FCC Class A Part 15 CSA CUS CAUTION RISK OF EXPLOSION IF BATTERY IS REPLACED BY AN INCORRECT TYPE DISPOSE OF USED BATTERIES ACCORDING TO THE INSTRUCTIONS For technical support please visit http ww...

Page 3: ...on 17 Factory default Transparent mode network configuration 18 Factory default firewall configuration 19 Factory default protection profiles 19 Planning the FortiGate configuration 20 NAT Route mode 21 NAT Route mode with multiple external network connections 21 Transparent mode 22 Configuration options 23 Next steps 24 NAT Route mode installation 25 Preparing to configure the FortiGate unit in N...

Page 4: ...2 Reconnecting to the web based manager 42 Connecting the FortiGate unit to your network 42 Next steps 44 High availability installation 47 Priorities of heartbeat device and monitor priorities 47 Configuring FortiGate units for HA operation 47 High availability configuration settings 47 Configuring FortiGate units for HA using the web based manager 49 Configuring FortiGate units for HA using the ...

Page 5: ... and Content Analysis System ABACAS technology which leverages breakthroughs in chip design networking security and content analysis The unique ASIC based architecture analyzes content and behavior in real time enabling key applications to be deployed right at the network edge where they are most effective at protecting your networks The FortiGate 1000 model provides the carrier class levels of pe...

Page 6: ...stration Web based manager Using HTTP or a secure HTTPS connection from any computer running Internet Explorer you can configure and manage the FortiGate unit The web based manager supports multiple languages You can configure the FortiGate unit for HTTP and HTTPS administration from any FortiGate interface You can use the web based manager to configure most FortiGate settings You can also use the...

Page 7: ... way to configure the basic initial settings for the FortiGate unit The wizard walks through the configuration of a new administrator password FortiGate interfaces DHCP server settings internal servers web FTP etc and basic antivirus settings Document conventions This guide uses the following conventions to describe command syntax Angle brackets to indicate variables For example execute restore co...

Page 8: ...er show system interface To show the settings for the internal interface you can enter show system interface internal A space to separate options that can be entered in any combination and must be separated by spaces For example set allowaccess ping https ssh snmp http telnet You can enter any of the following set allowaccess ping set allowaccess ping https ssh set allowaccess https ping ssh set a...

Page 9: ...ng spam filtering The administration guide also describes how to use protection profiles to apply intrusion prevention antivirus protection web content filtering and spam filtering to traffic passing through the FortiGate unit FortiGate CLI Reference Guide Describes how to use the FortiGate CLI and contains a reference to all FortiGate CLI commands FortiGate Log Message Reference Guide Describes t...

Page 10: ...ailable from the following addresses For information on Fortinet telephone support see http support fortinet com When requesting technical support please provide the following information Your name Company name Location Email address Telephone number FortiGate unit serial number FortiGate model FortiGate FortiOS firmware version Detailed description of the problem amer_support fortinet com For cus...

Page 11: ...ibes unpacking setting up and powering on a FortiGate Antivirus Firewall unit This section includes Package contents Mounting Turning the FortiGate unit power on and off Connecting to the web based manager Connecting to the command line interface CLI Factory default FortiGate configuration settings Planning the FortiGate configuration Next steps ...

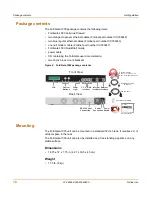
Page 12: ...standard 19 inch rack It requires 2 U of vertical space in the rack The FortiGate 1000 unit can also be installed as a free standing appliance on any stable surface Dimensions 16 75 x 12 x 1 75 in 42 7 x 30 5 x 4 5 cm Weight 17 5 lb 8 kg Back View Front View RS 232 Serial Connection Power Connection Power Switch Esc Enter LCD Control Buttons Internal Interface INTERNAL EXTERNAL 1 2 3 4 HA 1 2 3 4 ...

Page 13: ...unit in a closed or multi unit rack assembly the operating ambient temperature of the rack environment may be greater than room ambient Make sure the operating ambient temperature does not exceed the manufacturer s maximum rated ambient temperature Air flow For rack installation make sure that the amount of air flow required for safe operation of the FortiGate unit is not compromised For free stan...

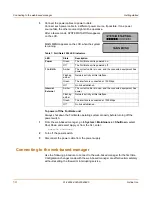
Page 14: ...witch 3 Disconnect the power cable from the power supply Connecting to the web based manager Use the following procedure to connect to the web based manager for the first time Configuration changes made with the web based manager are effective immediately without resetting the firewall or interrupting service Table 1 FortiGate 1000 LED indicators LED State Description Power Green The FortiGate uni...

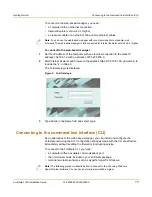
Page 15: ...Type admin in the Name field and select Login Connecting to the command line interface CLI As an alternative to the web based manager you can install and configure the FortiGate unit using the CLI Configuration changes made with the CLI are effective immediately without resetting the firewall or interrupting service To connect to the FortiGate CLI you need a computer with an available communicatio...

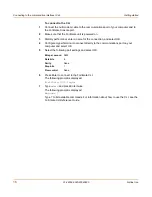
Page 16: ...n and select OK 4 Configure HyperTerminal to connect directly to the communications port on your computer and select OK 5 Select the following port settings and select OK 6 Press Enter to connect to the FortiGate CLI The following prompt is displayed FortiGate 1000 login 7 Type admin and press Enter twice The following prompt is displayed Welcome Type to list available commands For information abo...

Page 17: ...ly different levels of antivirus protection web content filtering spam filtering and IPS to the network traffic that is controlled by firewall policies Factory default NAT Route mode network configuration Factory default Transparent mode network configuration Factory default firewall configuration Factory default protection profiles Factory default NAT Route mode network configuration When the For...

Page 18: ...default route external Default Route A default route consists of a default gateway and the name of the interface connected to the external network usually the Internet The default gateway directs all non local traffic to this interface and to the external network Primary DNS Server 207 192 200 1 Secondary DNS Server 207 192 200 129 Table 2 Factory default NAT Route mode network configuration Conti...

Page 19: ...filtering for IMAP POP3 and SMTP firewall policies Enable the Intrusion Protection System IPS for all services Enable content logging for HTTP FTP IMAP POP3 and SMTP firewall policies Using protection profiles you can build protection configurations that can be applied to different types of firewall policies This allows you to customize types and levels of protection for different firewall policie...

Page 20: ... FTP IMAP POP3 and SMTP traffic You may not use the strict protection profile under normal circumstances but it is available if you have problems with viruses and require maximum screening Scan To apply antivirus scanning to HTTP FTP IMAP POP3 and SMTP content traffic Quarantine is also selected for all content services On FortiGate models with a hard drive if antivirus scanning finds a virus in a...

Page 21: ... the FortiGate unit is operating as a gateway between private and public networks In this configuration you would create NAT mode firewall policies to control traffic flowing between the internal private network and the external public network usually the Internet If you have multiple internal networks such as a DMZ network in addition to the internal private network you could create route mode fi...

Page 22: ... on the same subnet You only have to configure a management IP address so that you can make configuration changes The management IP address is also used for antivirus and attack definition updates You typically use the FortiGate unit in Transparent mode on a private network behind an existing firewall or behind a router The FortiGate unit performs firewall functions IPSec VPN virus scanning IPS we...

Page 23: ...up wizard for easy configuration of a few more advanced settings Web based manager You can configure most basic and advanced setting from the web based manager GUI CLI If you are configuring the FortiGate unit to operate in NAT Route mode you can add the administration password and all interface addresses using the CLI You can also add DNS server IP addresses and a default route for the external i...

Page 24: ...rs set the antivirus protection to high medium or none If you are configuring the FortiGate unit to operate in Transparent mode you can switch to Transparent mode from the web based manager and then use the setup wizard to add the administration password the management IP address and gateway and the DNS server addresses Next steps Now that your FortiGate unit is operating you can proceed to config...

Page 25: ...cting the FortiGate unit to the network s Configuring the networks Next steps Preparing to configure the FortiGate unit in NAT Route mode Use Table 5 to gather the information that you need to customize NAT Route mode settings You can configure the FortiGate unit in several ways the web based manager GUI is a complete interface for configuring most settings See Using the web based manager on page ...

Page 26: ...ble 5 NAT Route mode settings Administrator Password Internal IP _____ _____ _____ _____ Netmask _____ _____ _____ _____ External IP _____ _____ _____ _____ Netmask _____ _____ _____ _____ Port 1 IP _____ _____ _____ _____ Netmask _____ _____ _____ _____ Port 2 IP _____ _____ _____ _____ Netmask _____ _____ _____ _____ Port 3 IP _____ _____ _____ _____ Netmask _____ _____ _____ _____ Port 4 HA IP ...

Page 27: ...r an interface 3 Set the addressing mode for the interface Choose from manual DHCP or PPPoE 4 Complete the addressing configuration For manual addressing enter the IP address and netmask for the interface For DHCP addressing select DHCP and any required settings For PPPoE addressing select PPPoE and enter the username and password and any other required settings For information about how to config...

Page 28: ...Gate operating mode can be configured using the LCD and front control buttons on the FortiGate unit Use the information that you recorded in Table 5 on page 26 to complete the following procedure Start when Main Menu is displayed on the LCD To change the IP address and netmask of an interface 1 Press Enter to display the interface list 2 Use the up and down arrows to highlight the name of the inte...

Page 29: ...default gateway press Enter 6 Press Esc to return to the Main Menu You have now completed the initial configuration of the FortiGate unit and you can proceed to Next steps on page 35 Using the command line interface You can also configure the FortiGate unit using the command line interface CLI For information about connecting to the CLI see Connecting to the command line interface CLI on page 15 C...

Page 30: ... set mode static set ip address_ip netmask end Example config system external edit external set mode static set ip 204 23 1 5 255 255 255 0 end To set the external interface to use DHCP enter config system interface edit external set mode dhcp end To set the external interface to use PPPoE enter config system interface edit external set mode pppoe set connection enable set username name_str set pa...

Page 31: ...ends traffic that should be sent to an external network usually the Internet Adding the default route also defines which interface is connected to an external network The default route is not required if the interface connected to the external network is configured using DHCP or PPPoE Set the default route to the Default Gateway IP address Enter config router static edit 1 set dst 0 0 0 0 0 0 0 0 ...

Page 32: ... medium or none Table 7 lists the additional settings that you can configure with the setup wizard See Table 5 on page 26 and Table 6 on page 26 for other settings Table 7 Setup wizard settings Password Prepare an administrator password Internal Interface Use the information you gathered in Table 5 on page 26 External Interface Use the information you gathered in Table 5 on page 26 DHCP server Sta...

Page 33: ...t steps on page 35 Connecting the FortiGate unit to the network s After you complete the initial configuration you can connect the FortiGate 1000 unit between the internal network and the Internet There are two copper gigabit connectors on the FortiGate 1000 Internal for connecting to the internal network External for connecting to your public switch or router and the Internet Antivirus High Creat...

Page 34: ...ing in NAT Route mode 1 Connect the Internal interface to the hub or switch connected to the internal network 2 Connect the External interface to your public switch or router 3 Optionally connect interfaces 1 2 3 and 4 HA to networks Figure 9 FortiGate 1000 NAT Route mode connections Note You can also create redundant connections to the Internet by connecting two interfaces to separate Internet co...

Page 35: ...ring monitoring and maintaining the FortiGate unit To set the date and time For effective scheduling and logging the FortiGate system date and time must be accurate You can either manually set the system date and time or configure the FortiGate unit to automatically keep its time correct by synchronizing with a Network Time Protocol NTP server 1 Go to System Config Time 2 Select Refresh to display...

Page 36: ... the virus attack and spam definitions on a schedule through the web based manager You can also receive updates whenever a threat occurs by using Push Updates 1 Go to System Maintenance Update Center 2 Select Refresh to test the FortiGate unit connectivity with the FortiProtect Distribution Network FDN To be able to connect to the FDN the FortiGate unit default route must point to a network such a...

Page 37: ...ing the FortiGate configuration on page 20 This chapter describes Preparing to configure Transparent mode Using the web based manager Using the front control buttons and LCD Using the command line interface Using the setup wizard Connecting the FortiGate unit to your network Next steps Preparing to configure Transparent mode Use Table 8 to gather the information that you need to customize Transpar...

Page 38: ...nagement computer to 10 10 10 2 Connect to the internal interface or port 1 2 or 3 and browse to https followed by the Transparent mode management IP address The default FortiGate Transparent mode management IP address is 10 10 10 1 To change the Management IP 1 Go to System Network Management 2 Enter the management IP address and netmask that you recorded in Table 8 on page 38 3 Select access met...

Page 39: ...nt IP default gateway field Using the front control buttons and LCD This procedure describes how to use the control buttons and LCD to configure Transparent mode IP addresses Use the information that you recorded in Table 8 on page 38 to complete this procedure Starting with Main Menu displayed on the LCD use the front control buttons and LCD To change the management IP address and netmask 1 Press...

Page 40: ... the command line interface CLI on page 15 Use the information that you gathered in Table 8 on page 38 to complete the following procedures To change to Transparent mode using the CLI 1 Make sure that you are logged into the CLI 2 Switch to Transparent mode Enter config system global set opmode transparent end The FortiGate unit restarts After a few seconds the login prompt appears 3 Type admin an...

Page 41: ...ig system dns set primary address_ip set secondary address_ip end Example config system dns set primary 293 44 75 21 set secondary 293 44 75 22 end To configure the default gateway 1 Make sure that you are logged into the CLI 2 Set the default route to the default gateway that you recorded in Table 8 on page 38 Enter config router static edit 1 set dst 0 0 0 0 0 0 0 0 set gateway address_gateway s...

Page 42: ...n the upper right corner of the web based manager 2 Use the information that you gathered in Table 8 on page 38 to fill in the wizard fields Select the Next button to step through the wizard pages 3 Confirm your configuration settings and then select Finish and Close Reconnecting to the web based manager If you changed the IP address of the management interface while you were using the setup wizar...

Page 43: ... Transparent mode 1 Connect the Internal interface to the hub or switch connected to your internal network 2 Connect the External interface to the network segment connected to the external firewall or router 3 Optionally connect interfaces 1 to 4 HA to hubs or switches connected to your other networks Figure 10 FortiGate 1000 Transparent mode connections Esc Enter INTERNAL EXTERNAL 1 2 3 4 HA Inte...

Page 44: ...ght saving changes check box 5 Select Set Time and set the FortiGate system date and time 6 Set the hour minute second month day and year as required 7 Select Apply To use NTP to set the FortiGate date and time 1 Go to System Config Time 2 Select Synchronize with NTP Server to configure the FortiGate unit to use NTP to automatically set the system time and date 3 Enter the IP address or domain nam...

Page 45: ...Maintenance Update Center 2 Select Refresh to test the FortiGate unit connectivity with the FortiProtect Distribution Network FDN To be able to connect to the FDN the FortiGate unit default route must point to a network such as the Internet to which a connection to the FDN can be established If FortiProtect Distribution Network changes to Available then the FortiGate unit can connect to the FDN 3 ...

Page 46: ...46 01 28004 0025 20040830 Fortinet Inc Next steps Transparent mode installation ...

Page 47: ...de steps for changing the priorities of heartbeat devices or for configuring monitor priorities settings Both of these HA settings should be configured after the cluster is up and running Configuring FortiGate units for HA operation A FortiGate HA cluster consists of two or more FortiGate units with the same HA configuration This section describes how to configure each of the FortiGate units to be...

Page 48: ... in the cluster get the same virtual MAC address This virtual MAC address is set according to the group ID Group ID MAC Address 0 00 09 0f 06 ff 00 1 00 09 0f 06 ff 01 2 00 09 0f 06 ff 02 3 00 09 0f 06 ff 03 63 00 09 0f 06 ff 3f If you have more than one HA cluster on the same network each cluster should have a different group ID If two clusters on the same network have same group ID the duplicate...

Page 49: ...itches select Least connection to distribute traffic to the cluster unit with the fewest concurrent connections Round Robin Round robin load balancing If the FortiGate units are connected using switches select round robin to distribute traffic to the next available cluster unit Weighted Round Robin Weighted round robin load balancing Similar to round robin but weighted values are assigned to each ...

Page 50: ...nce all of the units are configured continue with Connecting the cluster to your networks on page 51 11 If you are configuring a Transparent mode cluster reconnect to the web based manager You may have to wait a few minutes before you can reconnect 12 Go to System Status 13 Select Change to Transparent Mode and select OK to switch the FortiGate unit to Transparent mode 14 Allow the FortiGate unit ...

Page 51: ... the FortiGate units in the cluster Once all of the units are configured continue with Connecting the cluster to your networks on page 51 3 If you are configuring a Transparent mode cluster switch the FortiGate unit to Transparent mode config system global set opmode transparent end 4 Allow the FortiGate unit to restart in Transparent mode and then power off the FortiGate unit 5 Repeat this proced...

Page 52: ...t the cluster 1 Connect the cluster units Connect the internal interfaces of each FortiGate unit to a switch or hub connected to your internal network Connect the external interfaces of each FortiGate unit to a switch or hub connected to your external network Optionally connect ports 1 2 and 3 of each FortiGate unit to switches or hubs connected to other networks Connect the 4 HA interfaces of the...

Page 53: ...f the FortiGate units in the cluster are synchronized so that the FortiGate units can function as a cluster Because of this synchronization you configure and manage the HA cluster instead of managing the individual FortiGate units in the cluster You can configure and manage the cluster by connecting to the cluster web based manager using any cluster interface configured for HTTPS administrative ac...

Page 54: ...54 01 28004 0025 20040830 Fortinet Inc Installing and configuring the cluster High availability installation ...

Page 55: ...onfiguring FortiGate units for HA operation 47 connecting an HA cluster 51 53 High availability 47 HTTPS 6 I internal network configuring 35 IP addresses configuring from the CLI 40 configuring with front keypad and LCD 28 39 L LCD and keypad configuring IP address 28 M management IP address transparent mode 40 N NAT Route mode configuration from the CLI 29 NTP 35 44 NTP server 35 44 P power requi...

Page 56: ...56 01 28004 0025 20040830 Fortinet Inc Index ...

Reviews: