background image


OPERATION MANUAL 

MULTIDECK 

JUPITER 


Summary of Contents for JUPITER H8

Page 1: ...OPERATION MANUAL MULTIDECK JUPITER ...

Page 2: ...7 Improper installation of hooked shelves 10 2 8 Opening closing the doors 10 2 9 Recommended working conditions and ambient temperature 10 2 10 Purpose of use 11 3 UPLOADING LEVEL 12 4 UNPACKING 12 5 INSTALLATION 15 5 1 Requirements for installation the multideck 15 5 2 Installation of multideck 16 6 MAINTENANCE OF THE COMPRESSOR 28 7 ELECTRICAL CONNECTION 33 7 1 Connecting the unit to the power ...

Page 3: ...Cleaning 36 10 INNER LIGHTING 37 11 ENERGY SAVING 38 12 DISPOSAL 38 13 STORAGE 38 14 TESTING 38 15 ACCESSORIES 38 16 TECHNICAL DATA 39 16 1 Electrical layouts 39 16 2 Failures and troubleshooting 39 17 MEANINGS OF SYMBOLS 42 ...

Page 4: ...cturer information Manufacturer address FREOR LT UAB Katiliskiu St 92 LT 02212 Vilnius Lithuania T 370 5 232 9188 EN Made in Lithuania Customer Installation date Installation place Start of the product operation PLACE FOR PRODUCT LABEL ...

Page 5: ...h multideck Fig 1 Fig 1 Example of sticker Intention of this document is to provide information about maintaining and operating of the multideck Jupiter In accordance with the EU Directive the refrigeration unit is electrical refrigeration machine therefore the focus is to ensure safety during operation The operation manual of the multideck Jupiter must be kept at the place of operation It must be...

Page 6: ...6 1 2 Dimensions Fig 2 Jupiter H8 remote Fig 3 Jupiter L8 remote For more detailed information visit www freor com Fig 4 Jupiter H8 plug in Fig 5 Jupiter L8 plug in ...

Page 7: ...lled and has no obvious defects Do not make any technical changes to the appliance Do not store any explosive substances such as aerosol containers with flammable propellant gas in the multideck Do not make any technical changes to the multideck 2 2 R290 refrigeration cabinets safety guidelines Refrigerant R290 propane gas is classified as refrigerants of safety group A3 Based on the refrigerant c...

Page 8: ...nit Do not allow external forces to act on the appliance e g careless handling with a forklift or floor cleaning machine Do not crush or bend pipes Only qualified maintenance personnel may carry out work on the refrigerant circuit Only open the refrigerant circuit and suck off the refrigerant in well ventilated rooms outside store business hours when customers are not present or outdoors Disconnec...

Page 9: ...in the event of glass breakage Use eye protection Protection from contact with liquid leaking refrigerant in the event of leakage in the refrigerant circuit Wear protective clothing When loading the multideck with products wear appropriate clothing cold protection 2 5 Electrical voltage Only qualified staff may carry out work on the electrical system In the event of fault messages or damage to the...

Page 10: ...rackets must snap completely into the openings provided when being attached 2 8 Opening closing the doors Hand or other body parts may become caught on side of door hinge or handle When opening closing the door do not reach into the opening gap especially on the hinge side Look out for other persons when opening closing the door 2 9 Recommended working conditions and ambient temperature The multid...

Page 11: ...DIN10508 requirements for the temperatures of uploaded goods are provided below 10 о C Fruits vegetables butter cheese and cheese products 8 о C Pasteurized products sour milk 7 о C Milk and dairy products delicacies ready made food snacks sandwiches green salad game salad with mayonnaise sauce cooked meat products eggs and their products sauces 4 о C Household poultry minced meat and products rab...

Page 12: ...aximum loads Fig 6 Example of the maximum allowable loads sticker 4 UNPACKING Note the following to prevent the collision or risk of injury to persons when transporting units with forklift Observe transport routes for forklift Secure transported units Only trained personnel may operate industrial trucks Note the centre of gravity of the unit for safe lifting of the load with the forklift Informati...

Page 13: ...13 x 2 Size 13 15 min Use appropriate equipment for unit transportation refer to unit weight and dimension information Lift the multideck Remove pallet s screws Remove the pallet Screws M6x100 ISO 7380 ...

Page 14: ...14 Install the plastic legs Lower the multideck ...

Page 15: ...t distance around the unit It must be possible to open the doors without any obstructions o The exhaust air must be able to escape freely at the top of the unit o Minimum clearance from ceiling 500 mm Lower minimum clearance must be approved by the manufacturer o Superstructures or false ceilings directly on top of the unit should only be installed after consultation with the manufacturer To allow...

Page 16: ...16 5 2 Installation of multideck x 2 Size 17 32 PH2 Apply silicone and screw the nozzle into the drainage opening Remove the screws M8x25 DIN 7976 and dismount the transportation profile ...

Page 17: ...perform horizontal and vertical pre adjustment of the multideck The legs are adjustable up to 5 cm Using the level tool perform horizontal and vertical pre adjustment of the multideck Leave the middle legs lifted from the ground 3 4 mm ...

Page 18: ...18 Insert the guiding pins as shown in the figure For more accurate connection of the top part of the multideck insert the guiding pins as shown in the figure ...

Page 19: ...19 Seal connection gaps using the adhesive foam tape ...

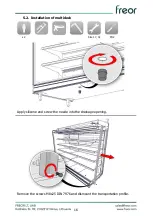
Page 20: ...20 Apply silicone as shown in the picture to seal the joint ...

Page 21: ...21 Perform the final match of the guiding pins and join the multideck units To achieve more robust connection tighten the cabinet legs ...

Page 22: ...shers into the indicated places and tighten them with a wrench Stud M10x90 ISO 7985 Insert the studs with washers into the indicated places on the roof of the display case and tighten them with the wrench Stud M10x90 ISO 7985 ...

Page 23: ...23 Seal the bottom connection with silicone Take the bracket to install the lower dust cover Insert the threaded tapped clip as shown in the figure ...

Page 24: ...24 Secure brackets on the legs Secure the tapped clips to the dust cover ...

Page 25: ...25 Connect the dust covers using the self tapping screws D4x13 ISO 7380 Attach the dust covers and fasten them with the self tapping screws D4x13 ISO 7380 ...

Page 26: ...uiding pins as shown in the figure Connect top cabinet decoration and adjust the gap between cabinet cover and decoration edge Tighten screws after adjustment of the decoration and its placing on the display case roof ...

Page 27: ... and adjust gaps between the cabinet cover and edges of the facing The gap to be not less than 12 mm Attach the plastic bumper using a rubber hammer Note unroll the bumper and leave it in room temperature for at least 30 minutes to gain into shape ...

Page 28: ...28 The example of installed multidecks 6 MAINTENANCE OF THE COMPRESSOR x 2 Size 7 15 min Remove the hooked shelves bottom shelves intake grids Note compresor is always on the right side of multideck ...

Page 29: ...self tapping screws from the lower wall Remove the lower wall Self tapping screws D4 2x13 DIN 968 Unscrew the self tapping screws from the perforated wall Remove the perforated wall Self tapping screws D4 2x13 DIN 968 ...

Page 30: ...apping screws from the evaporator cover plate Remove the evaporator cover plate Self tapping screws D4 2x13 DIN 968 Unscrew the self tapping screws from the fan plate Remove the fan plate Self tapping screws D4 2x13 DIN 968 ...

Page 31: ...or s cover Remove the compressor s cover Self tapping screws D4 8x19 DIN 7504 K When installing cover back apply new foam seal and seal the cover with silicone as it was before Optional Unscrew the indicated screw rotate the upper compressor to the right ...

Page 32: ...losure is located under back wall mounted on rails Slide it to the right Pull the enclosure out through the compressor hole in the back wall Optional Unscrew the self tapping screws remove the cover to gain access to start capacitors ...

Page 33: ...rts such as electrical cables to the power supply Only connect the unit to a mains circuit with protective grounding Do not use extension cords or multiple socket strips 8 DRAINAGE 8 1 Drainage system Multideck Jupiter to be equipped with suitable drainage system The condensate can be drained to the tub trough the drainage siphon Also condensate drainage can be connected to the common sewerage sys...

Page 34: ...34 Assembly of the drainage system Attach the siphon to the condensation nozzle Attach the drain elbow to the siphon ...

Page 35: ...ures are listed in chapter 2 10 The actual temperature is shown in the thermometer of the multideck If the actual temperature is higher than that set in the control reduce the temperature in the control Products must be uploaded into the cooled inner space of the multideck 9 2 Shelves brackets hooks of the multideck Before uploading products check the arrangement of the shelves The position and ar...

Page 36: ...isture residue and to dry up the surface Chromed surfaces must be cleaned with suitable cleaning agents After cleaning they must be dried up with a soft cloth that does not leave dust Painted components must be cleaned with liquid cleaning agents without abrasive materials It is recommended to use special detergents purposed for painted surfaces The surfaces must be well dried up after washing The...

Page 37: ...od products and the condensate residue from surfaces Disinfect the internal space of the multideck Clean and disinfect detached parts and dry them Assemble the detached components into the structure Switch on the power supply to the multideck When the temperature in the internal space reaches the one that is specified in the control bring cooled products back into the cabinet x 1 Remove the air in...

Page 38: ...ions that dispose of certain types of materials 13 STORAGE If temporary storage and subsequent use of the multideck is expected during repair of the shopping premise or change location of the cabinet the equipment must be stored in a well ventilated room with temperature higher than 0 C It is forbidden to leave the cabinets outdoors It is necessary to put on cover the multideck or to make other st...

Page 39: ... multideck check the refrigerant amount and replacement of parts may only be carried out by a specialist qualified to work with F and OAM gases Only an electrician with the respective qualification may carry out inspection and repair of electrical installation Description of controller errors can be found in the instructional manual of the controller manufacturer ...

Page 40: ...mination of the freezing coil Damage of the tightness of the freezing coil Failure of the control valve TRV ERV Leakage of the refrigerant Call the refrigeration technician service department Defrosting malfunction Failure of defrosting heating elements Malfunction of the electromagnetic valve functionality Failure of the defrosting clock Failure of the control system The icing of the evaporator H...

Page 41: ...elements can be operational Check switches Check the power network The compressor is out of order Refrigeration cycle malfunction Signals of the pressure sensors Fluctuations of the electrical network voltage Contamination of refrigerant filter Leakage of the refrigerant in the system Call the refrigeration technician service department ...

Page 42: ...7 MEANINGS OF SYMBOLS Symbol Meaning Type Qualified specialist Work clothing Protective gloves Brittle surfaces Wrench Sizes 7 13 17 32 Screwdriver PH2 Rubber hammer Protective goggles Silicone pistol Clamp ...

Page 43: ...43 Date Work Name ...

Page 44: ...nufacturer of the commercial refrigeration equipment Katiliskiu St 92 LT 02212 Vilnius Lithuania T 370 5 232 9188 E sales freor com www freor com DOM 00XXX X0000E_v2 2 FREOR LT is not affiliated with Chemours or FREON ...

Reviews: