background image

P/N 316000272 (9801)

Contents

Product Registration ................................................................. 2

IMPORTANT SAFETY INSTRUCTIONS ....................................... 3-4

Grounding Instructions ............................................................. 4

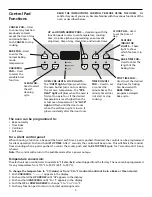
Control Pad Functions .............................................................. 5

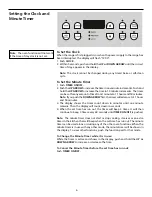
Setting the Clock and Minute Timer ......................................... 6

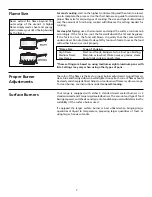
Flame Size ................................................................................. 7

Proper Burner Adjustments....................................................... 7

Surface Burners ........................................................................ 7

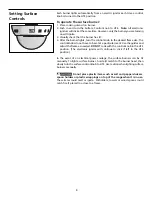
Setting Surface Controls ........................................................... 8

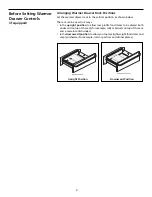
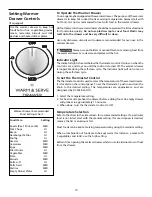
Before Setting Warmer Drawer Controls .................................. 9

Setting Warmer  Drawer Controls ........................................... 10

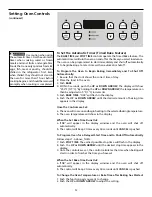
Before Setting Oven Controls ................................................. 11

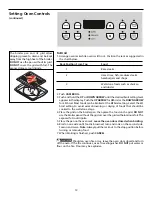
Setting Oven Controls........................................................ 11-13

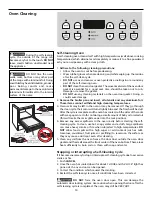
Oven Cleaning ................................................................... 14-15

General Cleaning ............................................................... 16-19

Changing Cooktop and/or Oven Lights................................... 19

Adjusting Oven Temperature .................................................. 20

Avoid Service Checklist ...................................................... 21-22

Warranty ..................................................................... Back Page

Summary of Contents for FGF367CGSB

Page 1: ...e Size 7 Proper Burner Adjustments 7 Surface Burners 7 Setting Surface Controls 8 Before Setting Warmer Drawer Controls 9 Setting Warmer Drawer Controls 10 Before Setting Oven Controls 11 Setting Oven Controls 11 13 Oven Cleaning 14 15 General Cleaning 16 19 Changing Cooktop and or Oven Lights 19 Adjusting Oven Temperature 20 Avoid Service Checklist 21 22 Warranty Back Page ...

Page 2: ... result causing property damage personal injury or death FOR YOUR SAFETY Do not store or use gasoline or other flammable vapors and liquids in the vicinity of this or any other appliance WHAT TO DO IF YOU SMELL GAS Do not try to light any appliance Do not touch any electrical switch do not use any phone in your building Immediately call your gas supplier from a neighbor s phone Follow the gas supp...

Page 3: ... burst and result in injury Remove the oven door from any unused range if it is to be stored or discarded IMPORTANT Do not attempt to operate the oven during a power failure If the power fails always turn the oven control to off Once the power resumes reset the clock and oven functions This guide contains important safety symbols and instructions Please pay special attention to these symbols and f...

Page 4: ...t breaking due to the sudden change in temperature Check the manufacturer s recommendations for rangetop use Do Not Use Decorative Surface Burner Covers If a burner is accidentally turned on the decorative cover will become hot and possibly melt You will not be able to see that the burner is on Burns will occur if the hot covers are touched Damage may also be done to the cooktop or burners because...

Page 5: ...te timer does not start or stop cooking FEATURE INDICATOR LIGHTS These light to show which feature is in use CLOCK PAD Used to set the time of day The oven can be programmed to Bake normally Time bake Vari Broil Self clean For a silent control panel When choosing a function a beep will be heard each time a pad is pushed If desired the controls can be programmed for silent operation Push and hold S...

Page 6: ... shows the timer count down in minutes until one minute remains Then the display will count down in seconds 4 When the set time has run out the timer will beep 3 times It will then continue to beep 3 times every 60 seconds until TIMER ON OFF is pushed Note The minute timer does not start or stop cooking It serves as an extra timer in the kitchen that will beep when the set time has run out The min...

Page 7: ...lear blue and hardly visible in a well lighted room Each cone of flame should be steady and sharply defined Adjust or clean burner if flame is yellow orange To clean burner see instructions under General Cleaning Your range is equipped with either 4 standard sized sealed burners or 2 standard sizeed and 2 larger sized sealed burners The amount and type of food being prepared and the size and type ...

Page 8: ...articular mark Use the guides and adjust the flame as needed DO NOT cook with the control knob in the LITE position The electronic ignitor will continue to click if left in the LITE position In the event of an electrical power outage the surface burners can be lit manually To light a surface burner hold a lit match to the burner head then slowly turn the surface control knob to LITE Use caution wh...

Page 9: ...position as shown below The rack can be used in 2 ways In the upright position to allow low profile food items to be placed both under and on top of the rack for example rolls or biscuits on top of the rack and a casserole dish under In the downward position to allow you to place light weight food items and empty dishware for example rolls or pastries and dinner plates ...

Page 10: ...cated on the control panel To set the thermostat push in and turn the knob to the desired setting The temperatures are approximate and are designated by HI MED and LO 1 Select the temperature setting 2 For best results preheat the drawer before adding food An empty drawer will preheat in approximately 15 minutes 3 When done turn the thermostat control to OFF Temperature Selection Refer to the char...

Page 11: ...he bake temperature is displayed 2 Push the UP or DOWN ARROW to increase or decrease the set temperature Arranging Oven Racks ALWAYS ARRANGE OVEN RACKS WHEN THE OVEN IS COOL PRIOR TO OPERATING THE OVEN Always use oven mitts when using the oven Before Setting Oven Controls ARRANGING OVEN RACKS WITH 5 RACK POSITIONS To bake on 1 rack place the rack on position 3 or 4 To bake on 2 racks place the rac...

Page 12: ...the temperature can then be adjusted in 5 F 1 C increments 5 Push BAKE TIME 0 00 will flash in the display 6 Push the UP or DOWN ARROW until the desired amount of baking time appears in the display Once the Controls are Set a Theovenwillcomeonandbeginheatingtotheselectedbakingtemperature b The oven temperature will show in the display When the Set Bake Time Runs Out a END will appear in the displa...

Page 13: ...sed fat could ignite 5 Place the pan on the oven rack Leave the oven door closed when broiling 6 Broil on one side until food is browned turn and cook on the second side Season and serve Note Always pull the rack out to the stop position before turning or removing food 7 When broiling is finished push CANCEL Should an oven fire occur leave the oven door closed and turn off the oven If the fire con...

Page 14: ...self cleaning cycle To clean use hot soapy water and a cloth Large spillovers can cause heavy smoke or fire when subjected to high temperatures DO NOT allow food spills with a high sugar or acid content such as milk tomatoes sauerkraut fruit juices or pie filling to remain on the surface as they may cause a dull spot even after cleaning 5 Clean any soil from the oven frame the door liner outside t...

Page 15: ...d the LOCK indicator light will flash DO NOT open the door while the light is flashing it takes about 15 seconds for the lock to close 6 The LOCK light will glow until the cleaning cycle is completed or cancelled and the oven temperature has cooled When the Self Clean Cycle is Completed 1 The time of day will appear in the display window and the LOCK light will continue to glow 2 Once the oven has...

Page 16: ...r the porcelain may become damaged during future heating DO NOT use spray oven cleaners on the rangetop The holes in the burners of your range must be kept clean at all times for proper ignition and a complete even flame Clean the burners routinely and especially after bad spillovers which could clog these holes To remove clean and replace the entire burner cap assembly follow the instructions und...

Page 17: ...ollowing combinations burner cap and trim ring burner cap and burner pan or burner cap trim ring and burner pan Remove in the following order 1st burner cap 2nd trim ring and 3rd burner pan Do not operate the burners without the burner cap assembly in place To Clean the Burner Cap Burner Pan some models and Trim Ring some models Use a soap filled scouring pad or a mild abrasive cleanser to clean b...

Page 18: ...rame remove it and repeat the above steps 5 Replace screws previously removed To Remove and Replace Warmer Drawer some models To Remove Warmer Drawer 1 Turn power off before removing the warmer drawer 2 Open the drawer to the fully opened position 3 Locate the latches on both sides of the warmer drawer The left latch is visible However the right side is not and is located inside the drawer glides ...

Page 19: ...range 2 Remove Phillips Head screws 2 that secure the light cover and then lift the light cover off 3 Remove bulb by rolling back and up Install the new bulb by sliding down and rolling forward into place 4 Re install light cover and secure with Phillips Head screws 2 To Change the Oven Light some models On some models the oven light automatically turns on when the door is opened Some models have ...

Page 20: ... hold BAKE until the special 2 digit display appears Release BAKE The display now indicates the amount of degrees offset between the original factory temperature setting and the current temperature setting If the oven control has the original factory calibration the display will read 00 4 The temperature can now be adjusted up or down 35 F 17 C in 5 F 1 C steps by pushing and holding the UP or DOW...

Page 21: ... ports with a small gauge wire or needle Range power cord is disconnected from outlet electric ignition models only Be sure cord is securely plugged into the outlet Electrical power outage electric ignition models only Burners can be lit manually See Setting Surface Controls in this Owner s Guide Burner ports are clogged With the burner off clean ports by using a small gauge wire or needle Moistur...

Page 22: ...leaned Grease has built up on oven surfaces Regular cleaning is necessary when broiling frequently Old grease or food spatters cause excessive smoking Many factors affect baking results Make sure the proper rack position is used Center food in the oven and space pans to allow air to circulate Allow the oven to preheat to the set temperature before placing food in the oven Try adjusting the recipe ...

Page 23: ...23 ...

Page 24: ...t allow the exclusion or limitation of incidental or consequential damages so this limitation or exclusion may not apply to you 2 Service calls which do not involve malfunction or defects in workmanship or material or for appliances not in ordinary household use The consumer shall pay for such service calls 3 Damages caused by services performed by persons other than authorized Frigidaire servicer...

Page 25: ...k TOC0011 PM5 ISI0010 PM5 SCMT0036 PM5 SSC0013 PM5 SSC0021 PM5 SSC0022 PM5 SSC0025 PM5 SSC0027 PM5 BSOC0013 PM5 BS0C0018 PM5 BSOC0012 PM5 SOC0037 PM5 OC0032 PM5 GC004 PM5 GC0015 PM5 GC0045 PM5 GCES11 PM5 OL0037 PM5 AS0030 PM5 ...

Reviews: