background image

Summary of Contents for PLGFZ397GCA

Page 1: ...g Drawer Controls 8 9 Control Pad Features 10 Setting Oven Controls 11 24 Self Cleaning 25 27 Adjusting Oven Temperature 27 General Care Cleaning 28 30 Before You Call Solutions to Common Problems 31 Warranty Back Page READ AND SAVE THESE INSTRUCTIONS pin 316417133 0707 ...

Page 2: ...d _ with 3 prong _ grounding plug _ Grounding Instructions Avoid fire hazard or electrical shock Do not use an adapter plug an extension cord or remove grounding prong from electrical power cord Failure to follow this warning can cause serious injury fire or death This appliance is equipped with a 3 prong grounding plug for your protection against shock hazard and should be plugged directly into a...

Page 3: ... of the appliance unless specifically recommended in the manuals All other servicing should be done only by a qualified technician This may reduce the risk of personal injury and damage to the range Never modify or alter the construction of a range by removing leveling legs panels wire covers anti tip brackets screws or any other part of the product r All ranges can tip Injury to persons could res...

Page 4: ...a pan that has boiled dry may melt Protective Liners Do not use aluminum foil to line surface burner pans or oven bottom except as suggested in this manual Improper installation of these liners may result in risk of electric shock or fire Glazed Cooking Utensils Only certain types of glass glass ceramic ceramic earthenware or other glazed utensils are suitable for cooktop service without breaking ...

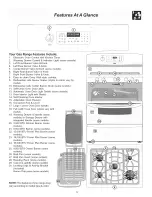
Page 5: ...eld 14 Self Cleaning Oven interior 15 Adjustable Oven Rack s 16 Convection Fan Cover 17 Large 1 piece Oven Door Handle 18 Full width Oven Door styles vary with model 19 Warming Drawer Handle some models or Storage Drawer with integrated handle some models 20 5 000 BTU Simmer Burner some models 21 9 500 BTU Burner some models 22 12 000 BTU Power Plus Burner some models 23 14 000 BTU Power Plus Burn...

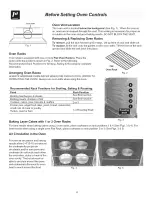
Page 6: ...VEN Always use oven mitts when using the oven Oven Rack Fig 2 Recommended Rack Positions for Broiling Baking Roasting Food Rack Position Broiling hamburqers steaks See Broil section Broiling meats chicken or fish See Broil section Cookies cakes pies biscuits muffins 2 or 3 Frozen pies angel food cake yeast bread casseroles small cuts of meat or poultry Turkey roast or ham 1 or Roasting Shelf Fig 3...

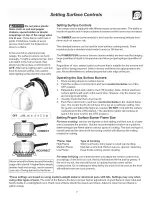
Page 7: ...er only the burner you are turning on will ignite 3 Visually check that the burner has lit 4 Push the control knob in and turn counterclockwise to the desired flame size The control knobs do not have to be set at a particular setting Use the guides and adjust the flame as needed DO NOT cook with the surface control knob in the LITE position The electronic ignitor will continue to spark if the knob...

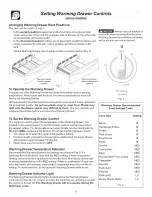
Page 8: ...Drawer it is located on the control panel To set the control push inand turn the knob to the desired setting The temperatures are approximate and are designated by HI high MED medium and LO low To set the Warming Drawer control 1 Turn the knob to select the desired temperature setting 2 For best results preheat the drawer before adding food An empty drawer will preheat inapproximately 15 minutes 3...

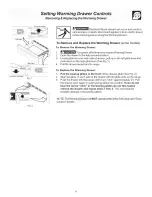
Page 9: ...on each side of drawer pull up on the left glide lever and push clown on the right glide lever See Fig l 4 Pull the drawer away from the range To Replace the Warming Drawer 1 Pull the bearing glides to the front of the chassis glide See Fig 2 2 Align the glide on each side of the drawer with the glide slots on the range 3 Push the drawer into the range until levers click approximately 2 Pull the d...

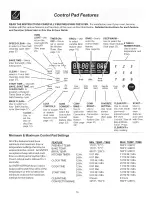
Page 10: ...ost oven Convection Convection Convection recipes set the features See Convert Bake Roast See page time of page 14 feature See feature feature See 23 day See page 22 See page page 21 page 12 29 KEEPWARM Use to select the Keep Warm feature 0 THRU 9 See page 25 NUMBERPADS Use to enter temperature and times 1 2 3 4 5 6 7 8 9 Clear 0 off CLEAR OFF START Use to cancel Use to any oven mode start all pre...

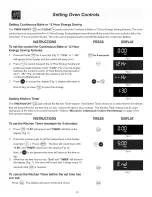
Page 11: ...Press _ pads to set the time of day to l 30 Fig 3 CLO will appear in the display Press CLO will disappear and the clock will start Fig 4 Changing between 12 or 24 hour time of day display 1 Press and hold _ for 6 seconds Fig 3 While holding the pad down the current time of day will remain and CLO will disappear from the display Fig 4 CONTINUE holding the pad until a beep is heard 3 The display wil...

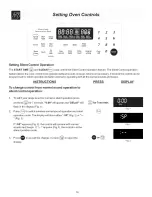
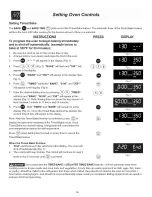
Page 12: ...ay will return to time of day or press _ to reject the change _for 6 seconds Fig 1 Fig 2 Fig 3 Setting Kitchen Timer Fig 4 The TIMER ON OFF _ pad controls the Kitchen Timer feature The Kitchen Timer serves as an extra timer in the kitchen that will beep when the set time has run out It does not start or stop cooking The Kitchen Timer feature can be used during any of the other oven control functio...

Page 13: ...again fully operational _ for 3 seconds _for 3 seconds Fig 1 Fig 2 Setting Temperature Display Fahrenheit or Celsius The BROIL O and CLEAN _ pads control the Fahrenheit or Celsius temperature display modes The oven control can be programmed to display temperatures in Fahrenheit or Celsius The oven has been preset at the factory to display in Fahrenheit INSTRUCTIONS PRESS DISPLAY To change display ...

Page 14: ...rammed for silent operation and later returned to operating with all the normal sounds and beeps INSTRUCTIONS PRESS DISPLAY To change control from normal sound operation to silent control operation 1 To tell if your range is set for normal or silent operation press and hold _ for 7 seconds 0 00 will appear and DELAY will flash in the display Fig 1 2 Press _ to switch between normal sound operation...

Page 15: ... place food inoven 2 Press will appear in the display Fig 1 3 Press Fig 2 BAKE will flash and 350 will appear in the display 4 Press A long beep will sound once the oven temperature reaches 350 F and the display will show 350 and BAKE Fig 3 Pressing will cancel the Bake feature at any time _ _ _ Fig 1 To change the Bake Temperature example changing from 350 to 425 F 1 After the oven has already be...

Page 16: ...and BAKE will remain on in the display Fig 6 Once the Timed Bake feature has started the current time of day will appear in the display Note After the Timed Bake feature has activated press _ _ to display the bake time remaining in the Timed Bake mode Once Timed Bake has started baking a long beep will sound when the oven temperature reaches the set temperature Press when baking has finished or at...

Page 17: ...ours and 59 minutes Press I TIMED BAKE and 350 will display Fig 6 Press _ Enter the desired start time using the number pads _ _ Fig 7 Fig 1 Fig 2 Fig 3 Fig 4 Fig 5 10 Press t When Delay Start starts the set oven temperature will disappear TIMED DELAY BAKE and the current time of time of day will appear in the display Fig 8 Note Once Delay Start has started press _ to display the bake time remaini...

Page 18: ...e broiler pan on the rack Be sure to center the broiler pan directly under the broiler element Close the oven door For optimum browning preheat the broil burner for 3 4 minutes before adding food 4 Press i BROIL will flash and 550 will appear Fig 1 Ifa lower broil temperature is desired minimum broil temperature setting is 400 F press the desired temperature before continuing to step 5 5 Pressl Th...

Page 19: ...scuits should be baked on pans with no sides or very low sides to allow heated air to circulate around the food Food baked on pans with a dark finish will cook faster 2 When using Convection Bake with a single rack place oven rack in position 2 or 3 If cooking on multiple racks place the oven racks in positions 1 4 2 oven racks Place racks in positions 1 3 5 for 3 oven racks Refer to Fig 1 3 Cakes...

Page 20: ...ng Rack Instructions some models When preparing meats for convection roasting use the broiler pan and insert along with the roasting rack if equipped The broiler pan will catch grease spills and the insert will help prevent grease splatters The roasting rack will allow the heat to circulate around the meat To prevent food from contacting the broil element and to prevent grease splattering DO NOT u...

Page 21: ...SS DISPLAY Using Convection Convert Bake feature to automatically adjust oven temperature example below when setting oven for 350 F 1 Arrange interioroven racks and place food inoven 2 Press will appear in the display Fig 1 3 Press __ _ _ _0_ BAKE will flash and 350 will appear in the display See Fig 2 If a Timed Bake or a Delayed Start Delayed Timed Bake is desired enter the times now 4 Press 0 C...

Page 22: ...ashes 1 and appears in the display See Fig 2 Press _ _ _ BAKE f ashes 1 and 350 appears in the display See Fig 3 Press and hold pad for at least 3 seconds or until a beep sounds The beep indicates that the recipe setting has been recorded for future recall The display will show 350 and BAKE See Fig 4 NOTE The oven will continue to bake unless is pressed hold pfor 3 seconds Fig 1 Fig 2 Fig 3 Fig 4 ...

Page 23: ...d activate the Sabbath feature 1 Be sure that the clock is set with the correct time of day 2 Arrange the oven racks and place the food in the oven Press 4 will appear in the display Fig 1 appear in the display 5 Press The display will show 350 and BAKE The oven will turn ON and begin heating See Fig 3 6 If a Timed Bake or Belayed Timed Bake is needed then enter the time in this step If not skip t...

Page 24: ...ture of 170 F The Keep Warm feature will keep oven baked foods warm for serving up to 3 hours after cooking has finished After 3 hours the Keep Warm feature will shut the oven OFF automatically The Keep Warm feature may be used without any other cooking operations or can be used after cooking hasflnished using TIMED BAKE or DELAYED TIMED BAKE INSTRUCTIONS PRESS DISPLAY To set Keep Warm 1 Arrange i...

Page 25: ...hey are not removed during the Self Clean cycle their color will turn slightly blue the finish will be dull After the cycle is complete the oven has cooled rub the sides of the oven racks with wax paper or a cloth containing a small amount of salad oil this will make the racks glide easier into the rack positions Remove any excessive spillovers in the oven cavity before starting the Self Cleaning ...

Page 26: ...will show in the display See Fig 1 Note 2 hours Self Cleaning time may be choosen by pressing or of 4 hours by pressing the _ at this time or _ optional Fig 1 3 Press _ The DOOR LOCKED icon will flash CLEAN Cooktop Lockout icon and the letters CLn will remain on in the display Fig 2 Fig 2 4 As soon as the control is set the motor driven oven door lock will begin to close automatically Once the doo...

Page 27: ...emperature setting that is higher or lower than the recommended temperature The baking results should help you to decide how much of an adjustment is needed INSTRUCTIONS To adjust the oven temperature higher PRESS 2 Press for 6 seconds Fig 1 To increase the temperature use the number pads to enter the desired change Example 30 F _ _0_ Fig 2 The temperature may be increased as much as 35 F 19 C 3 P...

Page 28: ...ure heating DO NOT use spray oven cleaners on the range top Remove racks See Removing Replacing Oven Racks under Before Setting Oven Controls Use a mild abrasive cleaner following the cleaner s recommendations Rinse with clean water let dry After cleaning the racks rub the sides of the racks with wax paper or a cloth containing a small amount of salad oil this will make the racks glide easier into...

Page 29: ... 4th surface burner drip pan if equipped Reverse the procedure above to replace the surface burner cap surface burner head and surface burner drip pans if equipped Do not remove any parts from the cooktop until they have completely cooled and are safe to handle Do not operate the surface burners without the surface burner cap and surface burner head properly in place Orifice i To Clean the Surface...

Page 30: ...the door hinge locks up towards and into the oven frame on both left and right oven door hinges See Fig 2 to the locked position 5 CIosetheoven door Special Door Care Instructions Most oven doors contain glass that can break Read the following recommendations 1 Do not close the oven door until all the oven racks are fully in place 2 Do not hit the glass with pots pans or any other object 3 Scratch...

Page 31: ...of day must first be set in order to operate the oven See To Set the Clock in the Setting Oven Controls section 2 Make sure cord plug is plugged correctly into outlet 3 Service wiring is not complete Contact your authorized service agent 4 Electrical power outage Check house lights to be sure Call your local electric company for service 5 Be sure gas supply is turned ON Oven light does not work so...

Page 32: ...s other than authorized service companies or external causes such as abuse misuse inadequate power supply accidents fires or acts of God DISCLAIMER OF IMPLIED WARRANTIES LIMITATION OF REMEDIES CUSTOMER S SOLEAND EXCLUSIVE REMEDY UNDER THIS LIMITED WARRANTY SHALL BE PRODUCT REPAIR OR REPLACEMENTAS PROVIDED HEREIN CLAIMS BASED ON IMPLIED WARRANTIES INCLUDING WARRANTIES OF MERCHANTABILITY OR FITNESS ...

Reviews: