background image

O P E R A T O R ’ S  M A N U A L

AERATOR-OVERSEEDER

TR2058

Manual 5BP960374B

Date 08/07/2012

Summary of Contents for TR2058

Page 1: ...O P E R A T O R S M A N U A L AERATOR OVERSEEDER TR2058 Manual 5BP960374B Date 08 07 2012...

Page 2: ...r each have been selected using the following guidelines DANGER Indicates an imminently hazardous situation that if not avoided will result in death or serious injury WARNING Indicates a potentially h...

Page 3: ...Run 24 3 14 Start Up 22 3 13 Attaching to the Tractor 21 3 12 Pre Operational Check 21 3 11 Safety Slip Clutch 20 3 10 Driveline 18 3 09 Seed or Fertilizer Hopper Calibration 16 3 08 Hopper Adjustmen...

Page 4: ...actor is done at the same PTO speed and direction of rotation Do not operate this implement at a PTO speed or direction of rotation other than that shown on the implement Serious damage can occur to t...

Page 5: ...wing the model and the serial number Record your implement model and serial number in the space provided below Your dealer needs this information to give you prompt efficient service when you order pa...

Page 6: ...uals and is instructed in safe and proper use 2 01 Preparation 1 Before operating equipment read and understand the operator s manual and the safety signs see fig 2 2 Thoroughly inspect the implement...

Page 7: ...the implement until the rotor has come to a complete stop 8 To park the vehicle safely stop vehicle on a level surface not on a slope disengage PTO engage the parking brake stop the engine remove the...

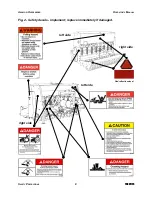
Page 8: ...Fig 2 Safety decals implement replace immediately if damaged SAFETY PRECAUTIONS 8 FRONTIER AERATOR OVERSEEDER OPERATOR S MANUAL right side left side Red reflective decal right side left side...

Page 9: ...Safety decals driveline replace immediately if damaged SAFETY PRECAUTIONS 9 FRONTIER AERATOR OVERSEEDER OPERATOR S MANUAL placed on outer shield placed on outer tube...

Page 10: ...mpacts the soil in a single pass Changing the machine over from an aerator to a tiller is a simple operation which can be performed in under 30 minutes with a pair of wrenches This unique machine redu...

Page 11: ...ctor at any time There is no safe place for riders 11 Do not operate unless all personnel livestock and pets are 50 yards away to prevent injury by thrown objects 12 Before backing up disengage the im...

Page 12: ...etup and service including lubrication is the responsibility of the authorized dealer It is up to him to assure that the machine is in perfect condition and ready to be used It is his responsibility t...

Page 13: ...es with two rows of tickler tines mounted between the roller arms see fig 4 These tines work as a rake to help cover grass seed for ideal germination conditions The tines are raised and lowered automa...

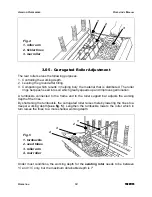
Page 14: ...r adjusts the working depth of the tines By shortening the turnbuckle the corrugated roller raises thereby lowering the tines to a deeper working depth see fig 5 Lengthen the turnbuckle lowers the rol...

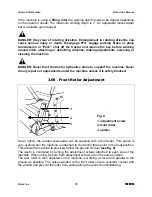
Page 15: ...machine unless it is safely blocked 3 06 Front Roller Adjustment As an option the aerator overseeder can be supplied with a front roller This option is very useful when the machine is attached to the...

Page 16: ...hed to the side of the aerator overseeder When using be sure both wheels are in the same position The rear roller is then adjusted so the machine is working as level and parallel to the ground as poss...

Page 17: ...the side of each cup housing This controls the position of the cleanout gate top middle and bottom Its position is determined by the size and shape of the material being dispersed see fig 9 The top p...

Page 18: ...163 122 68 Lovegrass Weeping 142 132 119 108 98 84 73 63 48 39 28 14 Wheatgrass Crested 158 145 130 117 105 89 76 64 48 36 24 7 Wheatgrass Western 438 406 363 330 300 257 224 193 150 118 87 38 Bermuda...

Page 19: ...2 WORKING SURFACE 72 revolutions 1000 sq ft 3137 revolutions 1 acre 1 revolution 13 88 sq ft TR2058 To calibrate the aerator overseeder while it is working do the following 1 Measure out a predetermi...

Page 20: ...2 9 25 5 28 6 32 7 38 2 45 8 57 3 76 3 114 4 229 0 2 5 18 3 20 4 22 9 26 2 30 5 36 6 45 8 61 1 91 5 183 1 2 13 7 15 2 17 1 19 6 22 8 27 5 34 4 45 8 68 7 137 4 1 5 9 2 10 1 11 4 13 0 15 3 18 3 22 8 30...

Page 21: ...sition 7 Install both driveline safety chains One should be hooked in a hole on the outer driveline yoke shield and to the tractor to restrict outer shield rotation The second one should be hooked in...

Page 22: ...been contacted to make certain there are no bundled gas lines electrical cables etc in the work area 11 When working make sure the aerator overseeder has its full weight riding on the roller The front...

Page 23: ...hten the tractor arms side movement with either the sway chains or blocks to limit side swing to 2 3 Connect the top link locking it in place with the top hitch pin Adjust it so the aerator overseeder...

Page 24: ...e lowered and allowed to rest on the stand which is supplied with the machine see fig 13 3 14 Start Up DANGER Never allow anyone around the aerator overseeder when it is in operation Never engage the...

Page 25: ...all maintenance and lubrication has been performed on the aerator overseeder 4 Having read and understood all safety aspects for the aerator overseeder in the operator s manual 5 Having read and under...

Page 26: ...o loosen the soil without tearing up existing grass It is very important to check the depth prior to the corrugated roller going over where the blades have cut into the ground With the optional tillin...

Page 27: ...torqued9 Under these extreme conditions it may be wise not to use the tiller as a primary tillage tool Run over the ground with a disc or plow prior to tilling 3 20 Uneven Terrain DANGER Be careful wh...

Page 28: ...g 1 Always select a safe ground speed that is appropriate for the terrain 2 Beware of traffic on public roads Install a SMV Slow Moving Vehicle sign when traveling on roads or streets Comply with all...

Page 29: ...206 97 131 2 M16 171 232 121 164 79 106 18 9 16 154 209 105 142 69 94 1 5 M14 154 208 109 147 70 95 12 9 16 144 195 98 133 62 84 2 M14 120 163 85 115 55 75 20 1 2 98 133 66 90 44 59 1 25 M12 106 144 7...

Page 30: ...omplete stop before attempting to perform maintenance 6 Never work under equipment unless it is blocked securely 7 Never trust the tractor hydraulics alone to support the machine Before repairing or a...

Page 31: ...cept any liability for injury or warranty 4 02 Service The following illustrations show lubrication points The frequency of lubrication given is based on normal operating conditions Severe or unusual...

Page 32: ...3 full If needed add either SAE 90 wt or SAE 140 wt gear oil Whenever the hopper is used for fertilizer spreading it is extremely important to carefully clean out the hopper and wash the machine with...

Page 33: ...recommended to purchase the machine with both rotors in order to get the most use out of the aerator overseeder Changing the rotor is a very simple operation Both types consist of two side supports an...

Page 34: ...er and nut Proceed until all blades needed to be changed are changed After installing the new blades tighten the nuts to their proper torque specifications To determine if a blade is right or left do...

Page 35: ...ERATOR OVERSEEDER OPERATOR S MANUAL 1 2 3 4 5 6 1 2 3 4 5 6 Fig 20 The drawing on the left shows the tilling rotor while that on the right shows the straight blade aerating rotor 1 rotor 2 flange 3 bo...

Page 36: ...ssed in when being replaced 5 When reassembling the gearbox ensure that there is a precise match between ring and pinion gears 5 02 Chain Case To remove the chain do the following 1 Unbolt chain case...

Page 37: ...or damaged parts 4 Tighten all hardware 5 Grease all areas indicated under Maintenance13 6 Touch up scratches by sanding the area and applying a light coat of primer and paint to prevent rust from for...

Page 38: ...eed Worn blades Slip clutch slipping Ground speed too fast Machine skips and leaves crop residue Adjust slip clutch or replace discs Slip clutch slipping PTO turning but not blades Remove chain case a...

Page 39: ...the chemicals build up in seed cup Unless cleaned regularly this buildup can cause breakage of the seed cup shaft Seed cups might be obstructed Actual seeding rate is different than desired Check for...

Page 40: ...ing of bearings Operator s Manual Review the Operator s Manual with the customer Explain the following Warranty Safe operation and service Correct machine installation and operation Daily and periodic...

Page 41: ......

Page 42: ......

Page 43: ...tails in this manual without the expressed written permission of the Company Technical information provided in this manual is approximate the Company reserves the right to modify or improve the models...

Page 44: ...Manual 5BP960374B Date 08 07 2012 Frontier OM GRT 258 US lwp Printed in the USA August 31 2012...

Reviews: