FrSky RB-30, Manual
The FrSky RB-30 is a cutting-edge receiver that provides high-quality signal reception for your remote-controlled drone or aircraft. Ensure optimal performance by downloading the free manual from 88.208.23.73:8080 to learn how to set up and customize your RB-30 for the ultimate flying experience.
Share
Download


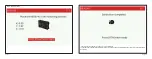
Reviews:
No comments