background image

FISH SPECIES AND

BIOMASS SOUNDER

FSS-3BB

OPERATOR'S MANUAL

www.furuno.com

Model

(Product Name: FISH FINDER)

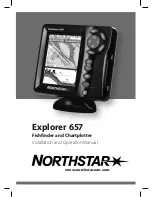
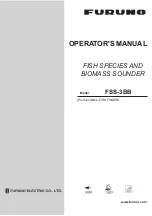
Summary of Contents for FSS-3BB

Page 1: ...FISH SPECIES AND BIOMASS SOUNDER FSS 3BB OPERATOR S MANUAL www furuno com Model Product Name FISH FINDER...

Page 2: ...7KH SDSHU XVHG LQ WKLV PDQXDO LV HOHPHQWDO FKORULQH IUHH 85812 XWKRUL HG LVWULEXWRU HDOHU VKLKDUD FKR 1LVKLQRPL D 3 1 35 3ULQWHG LQ DSDQ OO ULJKWV UHVHUYHG 8 3XE 1R 20 26 66...

Page 3: ...nner Road Havant Hampshire PO9 1QY U K All brand product names trademarks registered trademarks and service marks belong to their respective holders How to discard this product Discard this product ac...

Page 4: ...ssel using the depth data alone Grounding and serious injury may result The operator must read the applicable safety instructions before attempting to operate the equipment ELECTRICAL SHOCK HAZARD Do...

Page 5: ...t carry the equipment by their cables The cables may be damaged or become disconnected Adjust the gain properly Too little gain may present no picture Too much gain shows excessive noise on the pictur...

Page 6: ...m mode 1 22 1 13 3 Marker zoom mode 1 22 1 13 4 Bottom discrimination mode 1 23 1 14 How to Switch Between Daytime and Nighttime Color Modes 1 24 1 15 How to Use the A scope Display 1 25 1 16 How To S...

Page 7: ...play a screenshot 3 3 3 1 5 How to copy screenshots from internal to external memory 3 4 3 1 6 How to delete screenshot files 3 5 3 2 Echo Data Recording and Playback 3 5 3 2 1 How to record echo data...

Page 8: ...TABLE OF CONTENTS vi 5 7 3 How to test the Trackball Control Unit 5 10 5 7 4 LCD test 5 11 APPX 1 MENU TREE AP 1 APPX 2 SCREEN LAYOUTS AP 4 SPECIFICATIONS SP 1 INDEX IN 1 Operator s Guide...

Page 9: ...or Unit Transceiver Unit and Transducer optional or local supply The FSS 3BB shows under water conditions on a monitor local supply The IDENTI FISH function distinguishes swim bladder and swim bladder...

Page 10: ...xternal memory devices while the FSS 3BB is powered Turn off the power to the FSS 3BB before connecting or disconnecting an external memory device For external hard drives drives with a separate exter...

Page 11: ...CU 026 connect the RCU 026 to the USB port on the processor unit using the USB cable supplied with the RCU 026 If you do not use the USB port on the RCU 026 the USB connection between the RCU 026 and...

Page 12: ...SYSTEM CONFIGURATION x This page is intentionally left blank...

Page 13: ...InstantAccess bar Long press Activates the scrollback mode Confirms picture when the scrollback mode is active Scrollwheel Scroll Changes the setting for the selected item Short press Takes a screensh...

Page 14: ...means changes made to settings are not saved Note 2 The Transceiver Unit uses a small amount of power when it is off When the system will not be used for a long period of time turn the system off from...

Page 15: ...pinned header is always visible at the top of the screen An un pinned header is hidden until the cursor is placed on the header s lo cation This icon is shown in green color when pinned 2 Miscellaneo...

Page 16: ...ays visible at the bottom of the screen An unpinned footer is hidden until the cursor is placed on the foot er s location This icon is shown in green color when pinned 2 Internal memory screenshot cou...

Page 17: ...he icons Internal Settings 1 Internal Settings 8 see section 1 27 cannot be stored as shortcuts Note 2 You can cancel a drop and drag operation in progress by right clicking To remove an icon from the...

Page 18: ...Zoom functions See section 1 13 Measure Fish Size icon Accesses the fish measurement area settings See section 2 3 2 The available settings are IDENTI FISH icon Shows the IDENTI FISH graph See section...

Page 19: ...vates the IDENTI FISH graph See section 2 2 Sonde Graph icon Activates deactivates the sonde graph See section 2 4 Temp Graph icon Activates deactivates the water temperature graph See section 2 5 Ala...

Page 20: ...speed through the water Temperature icon Shows hides the water temperature Echo Recording menu icon Accesses the echo recording and screenshot functions Record icon Starts recording echo data See sect...

Page 21: ...icon Undo the last operation See section 1 28 Redo icon Redo the last operation See section 1 28 Select External Memory Media icon Selects where to save data on an external memory device See section...

Page 22: ...ISH echo display is not available appears Low and high frequency displays Low frequency The sounder uses ultra sonic signals to detect bottom conditions The lower the frequency of the signal the wider...

Page 23: ...ho display on a sub monitor See your dealer for details IDENTI FISH usage notices This function requires a IDENTI FISH compatible transducer See the Instal lation Manual IME 23930 for a list of compat...

Page 24: ...suit your requirements To adjust the size of a split screen do the following 1 Put the cursor on the display dividing line The cursor shape changes from to 2 Drag the dividing line to resize the scre...

Page 25: ...ed out setting value means the corresponding menu item cannot be changed 4 Change the setting as necessary Item with options 1 Click the triangle T to show a drop down list 2 Select desired option fro...

Page 26: ...lphanumeric characters You can switch be tween upper and lower case alphabet as shown in the figure below 2 Use the trackball to click desired character You can use the BS key to erase the character t...

Page 27: ...he top edge of the display to show it 2 Click the ADVANCE indication on the header The indication is now highlighted in a green color 3 Scroll to select the appropriate advance speed The table below l...

Page 28: ...N indication shows HF or LF in the GAIN indication Further the red frame encloses the mode and gain setting indication top left corner of each image of the image currently selected for adjustment Clic...

Page 29: ...hen auto range or auto shift is active Note 2 The seabed echo may be lost if the shift is at a greater value than the seabed depth To shift the display range do as follows 1 Display the header if it i...

Page 30: ...cursor at the top edge of the display to show it 2 Click the RANGE indication on the header The indication is now highlighted in a green color 3 If the Split Range function is turned on click the RANG...

Page 31: ...he InstantAccess bar to show the Sounder menu then click the Interference icon INTERFERENCE appears in the miscellaneous section of the header and is highlighted in a green color 2 Scroll to adjust th...

Page 32: ...the screen Clutter is often caused by sediment in the water or noise These unwanted echoes can be rejected to clear up the picture To reject clutter do as follows 1 Click the Sounder icon from the In...

Page 33: ...mis cellaneous section of the header 2 Scroll to show the desired zoom mode The four modes are shown in abbrevia tions 1 13 1 Bottom lock mode Bottom lock display provides a normal picture on the righ...

Page 34: ...he specified area of the normal picture to full ver tical size of the screen on the left side of the screen You may specify the portion to expand by operating the VRM Variable Range Marker The area be...

Page 35: ...mination at 1 3 ratio The left side of the screen show the seabed as a straight line at approximately one third of the screen length from the screen bottom Bottom discrimination 1 2 displayed Un zoome...

Page 36: ...cess bar to suit your needs Unless otherwise specified all example figures in this manual use the Day display mode 1 Click the Display icon from the InstantAccess bar to show the Display menu bar then...

Page 37: ...pears at the bottom left corner of the screen You can show or hide the depth indication to suit your preferences To show hide the depth indication click the Depth icon from the Display menu on the Ins...

Page 38: ...eration 3 The depth is displayed above or below the VRM at the center of the VRM 4 To hide the VRM click the Display icon from the InstantAccess bar to show the Display menu bar then click the VRM ico...

Page 39: ...he cause of the alarm is removed or the offending alarm is disabled If the depth indication is shown at the bottom right corner the alarm icon appears at the bottom left corner Alarm descriptions Bott...

Page 40: ...olor depending on the status selected green for active alarm gray for inactive For the Bottom alarm Bottom Fish alarm and Fish alarm an alarm marker appears at the right edge of the display The alarm...

Page 41: ...ca tion of the transducer face Fish Normal Set the starting depth From and span range Span for the fish alarm The distance set here is measured from the location of the transducer face Fish B L Set th...

Page 42: ...ting From Set the starting temperature for the alarm Span Set the span of the alarm Fish Size Graph Fish Size Graph Select the fish size s which trigger the Fish Size Graph alarm Multiple selections a...

Page 43: ...tiple lines at any time Under default settings the FSS 3BB also outputs the TLL to the connected chart plot ter 1 24 How to Use the Scrollback Mode The scrollback mode allows the user to view past scr...

Page 44: ...ced Settings window 2 The Sounder menu item is already selected and the Sounder menu appears on the right side of the window Click Color Erase from the Sounder menu 3 Adjust the Color Erase setting un...

Page 45: ...the Advanced Settings icon from the InstantAccess bar then click the Advanced Settings icon to show the Advanced Settings window 2 Click the Sounder menu then click HF or LF as appropriate The example...

Page 46: ...ve settings to internal memory 1 Click the Advanced Settings icon from the InstantAccess bar then click the Save Settings icon 2 Click the save slot icon that you want to use The message Settings save...

Page 47: ...load ed settings How to load settings from an external memory Note This method requires connection to an external memory device If there is no device connected the Load External Unit Settings icon sh...

Page 48: ...orded echo data is played back all the history contents of the can cellation and redo of the operation performed before the playback are erased How to undo an operation Click the Advanced Settings ico...

Page 49: ...raph displays estimated fish size and related data with a bar graph See section 2 3 IDENTI FISH Graph Shows hides the IDENTI FISH graph The IDENTI FISH graph compares the histograms of the fish within...

Page 50: ...h On the InstantAccess bar click the Graph icon followed by the IDENTI FISH Graph icon The icon is highlighted in green and the graph appears To hide the graph click the close button No Description 1...

Page 51: ...the area Push the left button drag the frame to the location for the bottom right corner then release the left button A IDENTI FISH graph appears for the ID no selected at step 4 If model data has bee...

Page 52: ...message Note 1 If you selected No NameX X number at step 8 register the relevant fish species name using a name that is easy to remember see section 2 2 3 Note 2 To use the model data saved above as...

Page 53: ...List window 8 Click the OK button to finish 2 2 4 How to set model data Set the model data to be compared with the IDENTI FISH echo display in the mea surement range ID1 and ID2 model data can be set...

Page 54: ...e The factory default model data saved to the system are Mackerel and Herring Default Mackerel_CM265LHG ref Mackerel model data used by the transduc er CM265LHG Default Mackerel_CM599LHG ref Mackerel...

Page 55: ...then click the Advanced Settings icon to show the Advanced Settings window 2 Click ID1 or ID2 as applicable 3 Select On from the Reference Auto Select drop down list 4 Click the button at Select Refer...

Page 56: ...ings icon from the InstantAccess bar then click the Advanced Settings icon to show the Advanced Settings window 2 Click IDENTI FISH 3 Click the button at Delete Reference Data to show the Delete Refer...

Page 57: ...external storage device To import all model data click the All button The message Se lected model data will be deleted Are you sure appears 7 On the FSS 3BB select the save destination for the fish s...

Page 58: ...s model data selec tion window multiple selections are possible To select all model data click the Select All button 6 From the window for the external storage device use the drop down list to select...

Page 59: ...e See How to import model data on page 2 9 Export Reference Data Exports model data to an external storage device See How to export model data on page 2 10 Delete Reference Data Deletes model data See...

Page 60: ...ish species with the highest similarity among the fish spe cies set in Select Reference Auto below Select Reference Auto Effective when Reference Auto Select is turned on Set the fish species See page...

Page 61: ...selected No Description 1 Estimated size of the largest fish detected peak size detected Depending on the setting selected at Graph Peak in the Fish Size menu you can display up to the third largest...

Page 62: ...from the InstantAccess bar then click the Fish Size Graph icon The icon is highlighted in green and the graph appears To close the graph click the Close Window icon or click the graph icon 2 3 2 How...

Page 63: ...show menu op tions 3 Click the Entire Area icon The area of detection the entire screen is surrounded with the measurement marker yellow box as shown in the example figure below In a combination dis p...

Page 64: ...ment range Change the starting depth Drag and drop the measurement starting depth marker up or down Change the ending depth Drag and drop the measurement ending depth marker up or down Move the measur...

Page 65: ...arkers do not appear 4 If the header is not shown put the cursor inside the header area 5 Click SIZE TRACK on the header then scroll to change the setting When the setting is changed the SIZE TRACK wi...

Page 66: ...REA window turns green A maximum of three measurement ranges SIZE1 SIZE3 can be set on all screens except for the IDENTI FISH echo dis play 6 Drag the cursor to the diagonally opposite corner of the a...

Page 67: ...ating Cycle Sets how often to update the graph Measurement Range When the measurement mode is other than the bottom track set the range to measure fish length Std Measure to the bottom of the sea Enti...

Page 68: ...tributed Scale Start Sets the percentage of distribution at which data starts appearing on the graph See the above figure Distributed Scale End Sets the percentage of distribution at which data stops...

Page 69: ...k Color in the Display menu The hor izontal axis shows temperature and is linked with the depth scale The horizontal axis shows temperature If the temperature at the net goes out of the range of the c...

Page 70: ...k the Graph icon from the InstantAccess bar to show the Graph menu then click the Temp Graph icon The icon is high lighted in green and the graph appears The graph scale and the graph line color can b...

Page 71: ...acity of the external memory device To set the save destination for screenshots do the following 1 Click the Advance Settings icon on the InstantAccess bar then click the icon to show the Advanced Set...

Page 72: ...hat the external memory is connected correctly Note 3 When two monitors are used the screenshot from each monitor is saved 3 1 3 How to take screenshots at a set interval Several screenshots can be ta...

Page 73: ...number of current screenshots and total screenshots is located at the bottom of the screen see figure above This indication shows the num ber screenshots at the time of opening the replay screen and...

Page 74: ...emory device for example a USB flash drive Note 1 If the external memory device does not have the capacity to store the screen shot files the error message Not enough memory to copy screenshot Delete...

Page 75: ...3 2 Echo Data Recording and Playback The echo data recording and playback function requires connection to an external memory device Echo data is recorded as a movie allowing you to playback previ ousl...

Page 76: ...files from the external memory device or take other appropriate measures to allow sufficient capacity to save the echo data 3 2 2 How to play back recorded echo data The playback function lets you vi...

Page 77: ...um Time Minimum Depth Records with a time depth be low this setting are not displayed Maximum Time Maximum Depth Records with a time depth above this setting are not displayed No Name Description 1 Pa...

Page 78: ...ce Settings icon from the InstantAccess bar 2 Click the Select External Memory Media icon Note The Select External Memory Device icon is only displayed when there is more than one external memory devi...

Page 79: ...icon to restore the default settings for the menu items shown in the right window Confirm changes and close the menu Apply changes without closing the menu Cancel changes and close the menu Software...

Page 80: ...low Sets the area in which the seabed is displayed when auto range mode is active Note This menu item is available only if Auto Range is not selected from the Range Auto menu in the System menu Menu i...

Page 81: ...ds shown in dots Temp Graph Displays a graph showing the water temperature in one of three lay outs Narrow Normal or Wide Requires water temperature data Temp Color Sets the color for the water temper...

Page 82: ...ting is not se lectable when Hue is set for Custom In this case the background color is set on the Hue window Custom Sets a custom background color or select a preset color The setting is changeable w...

Page 83: ...t the appropriate sonde number at the right side of the col or selection pop up window 3 Adjust the slider bar to change the displayed color of the sonde 4 Click OK to confirm the changes or click Can...

Page 84: ...onsists of four menus Fish Size menu and SIZE1 SIZE3 menus Fish size graph related measurement can be set from the SIZE1 SIZE3 menus For details see section 2 3 7 Fish Size menu SIZE1 SIZE3 menus FSS...

Page 85: ...nsists of the IDENTI FISH ID1 and ID2 menus which set up the IDENTI FISH function See section 2 2 6 IDENTI FISH menu IDENTI FISH echo display IDENTI FISH graph settings ID1 and ID2 menus IDENTI FISH g...

Page 86: ...which do not require regular adjustment 4 7 1 Range menu The Range menu contains range related settings Menu item Description Range1 to Range8 Changes the range setting for the preset ranges Zoom Rang...

Page 87: ...s active the shift indication on the header shows AT Shift cannot be operated manually Range can be adjusted Menu item Description TX Rate Changes the rate at which the fish finder transmits a pulse A...

Page 88: ...m echo is displayed correctly Auto is available when TX Mode is set to TruEcho CHIRP Note The Auto setting automatically adjusts the gain If neces sary readjust the gain to display the bottom echo etc...

Page 89: ...n the Chirp Width If this happens reduce the chirp width to enable frequency adjustment 3 When the TX Mode is TruEchoCHIRP click the arrow but tons of Chirp Width to adjust the chirp width The soft wa...

Page 90: ...f Nor mal Manual Pulse length can be set manually regardless of the range Pulselength msec Operative when the TX Mode is Normal and RX Band Width is Manual A smaller number provides better resolution...

Page 91: ...age to display the menus and on screen in dications in Depth Selects the unit of measurement for depth Speed Selects the unit of measurement for speed Temperature Selects the unit of measurement for t...

Page 92: ...olor Determine the bottom edge by display color When bottom fish are well separated from the bottom the bottom is displayed with a straight line making discrimination of bottom fish easier Howev er th...

Page 93: ...m Level In the default bottom level setting 0 the equipment judges con secutive strong echoes to be bottom echoes If in that setting the depth indication is unstable adjust the bottom level If vertica...

Page 94: ...ion Sensor Selects the SATELLITE COMPASS model connected to the FSS 3BB The sensor is optimally set up during installation Do not change this set ting Delay Time msec Operative when Stabilization Sens...

Page 95: ...hange the settings 4 7 7 Mode menu The Mode menu sets the display modes to use The modes available for use appear in the MODE indication in the header HF menu LF menu FSS 3BB 0252470 xx xx FSS 3BB 025...

Page 96: ...n 3 From the Mode Select window select up to five items to display on the mode se lected The choices are outlined in the table below Mode Select window items Not shown when External IDENTI FISH Echo W...

Page 97: ...o edit the mode as re quired 3 Click OK to apply the changes and close the menu Click Cancel to cancel any changes made and close the menu How to delete a mode 1 With the Mode menu displayed select th...

Page 98: ...4 ADVANCED SETTINGS 4 20 This page is intentionally left blank...

Page 99: ...Fasten if loosened Remove rust if present Dust on units Remove dust or dirt from the units with a soft dry cloth Do not use chemical based cleaners to clean the equip ment because they can re move pai...

Page 100: ...ing Place the trackball and the retaining ring on a clean soft cloth laid on a flat sur face 3 Clean the ball with a damp soft cloth then use a dry lint free cloth to carefully wipe the ball dry 4 Use...

Page 101: ...error code P01 appears at the center of the screen Have a FURUNO representative replace the bat tery at your earliest convenience Note 2 Used batteries should be disposed of according to the applicab...

Page 102: ...opped Referring to section 1 6 set Pic Ad vance to other than Stop Check if the scrollback feature see section 1 24 is active If it is active de activate it The transducer cable is disconnected or dam...

Page 103: ...me error code reason remedy and priority order for each error type If the error window appears repeatedly contact a FURUNO dealer to request service Position readout is unrealistic or not shown The ca...

Page 104: ...t the external device 5 Transceiver Unit System Error T01 Communication error between the Transceiver Unit and Processor Unit Turn the equipment off then contact your local dealer for service 2 T02 Th...

Page 105: ...ess the Tests menu do the following 1 Click the Advanced Settings icon from the InstantAccess bar then click the Advanced Settings icon from the Advanced Settings menu to show the Advanced Settings wi...

Page 106: ...click Maintenance Information from the Tests menu The test results look something like the example figure below If the indication NG appears for any item consult a FURUNO agent or dealer To close the...

Page 107: ...for use in research surveys Do not use this mode in normal use Echo data is output from the NMEA port baud rate bps 38400 57600 or 115200 however navigation data cannot be received Output Data Where T...

Page 108: ...reen location turns light blue if the button is normal Scrollwheel Push and scroll the scrollwheel The scrollwheel s on screen lo cation turns light blue if the scrollwheel is normal Trackball Roll th...

Page 109: ...f the connected monitor can display all available colors clearly Left click to change screens in the order shown below To stop the test at anytime right click Test start screen Black White Red Green B...

Page 110: ...5 MAINTENANCE AND TROUBLESHOOTING 5 12 This page is intentionally left blank...

Page 111: ...rk Off On Mark ID Setting window appears Mark Color Setting window appears Mark Width 1 4 1 Net Sensor Temp Graph Mark0 Mark15 Mark0 Transparency Off 1 4 Mode Gain Display Off On Data Position Upper L...

Page 112: ...Fish B L From 0 0 600 0ft 0 0ft Span 0 1 600 0ft 1 0ft Fish Level Weak Medium Strong Temperature Inside Outside From 20 0 110 0 F 65 0 F Span 0 1 55 0 F 1 0 F Fish Size Graph Size1 Size16 Not selecte...

Page 113: ...Level Color Bottom Color 0 63 50 Zero Line Rejection Off On Zero Line Area 4 5 9 8ft 4 5ft Zero Line Fill Off On HF Bottom Level 40 40 0 Draft 30 0 99 9ft 0 0ft Gain ADJ 50 50 0 LF Same as HF Stabi S...

Page 114: ...h display Screen1 Screen2 Screen3 Screen1 Screen2 Screen3 Screen1 Screen2 Screen3 Screen1 Screen2 Screen3 Screen4 Screen1 Screen2 Screen3 Screen4 Screen1 Screen3 Screen2 Screen4 Vertical division Hori...

Page 115: ...gle Dual frequency Discrimination 2 7 Zoom display Bottom lock expansion Bottom zoom Marker zoom Discrimination zoom 2 8 Fish size measurement Histogram 2 9 Display advance speed 7 steps Lines TX Free...

Page 116: ...50 60 Hz 5 ENVIRONMENTAL CONDITIONS 5 1 Ambient temperature 15 C to 55 C 5 2 Relative humidity 93 or less at 40 C 5 3 Degree of protection Processor transceiver unit IP22 Control unit IP22 IPx0 USB c...

Page 117: ...16 Fish size menu 4 6 main 4 6 SIZE1 SIZE3 menus 4 6 Footer 1 4 Fuse replacement 5 3 G Gain 1 16 Graphs fish size 2 13 IDENTI FISH 2 2 showing hiding 2 1 sonde graph 2 21 temp graph 2 22 H Header 1 3...

Page 118: ...thing 1 20 Sonde graph 2 21 Sounder menu HF and LF menus 4 2 main 4 2 Split screen division 1 12 Stabilization menu HF and LF menus 4 17 main 4 15 System configuration ix System menu 4 8 T Temp graph...

Page 119: ......

Page 120: ......

Page 121: ......

Reviews:

Related manuals for FSS-3BB