background image

Operating and Assembly Instructions

VC 422-610

Glass Ceramic Electric Cooktop

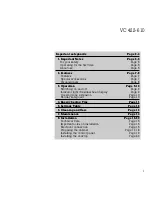
Summary of Contents for VC 422-610

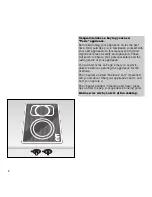
Page 1: ...Operating and Assembly Instructions VC 422 610 Glass Ceramic Electric Cooktop ...

Page 2: ......

Page 3: ... Switching on and off Page 9 Indicator light Residual heat display Page 9 Cooking zone extension Page 10 Holiday safeguard Page 10 4 Energy Saving Tips Page 11 5 Settings Table Page 12 6 Cleaning and Care Page 13 7 Maintenance Page 14 8 Installation Page 15 20 Technical Data Page 15 Important notes on installation Page 15 Electrical connection Page 16 Preparing the cabinet Page 17 18 Installing th...

Page 4: ...n These will serve to ensure your personal safety and the lasting value of your appliance You will find notes on Page 4 that you ought to observe before operating the appliance for the first time The chapters entitled Features and Operation tell you all about what your appliance can do and how you operate it The chapter entitled Cleaning and Care gives tips on how to keep your appliance looking go...

Page 5: ...Pan Size This appliance is equipped with one or more surface units of different size Select utensils having flat bottoms large enough to cover the surface unit heating element The use of undersized utensils will expose a portion of the heating element to direct contact and may result in burned clothing Proper relationship of utensil to burner will also improve efficiency b Never Leave Surface Unit...

Page 6: ...0 F The thermal protectors are rated at 939 F to cycle the burner off in order to protect the glass top Even on the highest setting it is normal for the burner to cycle on and off momentarily as the thermostat senses a high heat condition This could be caused by size of the cooking utensil composition and gauge of materials in the construction of the utensil and most importantly the amount of surf...

Page 7: ...wers or cupboards under the appliance Operation of the appliance must be discontinued immediately if improper use produces cracks breaks or flaws on the cooking surface with the result that live parts can come into contact directly or indirectly with seeping liquid or if there is a risk of injury Remove the mains plug or switch off the corresponding mains fuse Call after sales service Isolate the ...

Page 8: ... use The appliance is intended solely for household use and must not be put to any other uses Use the appliance to prepare meals only Do not use the appliance to heat up the room in which it is installed Do not use the cooking surface to store items Place a cooking vessel on the corresponding cooking zone before operating it Do not remove the cooking vessel until you have switched off the hotplate...

Page 9: ...ng zone Ø 7 1500 W converts to Ø 9 2400 W 3 Display panel with indicator light and residual heat display 4 Control knob for front cooking zone 5 Control knob for rear cooking zone You can order the following special accessory VV 400 000 Connecting trim VZ 400 700 Connecting trim with timer VD 400 000 Appliance cover 2 Features 1 2 3 4 5 ...

Page 10: ... of a holiday safeguard The appliance setting has not been luminous disc changed for over 4 hours Turn control knobs to 0 and then switch on again if required fast flashing of power cut After a power cut the appliance both control knobs stays switched off for safety reasons Turn control knobs to 0 and then switch on again if required fast flashing of faulty installation Connecting cable between th...

Page 11: ...ng use in order to maintain a constant heat the cooking zone switches on and off intermittently Switching off Fully turn the control knob to the OFF position The luminous disc goes off Indicator light Residual heat display The corresponding indicator light on the display panel lights as long as the corresponding cooking zone is switched on After switching off the cooking zone the corresponding ind...

Page 12: ...e the cooking zone is on Note do not use the roaster zone for heating up round pots or pans Switching off Fully turn the control knob to the OFF position The luminous disc goes off After switching off the cooking zone the corresponding indicator light will flash as long as the cooking zone has not cooled down sufficiently to be touched safely Note the extension will not be activated when switching...

Page 13: ...nd to that of the hotplate When buying pots pay attention to the fact that the manufacturer frequently specifies the top pot diameter which is generally larger than the diameter of the base We recommend that you use high quality pots and pans with thick flat bases For longer cooking times it is possible to switch off the cooking zone before the end of the cooking time to make use of the residual h...

Page 14: ...p sauces Steaming Vegetables potatoes fish Stewing Vegetables fruit fish Braising Goulash rolled beef steaks roasts vegetables Thawing Frozen foods 3 1 Slow cooking Rice pulses Reheating keeping warm Soup casserole vegetables in a sauce Melting Butter chocolate Thickening Egg dishes Switch to the highest cooking level in order to reach the required temperature quickly Then always switch back to th...

Page 15: ... Do not use scouring agents abrasives or chemically aggressive cleaners for example oven cleaner Do not use any nitro polishing agents for cleaning Do not use any abrasive sponges either Food with a high sugar content e g boiled over milk jam can damage the surface of your hob Immediately remove such food using the glass scraper Iridiscent discoloration can be caused by the bases of some pots Thes...

Page 16: ...Gaggenau dealer who will provide you with the address and telephone number of your nearest manufacturer s authorized service agent or contact Gaggenau USA on 800 828 9165 Specify the appliance type see rating plate Repairs may only be carried out by authorised technicians in order to guarantee the safety of the appliance Unauthorised tampering with the appliance will invalidate any warranty claims...

Page 17: ...proximity of cooking surfaces make sure that connecting cables do not come into contact with hot cooking surfaces The installation technician is responsible for the correct functioning of the appliance at the place of installation He must instruct the user on how to disconnect the appliance from electricity in an emergency After unpacking check the appliance for any transportation damage and repor...

Page 18: ...served for safety reasons see figure Only a qualified electrician should install this appliance This appliance must be hardwired The mains connecting cable must at least correspond to the type SJTO 3x16 AWG 105 C The mains connecting cable must only be purchased through and connected by an authorised specialist The appliance must be properly grounded Pay attention to the information on the rating ...

Page 19: ...of an unprotected wood or metal cabinet or A 24 inches 600 mm minimum when bottom of wood or metal cabinet is protected by no less than 1 4 inch thick flame retardant millboard covered with no less than No 28 MSG sheet steel 0 015 inch thick stainless steel 0 024 inch thick aluminimum or 0 020 inch thick copper 1 Building back wall 2 Top building cabinet 3 Cooking surface 4 Building side wall 5 Bu...

Page 20: ... is kept to between the appliances As shown in the installation sketch drill the Ø 35 mm 13 8 holes to secure the control knobs in the cabinet front If the cabinet front is thicker than 26 mm 11 32 the front must be routed from the back to max 26 mm 11 32 on an area of 80 x 310 mm 35 32 1213 64 18 min 4 9 64 max 6 13 62 30 7 64 62 46 4 64 14 11 64 3 1 2 14 31 32 19 19 64 min 1 31 32 min 1 12 32 20...

Page 21: ...ront insert control knobs into the holes secure from the rear with the nuts Take care to install control knobs in the correct order left for front cooking zone right for rear cooking zone Secure the control panel with the included nuts onto the support plate 19 Note only install control panel with appliance of the corresponding type Before connecting the appliance make sure the electricity is swit...

Page 22: ... the hob onto the worktop with silicone Turn the clamping screws under the countertop and tighten them evenly Do not tighten the clamping screws too tightly as a uniform sealing gap should be left all round Connect the appliance to the electricity Test that it functions correctly If the luminous discs behind both control knobs blink alternately check the connecting cable between the appliance and ...

Page 23: ......

Page 24: ...5551 McFADDEN AVENUE HUNTINGTON BEACH CA 92649 USA Y 800 828 9165 FAX 714 901 0979 www gaggenau usa com GAGGENAU HAUSGERÄTE GMBH CARL WERY STR 34 81739 MÜNCHEN GERMANY Y 089 45 90 03 FAX 089 45 90 23 47 ...

Reviews: