


988-00008
Gamry Instruments, Inc. © 2008
1
Reference 3000
™
Potentiostat/Galvanostat/ZRA
Quick-Start Guide
Installation Sequence is Important
for Success
The Gamry potentiostats are plug-and-play devices.
Therefore, setup is easiest if you use the sequence
below,
installing the software before the hardware
.
Setup of the Reference 3000 Potentiostat takes about
15 minutes.
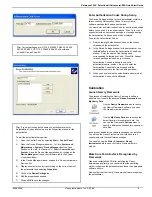
1)
Install the Gamry Framework™ software on the
PC
. In the process, you will also install the Gamry
software packages you have purchased, such as
DC105 DC Corrosion Techniques and EIS300
Electrochemical Impedance Spectroscopy
Software. See page 5.
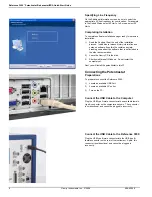
2)
Connect the Reference 3000™ Potentiostat to
the PC.
The operating system and Gamry
software will recognize the Potentiostat
automatically when you connect the USB and turn
on the power to the instrument. See page 6.
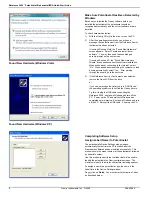
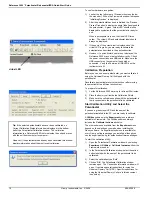
3)
Complete software setup
. You will be prompted
through this task when you restart the PC after
installing the software and hardware. See page 8.
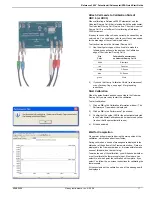
4)
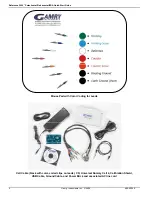
Calibrate the potentiostat
using the Universal
Dummy Cell 4 included in your Gamry shipment.
See page 9.
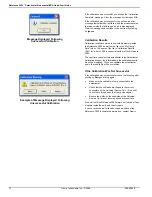
5)
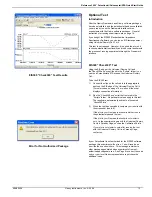
Do an optional test
using the Universal Dummy
Cell 4. See page 12.
When the first four tasks have been completed, the
Reference 3000 potentiostat is ready to use.
You can run experiments and gather data with your
Gamry software packages.
Instructions for running
experiments
are on page 16.
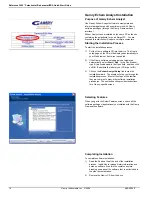
This guide also includes
instructions for installing
Gamry Echem Analyst
™
. (See page 14.) Gamry
Echem Analyst makes it easy for you to view and
manipulate experiment data.
Table of Contents
Installation Sequence is Important for Success ........... 1
Table of Contents ......................................................... 1
Cautions ....................................................................... 1
Computer and Power Requirements............................ 2
Compatibility Between Software Versions and
Potentiostats................................................................. 2
Authorization Codes and Serial Numbers .................... 2
Preparations ................................................................. 3
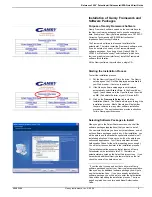
Installation of Gamry Framework and Software
Packages...................................................................... 5
Connecting the Potentiostat ......................................... 6
Completing Software Setup ......................................... 8
Calibration .................................................................... 9
Optional Tests ............................................................ 12
Gamry Echem Analyst Installation ............................. 14
Sources of More Information...................................... 15
Contacting Gamry ...................................................... 15
Reference Information................................................ 16
Procedure for Experiments .................................... 16
Grounding .............................................................. 16
Gamry File Types................................................... 16
General Instructions for Connecting Leads ........... 16
Cautions
To avoid damaging electronic
components of the Gamry Potentiostat or
your PC, observe standard precautions
against static damage.
Ground yourself before touching the
inputs of your potentiostat.
Do not place fingers or objects into the
fan openings on the rear of the
instrument.
Do not open or modify the instrument in
any fashion.


