background image

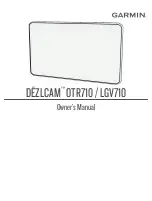
DĒZLCAM

 OTR710 / LGV710

Owner’s Manual

Summary of Contents for DEZLCAM OTR710

Page 1: ...D ZLCAM OTR710 LGV710 Owner sManual...

Page 2: ...s subsidiaries These trademarks may not be used without the express permission of Garmin Android is a trademark of Google LLC Apple iPhone and Mac are trademarks of Apple Inc registered in the U S and...

Page 3: ...om the Vault 12 Driver Awareness Features and Alerts 13 Enabling or Disabling Driver Alerts 13 Red Light and Speed Cameras 14 Advanced Driver Assistance System 14 Forward Collision Warning System 14 L...

Page 4: ...d Exit Services 32 Warning and Alert Symbols 32 Restriction Warnings 33 Road Condition Warnings 33 Alerts 34 Trip Information 34 Viewing Trip Data from the Map 34 Viewing the Trip Information Page 34...

Page 5: ...g a Route 47 Editing and Reordering Locations in a Route 48 Changing Routing Options for a Route 48 Navigating to a Saved Route 48 Editing and Saving Your Active Route 48 photoLive Traffic Cameras 48...

Page 6: ...ion Cup from the Windshield 66 Data Management 66 About Memory Cards 66 Formatting the Dash Cam Memory Card 67 Connecting the Device to Your Computer 67 Transferring Data From Your Computer 67 Disconn...

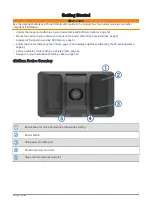
Page 7: ...Mounting Considerations page 2 Acquire GPS signals Acquiring GPS Signals page 6 Adjust the volume Adjusting the Volume page 7 and display brightness Adjusting the Screen Brightness page 8 Set up a ve...

Page 8: ...camera cannot record video 2 Press it in until it clicks Mounting Considerations Do not mount the device in a location that obscures the driver s view of the road WARNING It is your responsibility to...

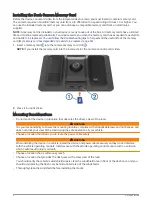
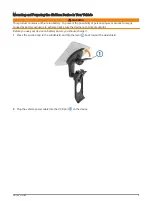
Page 9: ...al injury or product damage caused by battery exposure to extreme heat store the device out of direct sunlight Before you use your device on battery power you should charge it 1 Press the suction cup...

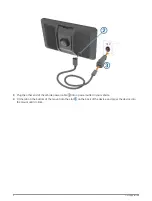
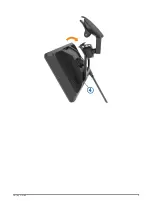
Page 10: ...end of the vehicle power cable into a power outlet in your vehicle 4 Fit the tab on the bottom of the mount into the slot on the back of the device and press the device into the mount until it clicks...

Page 11: ...Getting Started 5...

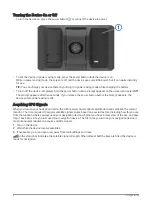
Page 12: ...s power saving mode Acquiring GPS Signals When you turn on your navigation device the GPS receiver must collect satellite data and establish the current location The time required to acquire satellite...

Page 13: ...to view the current ELD information When the icon is blue the device is connected to the Garmin eLog app Current time Select to set the time Setting the Time page 61 Battery charge level d zl app con...

Page 14: ...ll route suggestions or that you will receive the warning icons in all cases Limitations may exist in the map data such that your device cannot account for these restrictions or road conditions in all...

Page 15: ...Your Trailer Information Before you can change your trailer information you must enter a vehicle profile for a tractor Adding a Vehicle Profile page 8 When you change the trailer on your tractor you c...

Page 16: ...the device immediately starts recording video when it turns on and it continues recording until it is turned off If the memory card is full the device automatically deletes the oldest unsaved video t...

Page 17: ...r page 67 The media is sorted into several folders 100EVENT Contains videos saved automatically when the device detected an incident 101PHOTO Contains photos 102SAVED Contains videos saved manually by...

Page 18: ...p in the foreground while exporting a video The app exports the trimmed video to the Vault and saves the video to your smartphone 4 After the video export is complete select an option optional To remo...

Page 19: ...urves The device plays a tone to indicate a bend in the road Slower traffic The device plays a tone to indicate slower traffic when you approach slower traffic at a higher speed Your device must be re...

Page 20: ...es The FCWS relies on the camera to provide a warning of upcoming vehicles and as a result may have limited functionality in low visibility conditions For more information go to garmin com warnings Th...

Page 21: ...example the device alerts you if you cross some solid painted lane boundaries The LDWS feature provides alerts only when your vehicle speed exceeds 65 km h 40 mph The alert appears on the left or righ...

Page 22: ...Saving Locations The maps loaded in your device contain locations such as restaurants hotels auto services and detailed street information The Where To menu helps you find your destination by providi...

Page 23: ...number and street name To search for an address in another city enter the house number street name city and state To search for a city enter the city and state To search for coordinates enter latitude...

Page 24: ...s on the map You can scroll down to view more results Select a location to view the option menu Select to view detailed information about the location Go Select to start navigating to the location usi...

Page 25: ...nclude popular travel destinations such as gas stations restaurants hotels and entertainment venues Finding Trucking Points of Interest NOTICE You are responsible for understanding and complying with...

Page 26: ...distance or popularity Finding Tripadvisor Points of Interest 1 Select Where To Tripadvisor 2 Select a category 3 If necessary select a subcategory A list of nearby Tripadvisor points of interest for...

Page 27: ...ation Using Coordinates You can find a location using latitude and longitude coordinates 1 Select Where To Coordinates 2 If necessary select and change the coordinate format or datum 3 Select Coordina...

Page 28: ...rent location This feature is helpful if you need to tell emergency personnel your location From the map select the vehicle Finding Emergency Services and Fuel You can use the Where Am I page to find...

Page 29: ...o the saved location Select Map Symbol to change the symbol used to mark the saved location on a map 7 Edit the information 8 Select Done Assigning Categories to a Saved Location You can add custom ca...

Page 30: ...select Go To choose an alternate route select and select a route Alternate routes appear to the right of the map To edit the course of the route select Edit Route and add shaping points to the route S...

Page 31: ...reet or exit associated with the next action Route highlighted on the map Next action in the route Arrows on the map indicate the location of upcoming actions Vehicle speed Name of the road on which y...

Page 32: ...oute To view the complete list of turns and directions for the entire route select the text bar at the top of the map 2 Select a turn or direction optional Detailed information appears An image of the...

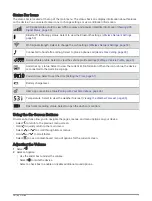
Page 33: ...truck vehicle profile the device automatically prompts you to find a truck destination such as a loading dock or truck parking You can select a suggested point on the map and then select Go to navigat...

Page 34: ...stination in your route select Add As Next Stop To add the location to the end of your route select Add As Last Stop To add the location and edit the order of destinations in your route select Add to...

Page 35: ...mation By default the device optimizes your route to avoid traffic delays automatically If you have disabled this option in the traffic settings Traffic Settings page 60 you can view and avoid traffic...

Page 36: ...avoidance without deleting it 1 Select Navigation Custom Avoidances 2 Select an avoidance 3 Select Disable Deleting Custom Avoidances 1 Select Navigation Custom Avoidances 2 Select an option To delet...

Page 37: ...s page 26 Phone Displays a list of recent phone calls from your connected phone and displays in call options while a phone call is active Using In Call Options page 40 Weather Displays weather conditi...

Page 38: ...cities along the highway For each city the map tool shows the distance to the highway exit and the services available similar to the information on highway road signs Viewing Upcoming Cities and Exit...

Page 39: ...Trailers Allowed Material Restrictions No Flammables or Explosives Allowed No Water Pollutants Allowed No Left Turn No Right Turn No U Turn Road Condition Warnings Risk of grounding Lateral wind Narr...

Page 40: ...n use the trip data map tool to show customized trip information on the map 1 From the map select Trip Data 2 Select an option Select a data field in the trip data tool and select the information to s...

Page 41: ...upcoming traffic incident appears in a panel on the right side of the map 2 Select the traffic incident to view additional details Viewing Traffic on the Map The traffic map shows color coded traffic...

Page 42: ...ne You can pair your d zlCam device with your smartphone and the d zl app to enable additional features and access live information Live Services Traffic and Smartphone Features page 36 1 From the app...

Page 43: ...show Viewing Videos and Photos on Your Smartphone Before you can view videos and photos on your smartphone you must pair your d zlCam device with the d zl app Pairing with Your Smartphone page 36 NOT...

Page 44: ...cation select View To listen to the notification select View Play The device reads the notification using text to speech technology This feature is not available for all languages To perform additiona...

Page 45: ...ty and state As you type suggestions appear below the search field 3 Select a suggested search result The app displays the location on a map 4 Select Go to start a route The d zlCam device starts navi...

Page 46: ...ble with your phone TIP If you close the in call options page you can open it again by selecting from the main menu You can also select Phone from the map To set up a conference call select the caller...

Page 47: ...iving Traffic Data Using Your Smartphone page 41 Traffic data is not available in all areas For information about traffic coverage areas go to garmin com traffic Receiving Traffic Data Using Your Smar...

Page 48: ...e list of suggested break locations The device adds the break location as the next destination on your route Starting the Break Timer The break timer starts automatically when the vehicle is moving at...

Page 49: ...to set up and configure the Garmin eLog system NOTE Until you complete the setup process the device has limited functionality Enabling the Garmin eLog App to Pair with a d zl Device 1 From the Garmin...

Page 50: ...it the information Select to delete the record Viewing and Exporting a Jurisdiction Summary The jurisdiction summary lists data for each state or province in which your vehicle has operated during eac...

Page 51: ...elect Service History 2 Select a service category 3 Select Add Record 4 Enter the odometer reading and select Next 5 Enter a comment optional 6 Select Done Adding Service Categories 1 Select Service H...

Page 52: ...nd other loyalty program information To activate loyalty program features sign in to your loyalty program account in the d zl app NOTE This feature is available only in the United States Using the App...

Page 53: ...f necessary select a city 3 Select Road Conditions Route Planner You can use the route planner to create and save a route which you can navigate later This can be useful for planning a delivery route...

Page 54: ...ute 1 Select Route Planner 2 Select a saved route 3 Select Go 4 Select the first location to navigate to and select OK 5 Select Start The device calculates a route from your current location to the se...

Page 55: ...device can display the video feed from one or more connected wireless cameras sold separately Pairing the BC 40 Camera with a Garmin Navigation Device You can pair the camera with a compatible Garmin...

Page 56: ...tended to enhance your situational awareness when used properly If used improperly you could become distracted by the display which could lead to an accident causing serious personal injury or death O...

Page 57: ...Lines 4 Use the arrows in the corners of the screen to move the ends of the white driver s side guidance line The guidance line should appear directly on top of the curb driveway or parking stall lin...

Page 58: ...le artist album station or channel Progress through the current media item Playback controls The controls change based on the source providing the media Volume controls You can use the slider to adjus...

Page 59: ...Garmin PowerSwitch device Displays the device name Displays Garmin PowerSwitch device tabs and custom layout tabs Activating a Power Switch Before you can use the Garmin PowerSwitch app to activate a...

Page 60: ...trol input select a control input 4 Select 5 Select Done Assigning a Switch to a Control Input Before you can use control input functions you must connect a control input to your Garmin PowerSwitch de...

Page 61: ...s 10 If applicable use the slider to set the brightness of lights 11 Select 12 If necessary select Add Action to add additional actions for the button You can add one action for every switch on the Ga...

Page 62: ...To add an action to the routine select Add Action and enter information about the action 4 Select Save Deleting a Routine 1 From the Garmin PowerSwitch app select Routines 2 Select on the routine you...

Page 63: ...l to a contact from the phone book of your paired smartphone Say OK Garmin call and say the contact name For example you can say OK Garmin call Mom Changing Device Settings Using Your Voice You can sa...

Page 64: ...GPS Simulator Stops the device from receiving a GPS signal and saves battery power Calculation Mode Settings Select Navigation Calculation Mode The route calculation is based on road speeds and vehic...

Page 65: ...hen the speed limit decreases Route Preview Displays a preview of the major roads in your route when you start navigation Break Planning Reminds you to take a break and displays upcoming services afte...

Page 66: ...e only when the device is connected to a wireless camera receiver cable See the owner s manual for your backup camera for detailed information about pairing cameras and camera settings Go to garmin co...

Page 67: ...g Shares anonymous data to improve the device Travel History Allows the device to store a record of the places you go This allows you to view the trip log use the Trip History feature and use myTrends...

Page 68: ...ions in the maps used by your device Keeping maps up to date helps your device find recently added locations and calculate more accurate routes Map updates are large and may take several hours to comp...

Page 69: ...tion To install all available updates select Install All To install only map updates select Map Install All To install only software updates select Software Install All 4 Read the license agreements a...

Page 70: ...of the cable connects to the USB port on your d zlCam device and the large end connects to an available USB port on your computer 4 From your d zlCam device select Tap to Connect to Computer 5 When yo...

Page 71: ...option To view the system requirements and verify the Garmin Express application is compatible with your computer select System Requirements To install on a Windows computer select Download for Windo...

Page 72: ...Device Mount and Suction Cup Removing the Device from the Mount 1 Press the release tab or button on the mount 2 Tilt the top of the device downward and lift the device from the mount Removing the Mo...

Page 73: ...sferring Data From Your Computer 1 Connect the device to your computer Connecting the Device to Your Computer page 67 Depending on your computer operating system the device appears as either a portabl...

Page 74: ...or My video recordings are choppy or incomplete For the best camera and video results use a high quality memory card with a speed rating of class 10 or higher A slower memory card may not record video...

Page 75: ...o increase the storage space for maps and other data on your device You can purchase memory cards from an electronics supplier The device supports microSD memory cards from 4 to 256 GB Memory cards mu...

Page 76: ...n must allow room for the routing and connection of all cables Mounting the Device Before you can mount the device you must select a mounting location and purchase the appropriate hardware for your mo...

Page 77: ...Opening the Front Cover You must open the front cover to make electrical connections 1 Lift the front cover latch and rotate it counter clockwise 2 Pull the front cover off of the device Appendix 71...

Page 78: ...to 30 A for each channel and a maximum of 100 A for the entire system Use 10 AWG 6 mm2 wires for accessories that use 20 to 30 A Use 12 AWG 4 mm2 wires for accessories that use 10 to 20 A Use 14 AWG...

Page 79: ...ly each time you start your vehicle The control terminals detect a signal from 3 3 V to 18 V You can configure output functions with the Garmin PowerSwitch app Connect the control wire from the contro...

Page 80: ...re turned on and within range Garmin PowerSwitch Specifications Dimensions D x W x H 75 x 125 x 32 mm 2 95 x 4 92 x 1 26 in Operating temperature range From 25 to 85 C from 13 to 185 F Wireless freque...

Page 81: ...tputs turn back on when the device detects more than 12 V of power Verify that all electrical connections are secure and will not come loose while operating the vehicle Verify that each connected acce...

Page 82: ...support garmin com GUID ABAF6DFB E932 4604 8ED5 926EAB8D964C v1 July 2022...

Reviews: