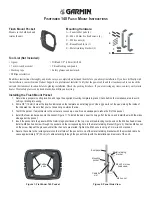
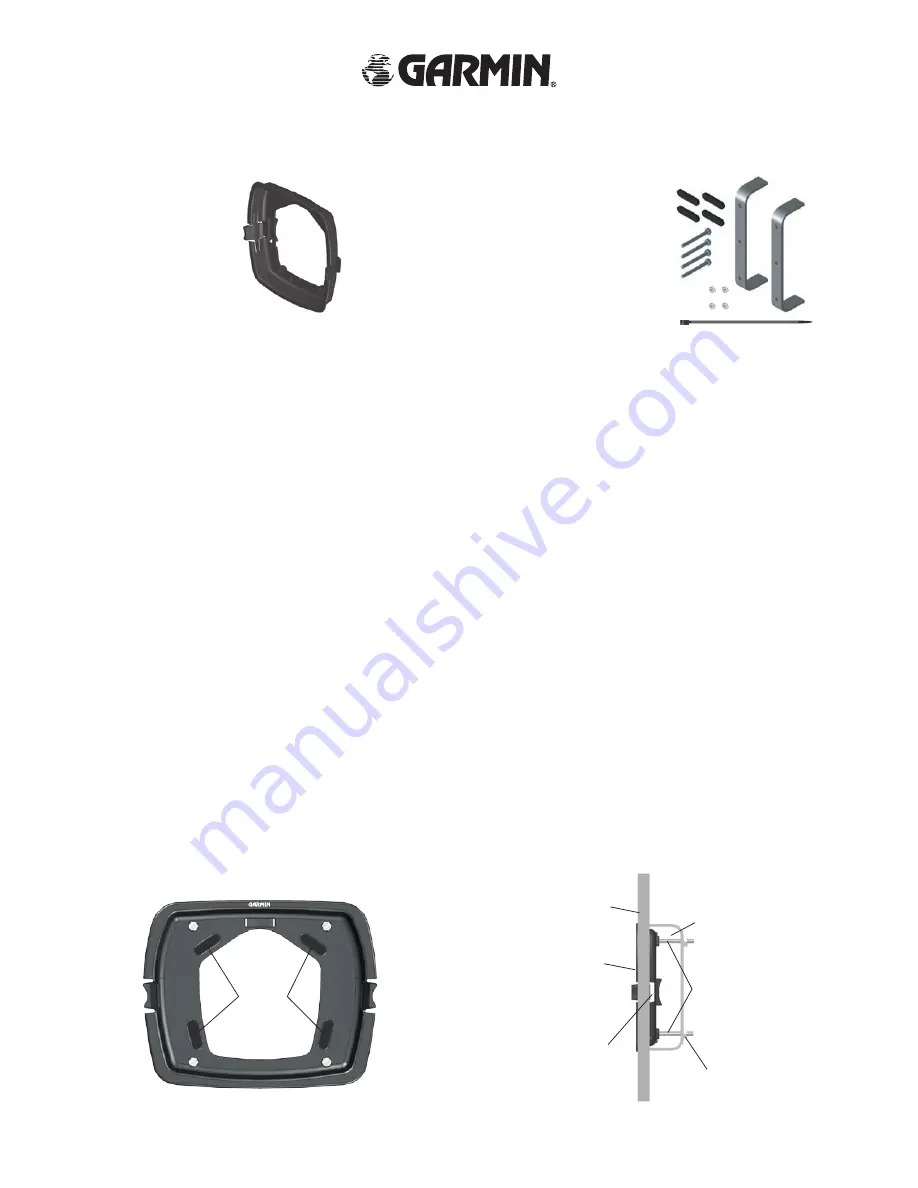
Mounting Hardware:
A—Foam rubber pads (4)
B—M4 x 40 mm hex head screws (4)
C—M4 hex nuts (4)
D—Reusable cable tie (1)
E—Metal retaining brackets (2)
Read these instructions thoroughly, and make sure you completely understand them before you attempt installation. If you have difficulty with
the installation, contact Garmin Product Support or a professional installer. Verify that the power cable and the transducer cable can reach the
unit and the transducer location before beginning installation. Check the packing list above. If you are missing any items, contact your Garmin
dealer. Wear safety glasses and a dusk mask when drilling and cutting.
Installing the Flush Mount Pocket
1. Determine a proper mounting location, and tape the supplied mounting template in place. Check behind the installation area to avoid
cutting or drilling into wiring.
2. Drill a 3/8" (10 mm) hole at the location indicated on the template as a starting point. Use a jig saw to cut the panel along the inside of
the indicated line. Be sure that your cut does not go outside the line.
3. Test fit the pocket. If adjustments to the cutout are necessary, use a file and sandpaper to refine the fit of the pocket.
4. Install the foam rubber pads onto the pocket (Figure 1). To install the pads, peel the lining off of the back, and install them with the sticky
side against the pocket.
5. Insert the pocket into the panel with the Garmin logo positioned at the top. Use a thread-locking compound on the M4 hex head screws.
Install a M4 hex head screw through the pocket and the corresponding hole in the metal retaining bracket (Figure 2). Start an M4 hex nut
on the screw. Repeat the process until all four hex nuts are started. Tighten the M4 hex nuts using a 7 mm wrench or socket.
6. Secure the cable to the rectangular slot on the left side of the pocket or one of the metal retaining brackets with the provided cable tie.
Leave approximately 18" (50 cm) of cable extending through the pocket to help with the installation and removal of the unit.
Flush Mount Pocket:
Mounts to the bulkhead and
retains the unit.
Tool List (Not Included):
• Jig saw
• 7 mm wrench or socket
• Masking tape
• Phillips screwdriver
• Drill and 3/8" (10 mm) drill bit
• Thread locking compound
• Safety glasses and dust mask
F
ISHFINDER
140 F
LUSH
M
OUNT
I
NSTRUCTIONS
M4 hex nut
Metal retaining
bracket
Boat panel
M4 x 40 mm hex
head screw
Figure 2: Panel Side View
Mounting
Cable tie
slot
E
A
B
C
D
Figure 1: Fishfinder 140 Pocket
Rubber
pads