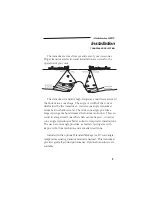
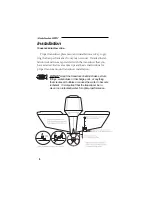
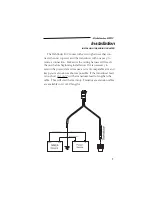
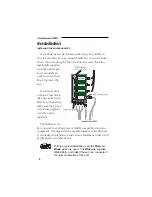
background image

Owner’s Manual

Summary of Contents for Fishfinder 240 Blue

Page 1: ...Owner s Manual...

Page 2: ...me to read this Owner s Manual and learn the operation of your new unit This will help ensure that you get the most from your new unit If you encounter a problem or just have a question contact our Pr...

Page 3: ...lush Mounting the unit 10 Testing the installation 11 UNIT OPERATION Describing the display 12 The Adjustment Bar 13 Range 14 Zoom 14 15 Gain 15 SETUP MENU Chart 17 19 Tools 20 21 Numbers 22 23 Alarms...

Page 4: ...olling Motor Mount w depth temp 010 10105 00 Plastic Transom Mount w depth 010 10106 00 Plastic Transom Mount w depth speed temp 010 10107 00 Bronze Thru Hull w depth 010 10118 00 Plastic Transom Moun...

Page 5: ...bottom through a transducer that is mounted below the waterline When the sound waves make contact with the bottom a fish or some type of underwater object the sound is reflected back toward the trans...

Page 6: ...hruTM technology the Fishfinder 240 can display more than just the thermocline and structure the unit displays fish in and below the thermocline trees brush and deadfall like you have never seen befor...

Page 7: ...ide cone angle provides a large viewing area but decreases the bottom resolution This can result in a large dead zone where fish cannot be seen A narrow cone angle transducer is better suited to deep...

Page 8: ...ted Below are some tips and basic instructions for proper transom mount transducer installation DO NOT mount the transducer behind strakes struts fittings water intake or discharge ports or anything t...

Page 9: ...it before beginning installation If it is necessary to extend the power data wires use a wire of comparable size and keep your extension as short as possible If the transducer lead is too short DO NOT...

Page 10: ...not have a fuse block the unit can be wired directly to the battery Make sure the 2 Amp in line fuse supplied with the unit is installed The fishfinder can be connected to another piece of NMEA compat...

Page 11: ...ehind the unit for cable clearance 2 Mark and drill the four mounting holes for the fasteners you are using not included 3 Secure the mount to the surface using the appropriate fasteners 4 Slip the un...

Page 12: ...hole 2 After carefully marking these locations drill the mounting holes using either a 6mm or 15 64 drill 3 Using a 1 7 8 hole saw cut the center relief 4 Using M5 screws secure the unit to the mounti...

Page 13: ...tom Verify that the unit is not in the simulator mode If the unit is in the simulator mode make sure that the transducer is con nected to the wiring harness To test the transducer installation gradual...

Page 14: ...de of the display Message and Alarm Icons display along the bottom If the unit is unable to track the bottom the digits in the depth window will flash on and off to alert the user that the unit is not...

Page 15: ...the highlight white bar over the desired selection using the R or L key and the current setting will be displayed in the highlight To immediately change the setting press the U or D arrow key If you w...

Page 16: ...ghlight over the Range field on the adjustment bar and press the U or D arrows to change the selection Zoom The Zoom Adjustment is used to select a zoom scale or to split the display To change the zoo...

Page 17: ...nge bar will be displayed on the right side of the screen This bar shows the position of the zoomed view relative to the full range To allow the unit to automatically track the current bottom informat...

Page 18: ...ess the Setup Menu press the Sbutton on the face of the unit The first time that the Sbutton is pressed the setup page will be displayed with the Chart tab highlighted in black Pressing the UorDarroww...

Page 19: ...ysuspendedunderwaterobject ToselecttheFish Symbolsfieldfromthe Chart setupmenu presstheRarrowkeyto movethehighlighttotheselectionfields UsetheUorDarrowtoplace thehighlightoverthe FishSymbols field and...

Page 20: ...eature To change the Whiteline setting press the S key Press the R key to place the highlight on the selection fields highlight the Whiteline field and press E Choose the desired setting and press E t...

Page 21: ...to display four different ways as an Overlay in the Corners with No Overlay or with No Scale To change the depth scale place the highlight over the Scale field and press E Select the display choice an...

Page 22: ...ects To change the Depth Line set ting press the S key to acti vate the setup menu Highlight the Depth Line field and press E Choose the desired setting and press E to accept the selec tion To change...

Page 23: ...if noise is present Flasher With the flasher feature active a graphic flasher represen tation will display on the right side of the screen This graphic representation operates and dis plays structure...

Page 24: ...all numbered infor mation in Normal or Large numbers To select the setting that you desire highlight the Number Size field and pressE Press the U or D key to highlight the setting of your choice then...

Page 25: ...ect Hide in the Temperature field To display the temperature select Show in the Temperature field Speed If equipped with a speed capable transducer the unit will Auto sense the speed capable transduce...

Page 26: ...dium and large or large only To select an alarm highlight the Fish Alarm field and press E Choose the desired setting and press E again to accept the selection Shallow W Water The Shallow Water Alarm...

Page 27: ...ou have entered the correct depth press E to save the change Battery V Voltage The Battery Voltage alarm can be set to warn you when the battery is reaching a critical state of discharge To activate t...

Page 28: ...ge the Contrast high light the Contrast Adjustment Slider and press E Using the R and L arrows adjust the contrast to the desired level Press E to accept the change Beeper The Beeper field contains th...

Page 29: ...te the NMEA output select On in the NMEA field Language The unit can be configured to display in nine different lan guages including English Danish Finnish French German Italian Portuguese Spanish Swe...

Page 30: ...the user to offset the surface reading for the depth of a keel Enter a posi tive number to offset a keel It is also possible to enter a negative to compensate for a large vessel that may draw several...

Page 31: ...ration process A window will be displayed that instructs the user to run the boat to a safe cruis ing speed make note of the speed stop the boat and pressE At this point another window will be display...

Page 32: ...th The Depth field can be configured to display in Feet ft Meters mt or Fathoms fa To select a unit for display place the highlight on the Depth field and press E Use the Uor Darrows to make a selecti...

Page 33: ...nsducer the unit can display the boat s speed The unit can be configured to display in nautical miles per hour kt kilometers per hour kh or miles per hour mh To change the speed unit high light the Sp...

Page 34: ...y highlight Setup Only and press E To remem ber the Setup Menu and Adjustment Bar items high light All and press E Factory S Setup To restore the factory settings highlight the Factory Setup button an...

Page 35: ...trikes an under water object such as the bottom structure or a fish sound is reflected back to the transducer where the information is received and sent to the unit to be processed and displayed The u...

Page 36: ...e of the transducer and the water depth Using G s standard 20 transducer the coverage is approx imately 1 3rd of the water depth As shown in Example 1 the coverage area at a 30 foot depth is approxima...

Page 37: ...ime but can not determine exactly where the return originated from Example 2 illustrates how the transducer looks at the underwater structure While it appears that the fish is directly below the tree...

Page 38: ...hiteline function to make this information easier to distin guish When viewing the display without the whiteline activat ed the bottom return is black While you can determine the bottom type the black...

Page 39: ...see through thermoclines and helps locate fish where they live and fish love the thermocline A rough definition of a thermocline is a break in water where the water temperature changes faster than th...

Page 40: ...key to proceed The unit will display a random bot tom scene and the unit can be con trolled just as if it were on the water The unit can be configured to act as if a variety of transduc ers are instal...

Page 41: ...15 C to 70 C Waterproof Waterproof to 1 meter for 30 minutes Power Input 10 to 15 VDC with High Voltage Protect Usage 10 watts maximum Nominal 12VDC 0 8 Amps Performance Sonar Power Output 400 Watts...

Page 42: ...ages There can be several messages that relate to an icon Memory ROM Failed Unit Needs Repair Memory RAM Failed Unit Needs Repair Transducer Disconnected Sonar Turned Off Stored Settings Lost Factory...

Page 43: ...ver Use alcohol or a mild cleaner that will not attack the surface of the cover DO NOT USE paint thinner or harsh solvents as these may damage the Protective Front Cover After the inside of the cover...

Page 44: ...4 B Back light 12 Battery Voltage Alarm 25 Battery Voltage 22 Beeper 26 Bottom Types 38 C Calibrate Speed 29 Calibration 28 Chart 17 Contrast 26 D Deep Water Alarm 25 Depth Line 20 Depth 30 F Factory...

Page 45: ...works 3 I Installing the Wiring Adapter 7 8 K Keel Offset 28 M Memory 32 N NMEA Output 27 Noise Reject 21 Notes 45 46 Numbers 22 23 O On the Water 33 Optional Transducers 2 R Range 14 Remember 32 S Sc...

Page 46: ...eed 31 Surface Mounting 9 System 26 T Temperature 30 Testing the Installation 11 Thermocline 4 37 Tools 20 Transducer Coverage 34 Transducer Installation 6 Transducer Selection 5 U Understanding the D...

Page 47: ...Notes 45 2...

Page 48: ...Notes 46 2...

Page 49: ...IGHTS WHICH MAY V ARY FROM STATE TO STATE IN NO EVENT SHALL GARMIN BE LIABLE FOR ANY INCIDEN TAL SPECIAL INDIRECT OR CONSEQUENTIAL DAMAGES WHETHER RESULTING FROM THE USE MISUSE OR INABILITY TO USE THI...

Page 50: ...151st Street Olathe KS USA 66062 Garmin Europe Ltd Unit 5 The Quadrangle Abbey Park Romsey UK S051 9AQ Garmin Asia Corp 3F No 1 Lane 45 Pao Hsing Road Hsin Tien Taipei Taiwan R O C Part Number 190 00...

Reviews: