

RADIO CONTROLLED CLOCK WITH TEMPERATURE
Model:
GARNI 335 Arcus
USER MANUAL
Thank you for purchasing this delicate radio controlled clock with temperature. Utmost care has
gone into the design and manufacture of the clock. This manual is used for DCF and MSF version.
Please read the instructions carefully according to the version you purchased and keep the manual
well for future reference.
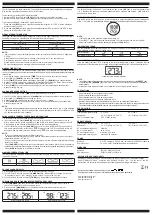
MAIN FEATURES
WEATHER STATION
1
4
2
3
DC 4.5V
300mA
5
13
12
14 15 16
17
18
6 7
8
9 10 11
19
1.
[ SNOOZE ]
key
- Stop the current alarm when it is sounding and enter into snooze mode.
2.
[ REVERSE ]
key
- Press it to reverse the projected data.
3.
PROJECTOR
- Project the time and indoor/outdoor temperature ( switch automatically between indoor and
outdoor temperature in every 5 seconds. )
4.
LCD
display
5.
[ TIME ]
key
-Press it to switch between Month/Date and alarm time mode.
-Press and hold it for 2 seconds to enter normal time setting.
-In normal time setting, press it to step the setting mode.
6.
[ ALARM
]
key
-In normal time display, press it to turn on/off ALM 1 & ALM 2.
-In ALM 1 / ALM 2 mode, press it to turn on/off alarm and pre-alarm function.
-Press it to stop the current alarm when the bell is ringing and turn off the alarm and snooze
function.
-In alarm time mode, press and hold it for 2 seconds to enter alarm time setting.
-In alarm time setting, press it to step the setting mode.
7.
[ UP ]
key
-In setting mode, press it to increase the setting values.
-In normal time mode, press it to switch among Channel 1, 2 and 3.
8.
[
DOWN ]
key
-In setting mode, press it to decrease the setting values.
-In normal time mode, press it to switch among 12/24 hour format.
9.
[
LOOP ]
key
- Press the
[
LOOP ]
key to turn on or turn off the backlight colour change
.
10.
[
RAINBOW ]
key
- Turn off
the LOOP function and press
[
RAINBOW ]
key, the backlight will change its colour
in this sequence: white > red > orange > yellow > green > cyan > blue > purple.
11.
[
TUNE ]
key
- Turn off
the LOOP function and press
[
TUNE ]
key, the backlight will display 256 colours.
12.
FOCUS
knob
- Adjust the focus of the projected data.
13.
[
MAX/MIN ]
key
- Press it to check the minimum and maximum temperature records.
14.
[
RCC ]
key
- Press it to turn on/off the RC signal reception.
15.
°C/°F
key
- Press it to switch between Celsius and Fahrenheit.
16.
[
RESET ]
key
- Press it to reset all values to default values.
- In case of malfunction, the unit may need to be reset.
17.
[
OFF / LO / HI ]
slide switch
- Slide to the
[ HI ]
position for the brighter backlinght.
- Slide to the
[ LO ]
position for the dimmer backlinght.
- Slide to the
[
OFF ]
position to turn off both backlight function and projection, when press
[
SNOOZE ]
key, the backlight and projection will light up for 5 seconds.
18.
DC
jack
19.Battery door
- Accommodates lithium battery CR2032 for back-up.
TRANSMITTER
1.
LED
indicator:
- Flashes when the remote unit transmits a reading.
2. Wall mounting holder
- Use it to support the transmitter on the wall
.
3.
[
RESET
]
key
- Press it to restart the transmitter.
4.
[
CHANNEL
]
slide switch
- Assign the transmitter to Channel 1, 2 or 3.
5. Battery compartment
- Accommodates 2 x AA size batteries.
BEFORE USING THE TRANSMITTER
1. Remove the battery door.
2. Insert 2 x AA size batteries into the battery compartment. Make sure you insert them the right
way according to the polarity information marked on the battery compartment.
3. Replace the battery door.
NOTE:
- Once the channel is assigned to one transmitter, you can only change it by removing the
batteries or resetting the unit.
- Avoid placing the transmitter in direct sunlight, rain or snow.
POWER UP WEATHER STATION
1. Plug the adaptor into the DC jack.
2. Press
[
RESET ]
key to re-start the clock and it will synchronize the channels of transmitter automatically.
NOTE:
- If no signals are received or the transmission is interfered, “--” will appear on the LCD.
- Position the receiver and transmitter within the effective transmission range: 30m in usual
circumstances.


