background image

80021997 Ver. B, 2017-04 


DU-WA-0016-01 Rev B 4/18/17 GCX Corp Page 1 of 4   
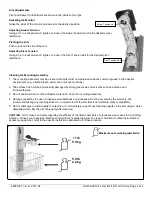
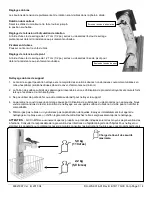
Tighten Knob 

3875 Cypress Drive, Petaluma, CA 94954  800.228.2555  707.773.1100 Fax 707.773.1180  www.gcx.com


GCX Mounting Assembly Installation Guide


M-Series Wall Mount Kit for Welch Allyn® Connex® VSM 6000 Series 
and VSM 300 Series Monitors 


The purpose of this guide is to describe installation of the Wall Mount Kit. 
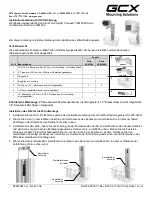
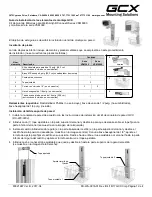
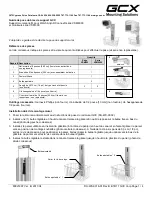
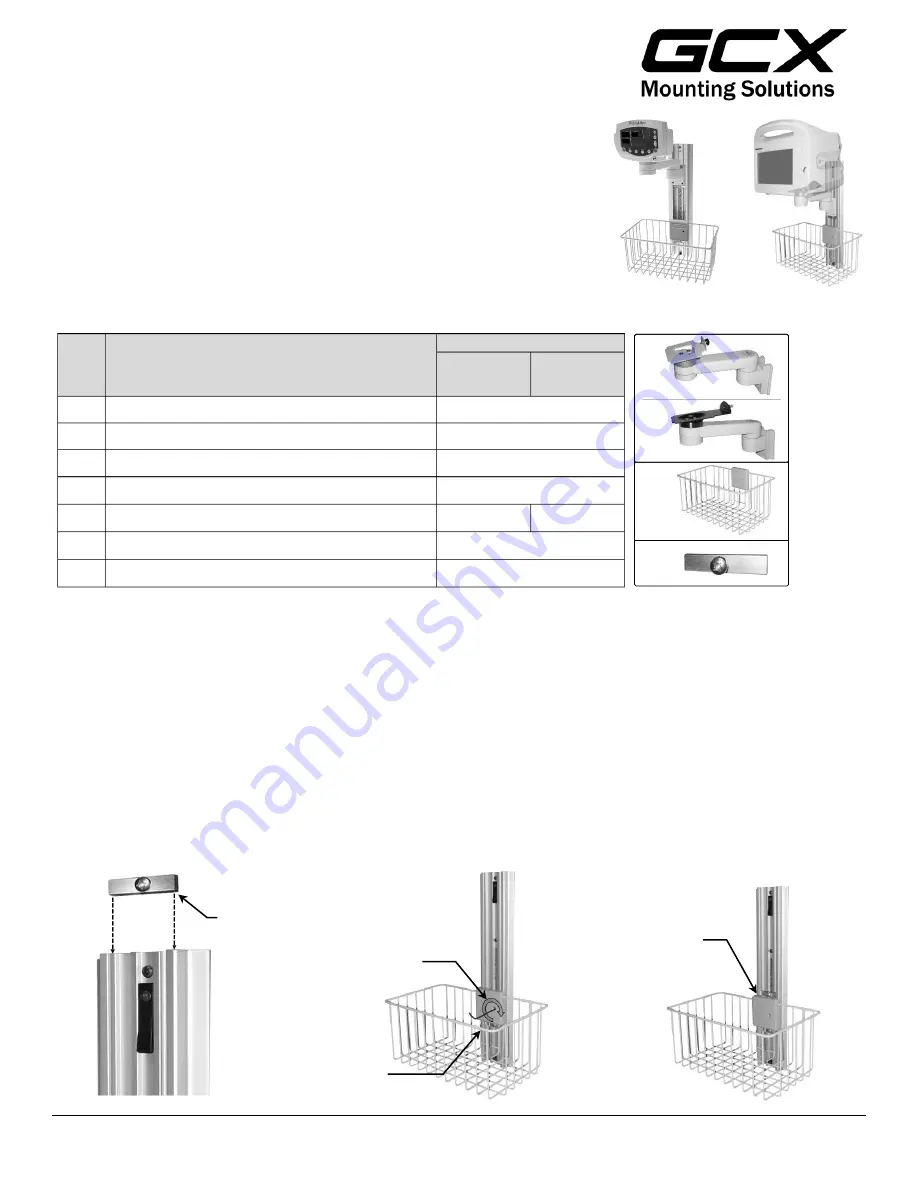
 

Parts Reference 

The parts list below includes parts and hardware that will be used in this installation procedure (hardware not shown).  


Tools Required: 

Phillips screwdriver (not provided), 1/2 in. socket wrench (not provided), 1/8 in. hex wrench (provided). 

 
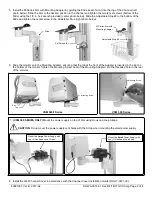
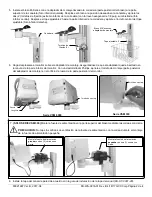
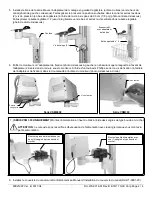
Installing the Wall Mount Kit 

1.  Install the Wall Channel in accordance with the 

GCX Wall Channel Kit Installation Instructions (DU-WC-0002).


2.  Insert one (1) Adjustable Stop in the top of Channel and let it slide to rest against the Fixed Stop at bottom of the 

Channel (left photo below). 


3.  Install the Utility Basket by inserting the Slide (on the back of the Basket) into the top of the Channel and sliding the 

Basket to the desired mounting position (center photo below). Using the 1/8 in. hex wrench, tighten the Set Screw to 
secure the Basket in position. Slide the Adjustable Stop up the Channel to the bottom of Basket Slide and tighten the 
center screw in the Adjustable Stop.  


4.  Insert the remaining Adjustable Stop in the Channel and let it slide to the top of the Basket Slide (right photo below). 


Adjustable Stop #2 

Adjustable Stop 

 Adjustable Stop #1 

Tighten Set Screw 

Item #   Description 

Quantity 

VSM300 

Series 

VSM6000 

Series 

1  

Wall Channel Kit, 19” (includes instructions – not shown) 

 M-

Series Arm with Mounting Adapter, 8” 

 Utility Basket 

 Adjustable Stop 

18” Strap, Hook and Loop (not shown) 

1/8” Hex Wrench (not shown) 

Wall Channel Cover, 16” (includes instructions – not shown) 


VSM 300 

VSM 6000 

Summary of Contents for M Series

Page 1: ...annel and let it slide to rest against the Fixed Stop at bottom of the Channel left photo below 3 Install the Utility Basket by inserting the Slide on the back of the Basket into the top of the Channe...

Page 2: ...he tab at the front of the Adapter is inserted in the slot on the bottom of the monitor Tighten the Mounting Screw rear of the Mounting Adapter into the threaded hole in the rear of the monitor 8 Inst...

Page 3: ...permanently damaged by strong chemicals and solvents such as acetone and trichloroethylene 3 Do not use steel wool or other abrasive material to clean the mounting assembly 4 Damage caused by the use...

Page 4: ...personnel or a Biomedical engineer should attach or remove the device from the wall mount WARNING Personal patient injury risk Any modification made to a Welch Allyn mounting solution removes Welch A...

Page 5: ...n Korb indem Sie die F hrung an der R ckseite des Korbs an der Oberseite des Kanals einf hren und den Korb zur gew nschten Befestigungsposition schieben Foto in der Mitte unten Ziehen Sie die Feststel...

Page 6: ...oben wird Setzen Sie die Befestigungs schraube an der R ckseite des Befestigungsadapters in die Gewindebohrung an der Monitorr ckseite ein und ziehen Sie sie mit einem Phillips Kreuzschlitzschraubendr...

Page 7: ...n Besch digung der Halterungsoberfl che 3 Verwenden Sie f r die Reinigung keine Stahlwollkissen oder andere scheuernde Reinigungsmittel 4 Sch den die durch die Verwendung nicht zugelassener Stoffe ode...

Page 8: ...g entfernen WARNUNG Verletzungsgefahr f r Personal Patienten Jede Ver nderung die an einer Befestigungsl sung von Welch Allyn vorgenommen wird entbindet Welch Allyn von der Verantwortung oder Haftung...

Page 9: ...Instale el cestillo introduciendo la gu a en la parte trasera del cestillo en la parte superior del canal y deslice el cestillo hasta la posici n deseada se muestra en la imagen central Con una llave...

Page 10: ...Phillips apriete el tornillo de montaje parte posterior del adaptador de montaje en el orificio de rosca de la parte posterior del monitor 8 Instale la tapa del canal de pared de acuerdo con la gu a...

Page 11: ...acetona o tricloroetileno 3 No utilice estropajo de aluminio ni otros materiales abrasivos para limpiar el conjunto 4 Los da os derivados del uso de sustancias o procesos no aprobados no estar n cubi...

Page 12: ...ieros biom dicos ADVERTENCIA Riesgo de lesiones personales o al paciente Cualquier tipo de modificaci n que se realice en una soluci n de montaje de Welch Allyn anula la responsabilidad de Welch Allyn...

Page 13: ...i re du panier en haut du canal et en faisant glisser le panier vers sa position de montage souhait e photo centrale ci dessous l aide de la cl six pans de 0 3 cm 1 8 po serrez la vis de pression pour...

Page 14: ...un tournevis Phillips serrer la vis de fixation l arri re de l adaptateur de fixation dans le trou taraud l arri re du moniteur photo ci dessous droite 8 Installez le couvercle du canal mural conform...

Page 15: ...ts forts tels que l ac tone et le trichlor thyl ne 3 Ne pas utiliser de paille de fer ou autre mat riau abrasif pour nettoyer le support 4 La garantie ne couvrira aucun dommage caus par l utilisation...

Page 16: ...e mural AVERTISSEMENT Risque de blessure du patient de l utilisateur Si une solution de montage Welch Allyn est modifi e la responsabilit n en incombe plus Welch Allyn et la garantie est annul e AVERT...

Page 17: ...a sulla parte posteriore del cestino nella parte superiore del canale e facendo scorrere il cestino fino alla posizione di montaggio desiderata foto al centro riportata di seguito Serrare la vite con...

Page 18: ...o un cacciavite Phillips serrare la vite di montaggio sulla parte posteriore dell adattatore di montaggio nel foro filettato sulla parte posteriore del monitor foto in basso a destra 8 Installare la c...

Page 19: ...iata da sostanze e solventi chimici aggressivi come l acetone e il tricloroetilene 3 Non usare lana d acciaio o altro materiale abrasivo per pulire il gruppo di montaggio 4 I danni causati dall utiliz...

Page 20: ...torizzato da Welch Allyn o da un ingegnere biomedico AVVERTENZA Rischio di lesioni per il personale paziente Le eventuali modifiche apportate a una soluzione di montaggio di Welch Allyn comportano l e...

Reviews: