background image

We bring good things to life.

40-Channel 2.4 GHz Caller ID Cordless
Telephone/Answering Machine
User’s Guide

27993

Summary of Contents for 27993

Page 1: ...We bring good things to life 40 Channel 2 4 GHz Caller ID Cordless Telephone Answering Machine User s Guide 27993 ...

Page 2: ...ts business and not inconsistent with FCC Rules and Regulations If these changes are expected to affect the use or performance of your telephone equipment the telephone company must give you adequate notice in writing to allow you to maintain uninterrupted service INTERFERENCE INFORMATION This device complies with Part 15 of the FCC Rules Operation is subject to the following two conditions 1 This...

Page 3: ...ERING MACHINE OPERATION 12 MESSAGES INDICATOR 12 SCREENING CALLS FROM THE BASE 12 MESSAGE PLAYBACK 12 MEMORY FULL 12 ERASING MESSAGES 13 LEAVING A MEMO 13 TELEPHONE SETUP 14 SETTING THE DISPLAY LANGUAGE 15 SETTING THE LOCAL AREA CODE 15 SETTING THE RINGERTONE 15 SETTING THETONE PULSE 16 SETTING THE FACTORY DEFAULT 16 CORDLESS PHONE BASICS 16 MAKING A CALL 16 IN USE INDICATOR 17 REDIAL 17 RECEIVING...

Page 4: ...e all of the features of this telephone you must subscribe to two separate services available from your local telephone company the standard Name Number Caller ID Service to know who is calling when the phone rings and Caller ID with Call Waiting Service to know who is calling while you are on the phone Because cordless phones operate on electricity you should have at least one phone in your home ...

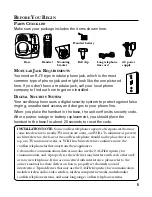
Page 5: ... of the cordless telephone should not be placed near or on top of a TV microwave ovens or VCR If such interference continues move the cordless telephone farther away from these appliances Certain other communications devices may also use the 2 4 GHz frequency for communication and if properly set these devices may interfere with each other and or your new telephone If you are concerned with interf...

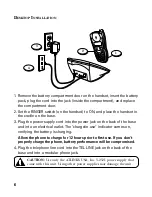
Page 6: ...power jack on the back of the base and into an electrical outlet The charge in use indicator comes on verifying the battery is charging Allow the phone to charge for 12 hours prior to first use If you don t properly charge the phone battery performance will be compromised 4 Plug the telephone line cord into theTEL LINE jack on the back of the base and into a modular phone jack CAUTION Use only the...

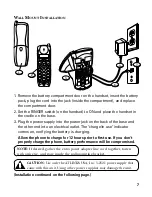
Page 7: ...e battery is charging Allow the phone to charge for 12 hours prior to first use If you don t properly charge the phone battery performance will be compromised NOTE If desired gather the extra power adapter line cord together fasten with a wire tie and store inside the wall mounting bracket CAUTION Use only the ATLINKS USA Inc 5 2521 power supply that came with this unit Using other power supplies ...

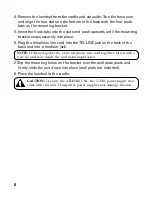
Page 8: ...ine cord into theTEL LINE jack on the back of the base and into a modular jack NOTE If desired gather the extra telephone line cord together fasten with a wire tie and store inside the wall mounting bracket 7 Slip the mounting holes on the bracket over the wall plate posts and firmly slide the unit down into place wall plate not included 8 Place the handset in the cradle CAUTION Use only the ATLIN...

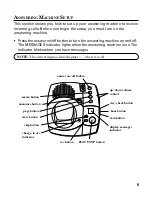
Page 9: ...MESSAGES indicator lights when the answering machine is on The indicator blinks when you have messages NOTE The answering machine displays when it is off charge in use PLAY STOP skip erase announce answerer on off page memo rev answer on off button memo button announce button erase button skip button PLAY STOP button rev button charge in use indicator page button display messages indicator up down...

Page 10: ...e press the rev review button when you plug in the answering machine and follow the voice instructions RECORDING THE OUTGOING ANNOUNCEMENT For best results when recording you should be about 9 inches from the microphone and eliminate as much background noise as possible 1 Make sure the answering machine is ON 2 Press and hold the announce button You need to hold the button until you finish the ann...

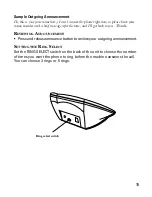
Page 11: ... the tone and I ll get back to you Thanks REVIEWING ANNOUNCEMENT Press and release announce button to review your outgoing announcement SETTING THE RING SELECT Set the RING SELECT switch on the back of the unit to choose the number of times you want the phone to ring before the machine answers the call You can choose 3 rings or 5 rings Ring select switch ...

Page 12: ...g when you activate the handset or pick up an extension phone TIP Make sure the volume on the base is set loud enough to hear your incoming calls MESSAGE PLAYBACK The messages indicator lets you know when you have messages To play messages press play stop While a message is playing you can do the following Press play stop to stop the message playback Press and release rev review to restart the cur...

Page 13: ...e until the unit beeps after messages have stopped playing To erase a message from the handset 1 Press chan ans button on the handset 2 Press play stop on the handset the 2 button 3 Press erase on the handset the 0 button to erase the message that is playing NOTE Erased messages cannot be restored Also be careful not to press the erase button as the next unheard message is playing because that mes...

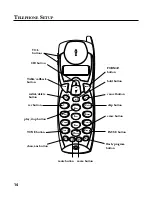
Page 14: ...ORMAT CID program callback hold delete mute mem play stop erase ans rev skip CID button TALK callback button redial delete button rev button play stop button TONE button chan ans button mute button skip button FORMAT button cancel button PAUSE button flash program button mem button VOL buttons hold button erase button ...

Page 15: ... display 2 Use the number pad to enter the area code 3 Press flash program to confirm and exit setup NOTE If you find it necessary to dial all local calls with the area codes included press and release flash program until SET AREA CODE is displayed Then enter 000 Press flash program again to confirm SETTING THE RINGER TONE 1 Press the flash program button until SET RINGERTONE shows in the display ...

Page 16: ...ur selection 3 Press flash program to confirm NOTE The default settings are English local area code ringer tone 1 and Tone CORDLESS PHONE BASICS MAKING A CALL To make a call you must Press theTALK callback button before you dial or dial the numbers and then press theTALK callback button to perform preview dialing PressTALK callback button or place the handset in the cradle on the base to hang up O...

Page 17: ...swer a call you must press theTALK callback button on the handset before speaking FLASH Use the flash program button to activate custom calling services such as call waiting or call transfer which are available through your local phone company TIP Don t use the TALK callback button to activate custom calling services such as call waiting or you ll hang up the phone VOLUME When the phone is ON pres...

Page 18: ...ing a phone conversation to mute the receiver 1 Press the hold button The display shows HOLD and the handset antenna indicator blinks To release Hold 1 Press the hold button again 2 Pick up a extension phone RINGER SWITCH The RINGER switch must be ON for the handset to ring during incoming calls PAGING THE HANDSET Press the page button on the base to locate a misplaced handset The display shows PA...

Page 19: ...hear the tone Press the flash program button to put the current person on hold so that you can answer the incoming call RECEIVING AND STORING CALLS When you receive a call the information is transmitted by the phone company to your Caller ID telephone between the first and second ring VERY IMPORTANT The Caller ID feature of this product requires a subscription to Caller ID service from your teleph...

Page 20: ...ALL ID 2 Press redial delete button again to confirm The display shows DELETED DELETING ALL RECORDS 1 Press the CID up or down arrow button until a CID record is displayed 2 Press and hold redial delete The display shows DELETE ALL 3 Press redial delete again to erase all records STORING CALLER ID RECORDS IN MEMORY 1 Press the CID up or down arrow button until the desired Caller ID record is displ...

Page 21: ...is OFF not inTALK mode 2 Use the CID up or down arrow button to display the desired Caller ID record 3 Press theTALK callback button to dial the number CHANGING THE NUMBER FORMAT The FORMAT button lets you change the format of the displayed number The available formats are as follows 7 digit 7 digit telephone number 10 digit 3 digit area code 7 digit telephone number 11 digit long distance code 1 ...

Page 22: ...o enter Bill Smith press the 2 key twice for the letter B Press the 4 key 3 times for the letter I Press the 5 key 3 times for the letter L then press the 5 key 3 times for the second letter L and press the 1 key to insert a space between the first and last name Press the 7 key 4 times for the letter S press the 6 key once for the letter M press the 4 key 3 times for the letter I press the 8 key f...

Page 23: ...shown 4 PressTALK callback The number dials automatically IMPORTANT If you make test calls to emergency numbers stored in memory remain on the line and briefly explain the reason for the call to the dispatcher Also it s a good idea to make these calls in off peak hours such as early morning or late evening CHAIN DIALING FROM MEMORY Use this feature to make calls which require a sequence of numbers...

Page 24: ...al 9 for an outside line or to wait for a computer access tone Each pause counts as 1 digit in the dialing sequence REVIEWING AND DELETING STORED NUMBERS 1 Press the mem button 2 Use the CID up and down arrow button to scroll to the desired memory location or press 0 9 3 While the entry is displayed press the redial delete button to delete the entry The display shows DELETE 4 Press redial delete a...

Page 25: ... using the handset to access the answering machine and accessing the answering machine from another phone The handset contains integrated buttons that enable you access the answering machine with the handset You can also access your answering machine from any phone that is tone dial compatible by entering a 3 digit security code after you hear the outgoing announcement A voice menu system guides y...

Page 26: ...LK call back button to speak to the person or press chan ans to stop screening the call MEMORY FULL When memory is full the system answers after 10 rings beeps and waits for you to enter the 3 digit security code If you don t enter the security code within 10 seconds after the unit beeps the phone hangs up You should erase some messages so the answering machine can record new messages NOTE The uni...

Page 27: ... turn off call screening 6 Review voice menu options 7 TIP You can bypass the outgoing announcement by pressing any numbered key on the keypad while the announcement is playing Then you can enter your security code to access the answering machine CHANGING THE SECURITY CODE The default security code for accessing the answering machine from another location is 1 2 3 You must use the handset to chang...

Page 28: ...dset to rest comfortably on top of your head and over your ear Move the microphone to approximately 2 to 3 inches from your mouth Press theTALK callback button to answer or place a call before using the headset CONNECTING THE BELT CLIP There are two slots one on each side of the handset Attach the belt clip by inserting the sides of the belt clip into the slots on the handset Slot for belt clip Sl...

Page 29: ... in the base to charge Allow the handset battery to properly charge for 12 hours prior to first use or when you install a new battery pack If you do not properly charge the phone battery performance will be compromised BATTERY SAFETY PRECAUTIONS Do not burn disassemble mutilate or puncture Like other batteries of this type toxic materials could be released which can cause injury To reduce the risk...

Page 30: ...cts on the handset and base with a soft cloth HANDSET SOUND SIGNALS Signal Meaning A long warbling tone with ringer on Signals an incoming call Three short beeps several times Page signal Single beep every 7 seconds Low battery warning DISPLAY AND CALLER ID MESSAGES The following indicators show the status of a message or of the unit ERROR Caller information has been interrupted during transmissio...

Page 31: ...call message Indicates that a new call from the same number was received more than once NO DATA No Caller ID information was received EMPTY Indicates a memory location is vacant NO CALLS Indicates no calls have been received CALL WAITING Indicates a call is waiting on the line ANSWERER REMOTE ACCESS Indicates the answering machine is being accessed remotely ANSWERING MACHINE DISPLAY MESSAGES The f...

Page 32: ...NE PULSE setting is correct but can t dial out Handset does not ring Make sure the RINGER switch on the handset is turned to ON Move closer to the base The handset may be out of range You may have too many extension phones on your line Try unplugging some phones Check for dial tone You experience Change channels static noise or fading Move closer to base handset might be out of range in and out Do...

Page 33: ...d after the first ring This message indicates either the presence of noises on the line or that an invalid message has been sent from the telephone company ANSWERING MACHINE SOLUTIONS Problem Solution Can t hear messages Adjust speaker volume beep etc Time Day setting Set the time clock stuck at 12 a m Mon Answers on 10th ring Make sure answering machine is turned on Memory may be full Incoming me...

Page 34: ...anufacturer or its authorized service agents In accordance with FCC requirements changes or modifications not expressly approved by ATLINKS USA Inc could void the user s authority to operate this product For instructions on how to obtain service refer to the warranty included in this guide or call customer service at 1 800 448 0329 Or refer inquiries to ATLINKS USA Inc Manager Consumer Relations P...

Page 35: ...set to the Handset 28 Connecting the Belt Clip 28 Cordless Phone Basics 16 Cordless Phone Solutions 32 D Deleting All Records 20 Deleting Records 20 Deleting the Current Record 20 Desktop Installation 6 Dialing a Caller ID Number 21 Dialing a Stored Number 23 Digital Security System 5 Display and Caller ID Messages 30 E Erasing Messages 13 F FCC Registration Information 2 Flash 17 G General Produc...

Page 36: ... the Handset 26 Service 34 Setting the Display Language 15 Setting the Factory Default 16 Setting the Local Area Code 15 Setting the Ring Select 11 Setting the RingerTone 15 Setting the Speaker Volume 10 Setting theTone Pulse 16 Setting the VoiceTime Day Stamp 10 Storing a Name and Number in Memory 23 Storing a Redial Number 20 Storing Caller ID Records in Memory 20 T Telephone Setup 14 TemporaryT...

Page 37: ...onks PA 17573 8419 Name_______________________________________________________ Address_____________________________________ Apt ____________ City ________________________State________ ZIP_________________ Daytime Phone Number _______________________________ 5 00 ____________________________________________________________________ Authorized Signature My card expires Copy the number above your name...

Page 38: ...limited to lightning damage Product Registration Please complete and mail the Product Registration Card packed with your unit It will make it easier to contact you should it ever be necessary The return of the card is not required for warranty coverage Limitation of Warranty THE WARRANTY STATED ABOVE ISTHE ONLY WARRANTY APPLICABLETOTHIS PRODUCT ALL OTHER WARRANTIES EXPRESS OR IMPLIED INCLUDING ALL...

Reviews: