background image

DVD User’s Guide

GE1100P

We bring good things to life.

Summary of Contents for GE1100P

Page 1: ...DVD User s Guide GE1100P We bring good things to life ...

Page 2: ...RNING To reduce the risk of fire or shock hazard do not expose this DVD player to rain or moisture TO REDUCE THE RISK OF ELECTRIC SHOCK DO NOT REMOVE THE COVER OR BACK NO USER SERVICEABLE PARTS ARE INSIDE REFER SERVICING TO QUALIFIED SERVICE PERSONNEL CAUTION THIS PRODUCT UTILIZES A LASER USE OF CONTROLS OR ADJUSTMENTS OR PERFORMANCE OF PROCEDURES OTHER THAN THOSE SPECIFIED HEREIN MAY RESULT IN HA...

Page 3: ...tem NavigationTool 14 Playing DVDs 15 Loading and Playing a DVD 16 DVD Playback Features 17 Chapter Scan 17 Fast Motion Playback Picture Scan 17 Freeze Frame and Frame Advance 17 Slow Motion Playback In Freeze Frame Mode 17 Repeating Play 18 Selecting Specific Scenes on a DVD 18 Selecting aTitle Number 18 Selecting a Chapter Number 18 Using the ElapsedTime 19 Selecting aTitle Using theTITLE Button...

Page 4: ...ks 31 Repeating Play 32 Selecting a SpecificTrack 32 Program Playback 33 Changing the Audio Channel Output 33 Program Playback With Playback Control 34 Deleting ProgrammedTracks 34 Setting Up the Rating Level 36 Unlocking the Rating Level 37 Selecting the Initial Audio Language 37 Selecting the Initial Subtitle Language 38 Selecting theTV Screen Setting 40 Turning the On Screen Messages Feature On...

Page 5: ... that you can play on your player DVDs Audio CDs and Video CDs So you don t have to read all of the book at once Read the First Two Sections First The first two sections BeforeYou Begin and Connections include key information to get you started in the right direction I suggest that you read at least these two sections before you do anything then you can go back to the sections that discuss the fea...

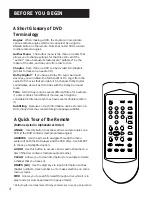
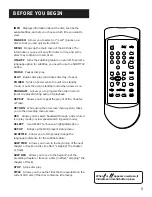
Page 6: ...s with the Dolby Surround mark Title A DVD may contain several different titles for example if a disc contains four different movies each might be considered a title and each may have several Chapters within it Subtitling Because so much information can be stored on a DVD many discs may contain foreign language subtitles A Quick Tour of the Remote Buttons Listed in Alphabetical Order ANGLE Use thi...

Page 7: ...pter orTrack RETURN While using the on screen menu system takes you to the preceding menu screen REV Allows you to search backward through a disc while it is in play mode or slow speed search in pause mode SELECT Use SELECT to choose a highlighted option SETUP Brings up the DVD player s Setup menu SUBTITLE Allows you to temporarily change the language preference for the subtitle feature SKIP FWD A...

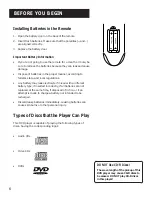
Page 8: ...ny battery may leak electrolyte if mixed with a different battery type if inserted incorrectly if all batteries are not replaced at the same time if disposed of in fire or if an attempt is made to charge a battery not intended to be recharged Discard leaky batteries immediately Leaking batteries can cause skin burns or other personal injury Types of Discs that the Player Can Play This DVD player i...

Page 9: ...o cables to the sides of the TV s back panel instead of straight down the middle after you connect your components Try not to coil any twin lead cables and keep them away from the audio video cables as much as possible Make sure all antennas and cables are properly grounded Protect Your Components from Overheating Do not block ventilation holes in any of the components Arrange the components so th...

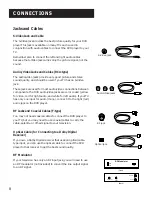
Page 10: ...d white for left audio If yourTV has only one input for audio mono connect it to the right red audio jack on the DVD player RF Jacks and Coaxial Cables F type You may not need coaxial cables to connect the DVD player to yourTV but you may need to use coaxial cables to carry the cable satellite or off air signal to your television Optical Cable for Connecting to a Dolby Digital Receiver If you own ...

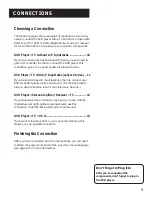
Page 11: ...acks use them to connect your DVD for better quality picture and sound For the best quality picture use the S Video input if your television has one DVD Player Stereo Amplifier Receiver TV 12 If your television has an S Video input and you have a Dolby Digital Receiver with optical type input jack use this connection to get the best quality picture and sound DVD Player TV VCR 13 If you want to inc...

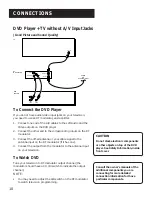
Page 12: ...he output from the modulator to the antenna input on your television To Watch DVD Tune your television to RF modulator output channel the modulator should have a CH 3 4 switch to indicate the output channel NOTE You may need to adjust the A B switch on the RF modulator to watch television programming R VIDEO AUDIO L ANT IN TV DVD PLAYER CABLE OR OFF AIR SIGNAL Audio L Video Ant In RF Out RF MODULA...

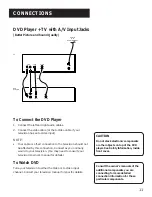
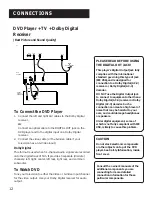
Page 13: ... should not be affected by this connection Connect as you normally would to your television You may need to consult your television s owner s manual for details To Watch DVD Tune your television to either the Video or S Video input channel Consult your television manual for specific details CAUTION Do not stack electronic components or other objects on top of the DVD player See Safety Information ...

Page 14: ...VIDEO L R VIDEO AUDIO ANT IN S VIDEO TV DVD PLAYER OR CABLE OR OFF AIR SIGNAL DIGITAL OUT OR CAUTION Do not stack electronic components or other objects on top of the DVD player See Safety Information inside front cover CONNECTIONS Consult the owner s manuals of the additional components you are connecting for more detailed connection information for those particular components PLEASE READ BEFORE ...

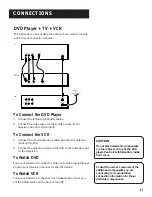
Page 15: ...enna or cable signal to the antenna input on the VCR 2 Connect the antenna output on the VCR to the antenna input on the television To Watch DVD Tune your television to either the Video or S Video input channel Consult your television manual for specific details To Watch VCR Tune your television to channel 3 or 4 depending on how you set the CH3 4 switch on the back of the VCR CAUTION Do not stack...

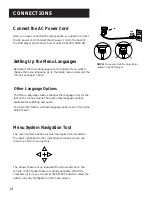
Page 16: ... have connected the components you need to connect the AC power cord Connect the AC power cord to the back of the DVD player and to an AC power outlet AC120 V 50 60 Hz 2nd 1st NOTE Make sure that the plug is fully seated in the DVD player CONNECTIONS Menu System Navigation Tool The menu system has an on screen navigation tool located in the lower right hand corner indicating which arrows you can p...

Page 17: ...o find out how to play DVDs and then you can sit back and enjoy all of the features it has to offer you Also Keep In Mind In order for some of the player s features to work the DVDs that you use must be encoded by the studios with specific information For example a disc must contain subtitles in order for the player to show them to you Regional Coding Both the DVD player and the discs are coded by...

Page 18: ...layer reads the table of contents and displays the disc s title menu if it has one Legends of Indiana Baseball Title Menu 1 High School 2 College 3 Semi Pro 4 Professional An example of a disc s title menu 4 Use the arrow buttons to point to highlight a menu item and then press SELECT to begin playing the highlighted menu item 5 Press STOP to stop playback Resume Feature When you stop disc play th...

Page 19: ... not work with all discs Freeze Frame and Frame Advance 1 Press PAUSE once to freeze playback 2 Each subsequent press of the PAUSE button advances the picture one frame at a time 3 Press PLAY to resume normal playback Slow Motion Playback In Freeze Frame Mode While the disc is in freeze frame mode you can invoke either forward or backward slow motion playback Press REV for backward slow motion pla...

Page 20: ...ars when you are in repeat mode The on screen display indicates which repeat mode you are using REPEAT CHAPTER REPEATTITLE or STANDARD PLAY The Repeat feature does not work with interactive DVDs Selecting Specific Scenes on a DVD Use the on screen display to go to a specific scene on a DVD Selecting a Title Number 1 Press the INFO button during disc playback TITLE 1 CHAPTER 5 TIME 38 20 Enter the ...

Page 21: ...unction when using a DVD without multiple title or chapter numbers Using the Elapsed Time 1 Press the INFO button during disc playback 2 Use the arrows to highlight the time value TITLE 1 CHAPTER 5 TIME 38 20 Use the arrows to highlight the time value 3 Use the digits on the remote to enter the elapsed playing time from which you want to start 4 Press PLAY to start playback at the elapsed time ind...

Page 22: ...ay Notes Not all DVDs contain multiple titles Depending on the type of DVD another menu may be displayed Using a DVD s Author Menu Each DVD is capable of having it s own menu structure which allows you to change the settings for audio subtitling and angle for that disc only In this manual we refer to this menu as the Author menu because its contents are created by the author manufacturer of the di...

Page 23: ...UDIO SUBTITLE ON OFF REPEAT SELECT REV SKIP REV SKIP FWD FWD PAUSE STOP RETURN SETUP CLEAR PLAY MARKER Subtitle button Subtitle ON OFF button Up Down arrows Make sure that the player s subtitle feature is turned on or the subtitling will not appear on screen Using the Subtitle Feature When a DVD is recorded with subtitles you can use the Subtitle feature to view the subtitles on screen The ON OFF ...

Page 24: ...e player is turned on the initialized audio language is selected If the disc does not contain the same initialized language as that of the player the default language is automatically selected Changing the Camera Angle Some DVDs are recorded using multiple camera angles Use the ANGLE button on the remote to select a different angle 1 Press ANGLE 2 Use the up down arrows on the remote to select an ...

Page 25: ...Clear button Storing a Marker During DVD Playback 1 Press the MARKER button at the point during playback that you want to mark The Marker display appears on screen MARKER PRESS SELECT TO MARK The Marker display screen 2 Press the SELECT button to place a mark You can place as many as three markers on a disc MARKER PRESS SELECT TO MARK 1 Marker 1 has been placed Playing a Marked Part 1 Press the MA...

Page 26: ...CLEAR 2 Use the arrows to highlight an existing marker 3 Press CLEAR to delete the highlighted marker Playing Karaoke Discs Use the AUDIO button and the arrows to change both the audio language and the audio output of a karaoke disc 1 Press the AUDIO button on the remote 2 Use the up down arrows change the audio language if necessary 3 Use the left right arrows to turn on or turn off the voice out...

Page 27: ...n play Audio Compact Discs as well as DVDs If you ve used a CD player before you will probably notice that your DVD player has a lot of the same features as a CD player This section gives you all the information you need to know to play Audio CDs on your DVD player ...

Page 28: ...ly into the tray with the disc s label facing up 3 Press the PLAY button to close the disc tray The DVD player reads the disc s table of contents and then begins disc playback 5 Press STOP to stop playback Audio CD Playback Features When playing audio CDs your DVD player has many of the same features that your CD player has including track skip repeat play and programmed playback Skipping Tracks T...

Page 29: ...time to resume normal playback Selecting a Specific Track 1 Press the INFO button TRACK 3 TIME 11 26 Enter the track number you want to hear 2 Use the digit buttons to enter the desired track 3 Press PLAY to begin playback Note You can also use the digit buttons on the remote to enter a track number directly If you select a number that does not exist on the disc the message NUMBER OUT OF RANGE is ...

Page 30: ...3 6 11 Use the arrow buttons to highlight and the SELECT button to choose a title chapter 4 Press PLAY to begin program playback Notes When the program is completed the disc stops and the Program Playback menu is displayed again To resume normal playback press the PROGRAM button and then press the PLAY button Deleting Programmed Tracks Press the CLEAR button in stop mode to delete tracks Note that...

Page 31: ...o CD format is similar to DVD in that Video CDs can contain movies The big difference is in the amount of information that can be stored on a single CD This section gives you all the information you need to know to play Video CDs on your DVD player ...

Page 32: ...ay The DVD player reads the disc s table of contents and then begins disc playback 4 Press STOP to stop playback If the Video CD Has Playback Control If a disc is encoded with the playback control function a menu screen appears after the disc is loaded into the player see step 3 above Pick Me Out a Winner Bobby A Pictorial History of Major League Batboys Title Menu 1 The Early Days 2 Scandal in th...

Page 33: ...P to put the player in Stop mode 2 Use the digits to enter the desired track number and then press PLAY When playback begins the disc will respond as if it is not in playback control mode Note To resume playback control mode press STOP and then press MENU Video CD Playback Features The DVD player gives you several options when playing Video CDs including skipping tracks repeat play and programmed ...

Page 34: ...O button TRACK 3 TIME 11 26 Enter the track number you want to hear 2 Use the digit buttons to enter the desired track 3 Press PLAY to begin playback Notes This feature does not work in Playback Control mode You can also use the digit buttons on the remote to enter a track number directly If you select a number that does not exist on the disc the message NUMBER OUT OF RANGE is displayed 1 2 3 4 5 ...

Page 35: ...s and Select button Note Use the Down Arrow to scroll backward through the Audio Channel Output options Program Playback Program playback lets you set up a specific order for the playback of tracks on a disc If a disc has Playback control you must bypass the playback control before you can program tracks see Bypassing Playback Control 1 Press the PROGRAM button while in stop mode to bring up the p...

Page 36: ...AY button Program Playback With Playback Control To use the Program Playback feature with discs that have Playback Control you need to bypass the Playback Control feature see Bypassing Playback Control earlier in this chapter Deleting Programmed Tracks Press the CLEAR button in stop mode when the disc is not rotating to delete programmed tracks one by one Notes All programmed tracks are deleted wh...

Page 37: ...ets you customize your DVD player by allowing you to set up a rating level select various language preferences and even adjust the player to the type of television screen you have i e wide screen To access the Setup menu press the SETUP button on the remote control ...

Page 38: ...Y ON MENU LANGUAGE ENGLISH PRESS RETURN TO EXIT Select RATING from the Setup menu 2 Use the arrows on the remote to highlight RATING and then press SELECT RATING SELECT LEVEL PRESS RETURN TO EXIT 1 KIDS TITLES ONLY 2 FORBID ADULT TITLES 3 PLAY ALL TITLES Use arrows to set the rating level 3 Use the arrows to select your preferred level and then press SELECT to set the rating RATING LEVEL IS SET AT...

Page 39: ... level Selecting the Initial Audio Language A DVD may contain the audio portion of the disc in a variety of languages Use the Audio menu to select an initial language in which you want to hear a DVD s audio 1 Press the SETUP button on the remote control 1 SETUP 2 3 4 5 6 RATING LEVEL 1 AUDIO ENGLISH SUBTITLE ENGLISH TV SCREEN 4 3 OSD DiSPLAY ON MENU LANGUAGE ENGLISH PRESS RETURN TO EXIT Select AUD...

Page 40: ...you select as your initial language in that case the disc will use its top priority language setting You can temporarily change the initial audio setting by using the AUDIO button on the remote control see DVD Playback Features Selecting the Initial Subtitle Language A DVD may contain subtitles in several languages Use the Subtitle menu to select an initial language in which you want to view subti...

Page 41: ...ay not contain the language you select as your initial language in that case the disc will use its top priority language setting Make sure that the subtitle feature is on in order to view subtitling You can temporarily change the initial subtitling setting by using the SUBTITLE button on the remote control see DVD Playback Features 1 2 3 4 5 6 7 8 9 0 POWER PROGRAM INFO 1 2 3 4 5 6 7 8 9 0 MENU TI...

Page 42: ... SelectTV SCREEN from the Setup menu 2 Use the arrows on the remote to highlight TV SCREEN and then press SELECT TV SCREEN SELECT TV TYPE AND PICTURE TYPE 4 3 4 3 16 9 PRESS RETURN TO EXIT Select aTV screen setting to match your television 3 Use the arrows on the remote to highlight a screen setting and then press SELECT 1 2 3 4 5 6 7 8 9 0 POWER PROGRAM INFO 1 2 3 4 5 6 7 8 9 0 MENU TITLE ANGLE A...

Page 43: ...ages Feature On or Off Use this feature to turn on or turn off the messages that appear on screen when you use certain features 1 Press the SETUP button on the remote control 1 SETUP 2 3 4 5 6 RATING LEVEL 1 AUDIO ENGLISH SUBTITLE ENGLISH TV SCREEN 4 3 OSD DiSPLAY ON MENU LANGUAGE ENGLISH PRESS RETURN TO EXIT Select OSD DISPLAY from the Setup menu 1 2 3 4 5 6 7 8 9 0 POWER PROGRAM INFO 1 2 3 4 5 6...

Page 44: ...CT OSD DISPLAY ON OFF PRESS RETURN TO EXIT Select aTV screen setting to match your television 3 Use the arrows on the remote to highlight ON or OFF and then press SELECT Changing the Menu Language Use this feature to change the language for the on screen menu system for the player and for discs 1 Press the SETUP button on the remote control 1 SETUP 2 3 4 5 6 RATING LEVEL 1 AUDIO ENGLISH SUBTITLE E...

Page 45: ...ghlight the desired language for the on screen menu system and then press SELECT MENU LANGUAGE PREFERENCE FOR DISC ENGLISH FRANCAIS ESPANOL OTHER PRESS RETURN TO EXIT Select a new menu language for discs 4 Use the arrows on the remote to highlight the desired language for disc menus and then press SELECT If the language you want is not listed select OTHER enter the appropriate code from the list o...

Page 46: ...278 Korean 7579 Kurdish 7585 Laothian 7679 Latin 7665 Latvian Lettish 7686 Lingala 7678 Lithuanian 7684 Macedonian 7775 Malagsy 7771 Malay 7783 Malayalam 7776 Maltese 7784 Maori 7773 Marathi 7782 Moldavian 7779 Mongolian 7778 Naru 7865 Nepali 7869 Norwegian 7879 Occitan 7967 Oriya 7982 Oromo Afan 7977 Panjabi 8065 Pashto Pushto 8083 Persian 7065 Polish 8076 Portuguese 8084 Quechua 8185 Rhaero Roma...

Page 47: ...on of the front panel and front panel display the back panel and some basic use and care guidelines Troubleshooting This short troubleshooting section will hopefully solve any problems that you might encounter with your DVD player Limited Warranty The Limited Warranty includes information on getting service for you DVD player ...

Page 48: ...lay 6 VOLUME Use to adjust headphone volume level 7 PHONES Headphone jack 8 Front Panel Display See following page for details 9 OPEN CLOSE Press to open and close the disc tray 10 PAUSE Pauses disc play also use for frame advance 11 SKIP FWD Allows you move to the beginning of the next chapter or track on a disc in effect skipping the chapter or track 3 Front Panel Messages The following messages...

Page 49: ...tes time i e elapsed time of playback 11 Shows the chapters or track numbers on a disc 12 Indicates that a disc contains 15 or more chapters or tracks If the 15th or subsequent chapter or track is played this indicator is lit REFERENCE 1 DIGITAL OUT Use to connect to a Dolby Digital receiver for best sound quality 2 AUDIO R L Connect to the audio inputs on your television 3 VIDEO Connect to the vi...

Page 50: ...you power up Cannot copy discs to videotape This player is equipped with anticopy protection Common Problem Solution No Power Insert the power plug securely into the outlet Power turns itself off The power is automatically turned off after approx 30 minutes have elapsed in the stop mode auto power off feature Turn power back on Play fails to start even Ensure that the disc is installed with the la...

Page 51: ...Exterior influences such as lightning and static electricity can affect normal operation of this player If this occurs turn the player off and on again with the POWER button or disconnect and then reconnect the AC power cord to the AC power outlet The player will operate normally Be sure to remove the disc and turn off the player after use Disconnect the AC power cord from the AC outlet when you d...

Page 52: ... How you get service Call 1 800 311 9263 and have your unit s date of purchase and model serial number ready The model serial number information is on the back of your unit A representative will troubleshoot your problem over the phone If the representative determines that you should receive a replacement unit you will be provided with a Return Authorization RA number and the location of a nearby ...

Page 53: ... a bill of sale to verify your unit s warranty eligibility A brief note describing your unit s problem Your name address and phone number Thomson assumes no responsibility of warranty shipments from the customer to the factory if not shipped in the manner prescribed byThomson Return transportation storage handling and insurance costs are your responsibility We accept no responsibility in case of d...

Page 54: ...ed byThomson Storage fees may be charged by the exchange point if you fail to pickup the replacement unit in a timely manner Product Registration Please complete and mail the Product Registration Card packed with your DVD product It will make it easier to contact you should it ever be necessary The return of the card is not required for a warranty coverage How state law relates to warranty This wa...

Page 55: ...nu system navigation tool 14 N Navigation tool 14 Number out of Range message 19 O ON OFF button subtitle feature 5 On screen messages turning on off 41 On screen navigation tool 14 Optical cable 8 OSD Display option from Setup menu 41 P Password 36 Picture scan 17 Playback control Video CD 30 Playback features 17 audio CD 26 Power Button 5 Program button 5 Program playback video CD 33 Program pla...

Page 56: ...10330 North Meridian Street Indianapolis IN 46290 1997 Thomson Consumer Electronics Inc Trademark s Registered Marca s Registrada s Printed in Japan TOCOM 15180900 ...

Reviews: