background image

 Care Guide

Electric Range

Safety instructions ...................3-5

Operating Instructions, Tips

Aluminum 

 15, 17, 19,22

Automatic Timer and Clock 

Features 

Oven . . . . . . . . . . . . . . . . . . . . . . . . . . . . . . . . . . . . . . . . . . . . . . . . . . . . . . . 

 12-20

Baking . . . . . . . . . . . . . . . . . . . . . . . . . . . . . . . . . . . . . . . . . . . . . . . . .  13-15

Broiling . . . . . . . . . . . . . . . . . . . . . . . . . . . . . . . . . . . . . . . . . . . . . . . .  19,20

Roasting . . . . . . . . . . . . . . . . . . . . . . . . . . . . . . . . . . . . . . . . . . . . . . 17, 18

Timed Baking . . . . . . . . . . . . . . . . . . . . . . . . . . . . . . . . . . . . . 15, 16

Surface Cooking . . . . . . . . . . . . . . . . . . . . . . . . . . . . . . . . . . . 10, 11

Canning Tips. . . . . . . . . . . . . . . . . . . . . . . . . . . . . . . . . . . . . . . . . . . . 11

Control Settings . . . . . . . . . . . . . . . . . . . . . . . . . . . . . . . . . . . . ....10

 Comparison .................................7

Cookware Tips . . . . . . . . . . . . . . . . . . . . . . . . . . . . . . . . . . . 10, 11

Care and Cleaning ....................2 l-25

Broiler Pan, Rack ..........................................25

Continuous-Cleaning ..................................24.

 1,22

Door Removal 

Light Bulb 

Porcelain Oven interior...............................2 3

Problem 

Thermostat 

Do It Yourself . . . . . . . . . . . . . . . . . . . . . . . . . . . . . . . . . . . . . . . .........16

More questions 

GE Answer 

 800.626.2000

Consumer Services ...................27

Appliance Registration ..................................2

Important Phone 

Model and Serial Number Location ...........2

Removal of Packaging Tape ........................2

Warranty ........................................Back Cover

Continuous-Clean 


GE Appliances

Standard-Clean Models: 


Summary of Contents for JDC27

Page 1: ...ips 10 11 Care and Cleaning 2 l 25 Broiler Pan Rack 25 Continuous Cleaning 24 Cooktop 2 1 22 Door Removal 23 Light Bulb Replacement 25 Porcelain Oven interior 2 3 Problem Soiver 26 Thermostat Adjustment Do It Yourself 16 More questions call GE Answer Center 800 626 2000 Consumer Services 27 Appliance Registration 2 Important Phone Numbers 27 Model and Serial Number Location 2 Removal of Packaging ...

Page 2: ...tion Card that came with your range Before sending in this card please write these numbers here Model Number Serial Number Use these numbers in any correspondence or service calls concerning your range If you received a damaged range Immediately contact the dealer or builder that sold you the range Save time and money Before you request service Check the Problem Solver in the back of this guide It...

Page 3: ... installed in a unter that is firmly attached to the house ructure Weight on the oven door could cause the oven to tip and result in injury Never allow anyone to climb sit or hang on the oven door Never wear loose fitting or hanging garments while using the appfiance Be careful when reaching for items stored over the range Flammable material could be ignited if brought in contact with hot surface ...

Page 4: ...d the container could burst causing an injury Keep the oven vent duct unobstructed Keep the oven free from grease buildup i Place the oven shelf in the desired position while the oven is cool If the shelves must be handled when hot do not let pot holder contact the heating elements Pulling out the shelf to the shelf stop is a convenience in lifting heavy foods It is also a precaution against burns...

Page 5: ...n change in temperature Always turn the surface unit controls off before removing the cookware To minimize the possibility of burns ignition of flammable materials and spillage the handle of a container should be turned toward the center of the range without extending over nearby surface units To avoid the possibility of a burn or electric shock always be certain that the controls for all surface ...

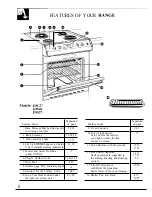
Page 6: ...rface Ufit ON Indicator Light 10 9 Controls for the Surface Units 10 21 10 Oven Vent Duct Located under 4 5 22 the right rear surface unit Feature Index 11 Oven Controls 12 Oven Light Switch Lets you turn the interior oven light on and off when the door is closed 13 Oven Shelves with Stop Locks 14 Oven Shelf Supports Shelf positions are suggested in the Baking Broiling and Roasting sections 15 Lif...

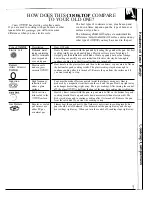
Page 7: ...than radiant or solid disks Heats up quickly but does not change heat settings as quickly as gas or induction Electric coils stay hot enough to continue cooking for a short time after they are turned off Heat travels to the glass surface and then to the cookware so pans must be flat on the bottom for good cooking results The glass cooktop stays hot enough to continue cooking after it is turned off...

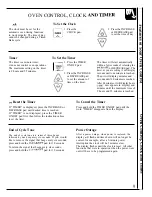
Page 8: ...op automatically at a time you select 8 CLOCK To set the clock first press the CLOCK pad Then press the INCREASE or DECREASE pad to the correct time of day Press the CLOCK pad to start 9 TIMER ON OFF Press this pad to select the timer function The timer does not control oven operations The timer can time up to 9 hours and 55 minutes To set the timer first press the TIMER ON OFF pad Then press the ...

Page 9: ...nd minutes until the maximum time of 9 hours and 55 minutes is reached LO Reset the Timer To Cancel the Timer If TIMER is displayed press the INCREASE or Press and hold the TIMER ON OFF pad until the DECREASE pad until desired time is reached word TIMER disappears from the display If TIMER is not displayed press the TIMER ON OFF pad first then follow the instructions above to set the timer End of ...

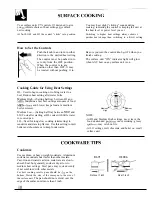
Page 10: ... High Setting halfway between HI and MED Maintains a fast boil on large amounts of food MED Saute and brown keeps food at a medium boil or simmer Medium Low Setting halfway between MED and LO Cook after starting at HI cooks with little water in covered pan LO Used for long slow cooking simmering to tenderize and develop flavors Use this setting to melt butter and chocolate or to keep foods warm 0 ...

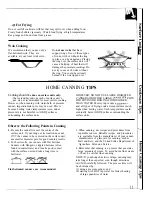
Page 11: ...uce mixtures and all types of frying cook at temperatures much higher than boiling water Such temperatures could eventually harm cooktop surfaces surrounding the surface units Observe the Following Points in Canning 1 Be sure the canner fits over the center of the surface unit If your range or its location does not allow the canner to be centered on the surface unit use smaller diameter pots for g...

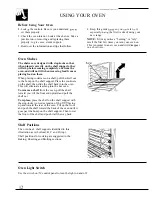
Page 12: ...ing food from or placing food on them When placing cookware on a shelf pull the shelf out to the bump on the shelf support Place the cookware on the shelf then slide the shelf back into the oven This will eliminate reaching into the hot oven To remove a shelf from the oven pull the shelf toward you tilt the front end upward and pull the shelf out To replace place the shelf on the shelf support wit...

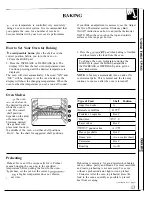
Page 13: ...ay display will show the changing temperatures When the continue to run even after the oven is turned off oven reaches the temperature you set a tone will sound Oven Shelves ge the oven sl i or shelves in the desired locations while the oven is cool The correct shelf position depends on the kind of food and the browning desired As a general rule w place most foods in the middle of the oven on eith...

Page 14: ...aking Guides When using prepared baking mixes follow package recipe or instructions for the best baking results Cookies When baking cookies flat cookie sheets without sides produce better looking cookies Cookies baked in a jelly roll pan short sides all around may have darker edges and pale or light browning may occur Do not use a cookie sheet so large that it touches the walls or the door of the ...

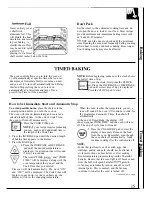
Page 15: ...ly 1 Press the COOK TIME pad cT NOTE If your recipe requires preheating A you may need to add additional time to the length of the Cook Time 2 Press the INCREASE pad until the desired length of baking time appears in the display 3 Press the BAKE pad A 4 Press the INCREASE or DECREASE pad until the desired temperature is displayed An attention tone will sound if step 3 is not done v The words TIME ...

Page 16: ... the display if necessary Remove the food from the oven Remember even though the oven shuts off automatically foods continue cooking after the controls are off NOTE Foods that spoil easily such as milk eggs fish stuffings poultry and pork should not be allowed to sit for more than one hour before or after cooking Room temperature promotes the growth of harmful bacteria Be sure the oven light is of...

Page 17: ...meat Place it fat side up or for poultry breast side up on a roasting rack in a shallow pan The melting fat will baste the meat Select a pan as close to the size of the meat as possible The broiler pan with rack is a good pan for this 3 Press the BAKE pad u BAKE A A 4 Press the INCREASE or DECREASE pad 350 appears in the display Q Continue pressing until the desired temperature is displayed v The ...

Page 18: ... time 10 minutes per pound for roasts under 5 pounds more time for larger roasts Type Meat Tender cuts rib high quality sirloin tip rump or top round Lamb leg or bone in shoulder Veal shoulder leg or loin Pork loin rib or shoulder I am precooked Poultry Chicken or Duck Chicken pieces Turkey Oven Temperature 325 325 325 325 325 325 350 325 Doneness Rare Medium Well Don Rare Medium Well Done Well Do...

Page 19: ...ernal parts This is normal and the fan may continue to run even after the oven is turned off Use of Aluminum Foil You can use aluminum foil to line Without the slits the foil will your broiler pan and broiler rack prevent fat and meat juices from However you must mold the foil draining into the broiler pan The tightly to the rack and cut slits in it juices could become hot enough to just like the ...

Page 20: ... lb 4 patties 1 2 to 3 4 inch thick Space evenly Up to 8 patties take about same time Ground Beef Well Done c I 10 7 I Beef Steaks c 6 c 8 c 12 Steaks less than 1 inch thick cook through before browning Pan frying is recommended Slash fat 1 inch thick 1 to 1X lbs Rare Medium Well Done Rare Medium 5 6 11 7 8 14 16 20 25 10 15 lfi inch thick 2 to 2X lbs c I 10 c 15 c 25 A 35 Well Done Chicken Reduce...

Page 21: ...d not be permitted to remain on the finish If acids spill on the cooktop while it is hot use a dry paper towel or cloth to wipe it up right away When the surface has cooled wash with soap and water Rinse well For other spills such as fat smatterings wash with soap and water or cleansing powders after the surface has cooled Rinse well Polish with a dry cloth The knob stem has a groove in each side ...

Page 22: ...sh with a clean soft cloth The drip pans may also be cleaned in the dishwasher Clean the area under the drip pans often Receptacle Built up soil especially grease may catch on fire Drip Pan Do not cover drip pans with foil Using foil so close to the receptacle could cause shock fire or damage to Lift the surface unit about 1 inch above the drip pan the range and pull it out Do not lift the surface...

Page 23: ... on the outside of the door Spillage of marinades fruit juices tomato sauces and basting materials containing acids may cause discoloration and should be wiped up immediately When surface is cool clean and rinse Do not use oven cleaners cleansing powders or harsh abrasives on the outside of the door Porcelain Oven Interior With proper care the porcelain enamel finish on the inside of the oven top ...

Page 24: ... not disappear completely and at some time after extended usage stains may appear that cannot be removed The special coating works best on small amounts of spatter It does not work well with larger spills especially sugars egg or dairy mixtures This special coating is not used on the oven shelves or on the inside of the oven door Remove these to lcan with a commercial oven cleaner to prevent dtin ...

Page 25: ...lb disconnect electrical power to the range at the main fuse or circuit aker panel or unplug the range from the electrical outlet Let the bulb completely before removing it Replace the bulb with a 40 watt a P1iance bulb only Do not touch a hot bulb with a damp cloth because the bulb will break Painted Surfaces Glass Window Painted surfaces include the control panel Clean To clean the outside of th...

Page 26: ...oiling Guide Food is being cooked on a hot pan Cookware is not suited for broiling s Low voltage See the Broiling section Aluminum foil used on the broiler pan and rack has not been fitted properly and slit as recommended c Oven controls not set properly See the Baking or Roasting section Shelf position is incorrect See the Roasting or Baking section Incorrect cookware or cookware of improper size...

Page 27: ...ired hearing or speech who have Braille controls fi r a variety of GE access to a TDD or a conventional teletypewriter may aPPliances and a brochure to call 800 TDD GEAC 800 833 4322 to request assist in planning a barrier free information or service kitchen for persons with limited mobility To obtain these itkms free of charge call 800 626 2000 SeNice Contracts 80 62 2224 You can have the secure ...

Page 28: ...e product please contact your dealer or our Consumer Affairs office at the address below or call toll free GE Answer Cente 800 626 2000 consumer information service Replacement of house fuses or resetting of circuit breakers Failure of the product if it is used for other than its intended purpose or used commercially Damage to product caused by accident fire floods or acts of God WARRANTOR IS NOT ...

Reviews: