background image

Summary of Contents for JGBP35WEV3WW

Page 1: ...Surface Cooking 8 10 Control Settings 9 Cooktop Comparison 8 Care and Cleaning 28 33 Broiler Pan and Grid 31 Burner Assembly 28 30 Cooktop 30 33 Door Removal 31 Oven Bottom 30 Oven Vents 33 Self Clea...

Page 2: ...NGE SEE INSTALLATION INSTRUCTIONS WARNING If the information in this guide is not followed exactly a fire or explosion may result causing property damage personal injury or death w Do not store or use...

Page 3: ...rpeting When You Get Your Range Have the installer show you the location of the range gas cut off valve and how to shut it off if necessary o Have your range installed and properly Using Your Range A...

Page 4: ...air openings of the range They provide the air inlet and outlet that are txecessai3i for the range to operate property with correct combustion Air openings are located atthe rear of the cooktop at ti...

Page 5: ...ibility of a burn always be Make Sure the broiler pan is in place correctly certain that the controls for all burners are at the off position and all grates are cool before to reduce the possibility o...

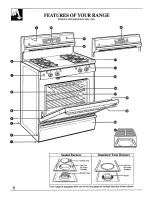
Page 6: ...OF YOUR RANGE Features and appearance may vary_ II Sealed Burners _ BurnerCap Drip Pan on some models Standard Twin Burners 6 Your range is equipped with one of the two types of surface burners shown...

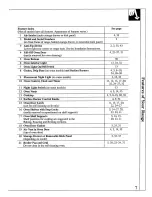
Page 7: ...escent Night Light on some models 3 13 33 10 Oven Control Clock and Timer 11 12 15 17 20 22 24 27 32 11 Night Light Switch on some models 13 12 Oven Vents 4 5 14 33 13 Cooktop 4 5 8 10 30 33 14 Surfac...

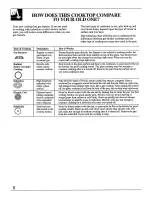
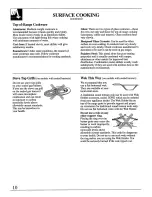
Page 8: ...ht away When you turn the control off cooking stops right away_ Heat travels to the glass surface and then to the cook ware so pans must be flat on the bottom for good cooking results The glass cookto...

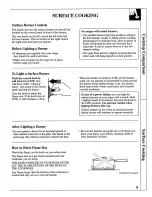
Page 9: ...me size If the knob stays at LITE it will continue to click When one burner is turned to LITE all the burners spark Do uot attempt to disassemble or clean around any burner while another burner is om...

Page 10: ...ally work satisfactorily if they are used with medium heat as the manufacturer recommends Stove Top Grills onmodels with sealed burners Do not use stove top grills on your sealed gas burners If you us...

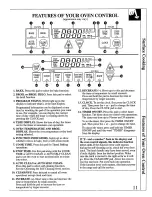
Page 11: ...10 CLEAR OFF Press this pad to cancel all oven operations except clock and timer I1 INCREASE Short taps to this pad increase the time or temperature by small amounts Press and hold the pad to increas...

Page 12: ...R is displayed press the or pad until desired time is reached If _TI2VIER is not displayed press the TIMER ON OFF pad first then follow the instructions above to set the timer To Cancel the Timer Pres...

Page 13: ...power failure occurs the oven burner shuts off and cannot be re lit until power is restored This is because the flow of gas is automatically stopped and will not resume when power is restored until t...

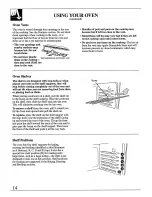
Page 14: ...before coming completely out of the oven and will not tilt when you are removing food from them or placing food on them When placing cookware on a shelf pull the shelf out to the bump on the shelf sup...

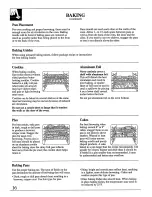
Page 15: ...d and then the or pad to get the new temperature Oven Shelves Arrange the oven shelf or shelves in the desired locations while the oven is cool The correct shelf position depends on the kind of food a...

Page 16: ...oor baking A smaller sheet of foil may be used to catch a spillover by placing it on a lower shelf several inches below the food Do not put aluminum foil on the oven bottom Pies For best results bake...

Page 17: ...ected length of time At the end of Cook Time the oven will turn off automatically _ 1 Press the COOK TIME pad COOK TIME 2 Press the or pad until the desired length of baking time appears in the displa...

Page 18: ...k Time is 3 hours Adding 3 hours to the time of day equals 5 00 4 Change the Stop Time from 5 00 to 7 00 by pressing the pad until 7 00 appears in the display 5 Press the BAKE pad 6 Press the or pad u...

Page 19: ...stores to check the temperature setting of your new oven These thermometers may vary 20 40 degrees To Adjust the Thermostat BA_I Press the BAIZd_ pa 2 Select an oven temperature between 500 E and 550...

Page 20: ...the oven at shelf 03 position for small size roast 3 to 5 Ibs and at R position for larger roasts 2 Check the weiglat of the meat Place the meat fat side up or poultry breast side up on masting grid i...

Page 21: ...nds more time for larger roasts Make sure poultry is thawed before roasting Unthawed poultry often does not cook evenly Some commercial frozen poultry can be cooked successfully without thawing Follow...

Page 22: ...d and then the pad once 7 When broiling is completed press the CLEAR OFF pad Serve the food immediately and leave the pan outside the oven to cool during the meal for easiest cleaning Use of Aluminum...

Page 23: ...7 Space evenly Up to 8 patties take 112to 3 4 inch thick about same time Beef Steaks Rare Medium Well Done Rare Medium Well Done Chicken 1 inch thick 1 to 17 lbs3 I inch thick 2 to 2_ lbs t whole 2 to...

Page 24: ...er or a soap filled steel woo pad Rinse well with a vinegar and water solution This wi l help prevent a brown residue from forming when the oven is heated Buff these areas with a dry cloth Do not clea...

Page 25: ...displayed and a short time later the door latch handle will be locked in position It will not be possible to open the oven door until the LOCK light goes off and the oven lllllllr k has cooled below l...

Page 26: ...in your oven If a shorter Clean Time is desired press the pad until the desired Clean Tune is displayed f _ 6 Press the STOP TIME pad I0 00 STOP anDears in the display and STOP q_ IE flashes The cont...

Page 27: ...lean cycle Q Is the crackling or popping sound I hear during cleaning normal A Yes This is the sound of the metal heating and cooling during both the cooking and cleaning functions Q Should there be a...

Page 28: ...ake sure the small hole in the section that fits over the electrode is kept open A sewing needle or wire twist tie works well to unclog it The slits in the burner heads of your range must be kept clea...

Page 29: ...the surface burner for 20 to 30 minutes For more stubborn stains use a cleanser like Soft Scrub brand or Bon Ami brand Rinse well to remove any traces of the cleanser that might clog the surface burne...

Page 30: ...omatoes sauerkraut fruit juices etco or foods with high sugar content could cause a dull spot if allowed to set When the surface has cooled wash and rinser For other spills such as fat spatterings etc...

Page 31: ...ecome displaced on the door you should have it replaced Inside gasket gasket Outside of the door Use soap and water to thoroughly clean the top sides and front of the oven door Rinse well You may also...

Page 32: ...water or vinegar and water rinse with clean water and polish dry with a soft cloth Do not use abrasive cleansers strong liquid cleaners plastic scouring pads or oven cleaners on the control panel they...

Page 33: ...After cleaning under the cooktop with hot soapy water and a clean cloth lower the cook top Be careful not to pinch your fingers Removable Kick Panel onsomemodels The kick panel may be removed for clea...

Page 34: ...additional information consult a qualified inslaller service agency manufacturer dealer or the gas supplier Never reuse old flexible connectors The use of old flexible connectors can cause gas leaks...

Page 35: ...between the cooking surface and the ventilation hood surface MUST NEVER BE I_SS THAN 24 INCHES EXCEPTION Installation of a listed microwave oven or cooking appliance over the cooktop shall conform to...

Page 36: ...ering wilt withstand 180 E See the Important Safety Instructions section of the Installation Instructions KITCHENCABIHETS Make sure the walt coverings around your range can withstand the heat generate...

Page 37: ...ply valve before disconnecting the old range and leave it off until new hook up has been completed Don t forget to relight the pilot on other gas appliances when you turn the gas back on Because hard...

Page 38: ...Pipe F_I _ _ _ Union _1 _ _ Nipple Installer Info_ _e f _ Gas consumer of the _ I_ Shut off tocatlon of the gas t 2 or 3 4 _ _ _ Valve shut off valve Gas Pipe Flexible Connector and Rigid Pipe Hookups...

Page 39: ...from the gas supply piping When using test pressures of 1 2 psig or less to test the gas supply system simply isolate the range from the gas supply system by closing the individual shut off valve _ E...

Page 40: ...r with one hand If this is not done the adapter ground terminal is very likely to break with repeated use Should this happen DO NOT USE the appliance until a proper ground has again been established r...

Page 41: ...f burner flames look like A call for service Normal burner flames should look like _ or C depending on the type of gas you use With LP gas some yellow tipping on outer cones is normal i lllllllll i i...

Page 42: ...tipping With most LP gas small yellow tips at the end of outer cones are normal Flames should not lift off burner ports If lifting is observed gradually reduce air shutter opening until flames are sta...

Page 43: ...l or awl may be used if a drill is not available Mount the Anti Tip device with the screw provided i i iimH IIHII HINIIHH I For cement or concrete construction you wilt need a 1 4 x 1 lag bolt and a 1...

Page 44: ...ot Models in Surface Cooking _range is connected to LP gas contact the person who installed your range or made the conversion The oven gas shut off valve may have accidentally been moved during cleani...

Page 45: ...at needs adjustment See the Adjust the Oven Thermostat section position Oven controls not pmper y set See the Broiling section oven aoornotclosed _Improper Shelf position being used See the Broiling s...

Page 46: ...lashed F and a number you have a function error code If a function eixor Code appears during the self c eaning cycle check the oven door latch The latch handle may have been moved even if only slightl...

Page 47: ...00 GE offers free of charge a brochure to assist in planning a barrier free kitchen for persons with limited mobility Consumers with impaired hearing or speech who have access to a TDD or a convention...

Page 48: ...or call toll free GE Answer CenteP 800 626 2000 consumer information service In Canada call 800o361 3400 Customer Relations Manager Improper installation If you have an installation problem contact yo...

Reviews: