


JGP990
ge.com
4226-0016-00
49-80323-1 10-05 JR
Owner’s Manual
& Installation
Instructions
Coo
kto
p
Operating Instructions
Accessories . . . . . . . . . . . . . .7
Controls . . . . . . . . . . . . . . 8, 9
Cookware . . . . . . . . . . . . . . 9
Electric Ignition . . . . . . . . . 8
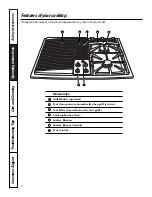
Features . . . . . . . . . . . . . . . . 6
Griddle . . . . . . . . . . . . . . . .14
Grill Module . . . . . . . . .10–13
Surface Burner
Modules . . . . . . . . . . . 6, 8–10
Ventilation System . . . . . 6, 9
Care and Cleaning
Control Knobs and
Control Panel Seal . . . . . . 15
Grease Jar . . . . . . . . . . . . . 15
Griddle Accessory . . . . . . . 17
Grill Burner . . . . . . . . . . . . 16
Grill Grate . . . . . . . . . . . . . 16
Igniters . . . . . . . . . . . . . . . .17
Porcelain Burner Basin . . 17
Porcelain Cooktop . . . . . . 15
Sealed Burner Module . . . 17
Stainless Steel Surfaces . . .15
Vent Grille and Filter . . . . 16
. . . . . . . . . . . . . . .34, 35
Consumer Support
Consumer Support . . . . . .40
Product Registration . .37, 38
Warranty . . . . . . . . . . . . . . .39
Gas Downdraft
Write the model and serial
numbers here:
Model # __________________
Serial #____________________
Find these numbers on a label
under the cooktop.


