background image

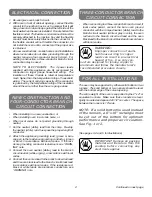
• Be sure your oven is installed properly by a

qualified installer or service technician.

• Be sure the oven is securely installed to a

cabinet that is firmly attached to the house
structure.  Weight on the oven door could
potentially cause the oven to tip and result in
injury.  Never allow anyone to climb, sit,
stand, or hang on the oven door.

• Make sure wall coverings, cabinets and

countertops around the oven can withstand
the heat (up to 200

°

F) generated by the oven.

INSTALLATION INSTRUCTIONS FOR YOUR NEW

27" BUILT-IN OVEN

Before you begin—Read these instructions completely and carefully.

IMPORTANT—Save these instructions for local inspector’s use.
IMPORTANT—OBSERVE ALL GOVERNING CODES AND ORDINANCES.

Note to Installer—Be sure to leave these instructions with the Consumer.

OWNER—Keep these instructions for future reference.
Note—This appliance must be properly grounded (if applicable).

Continued on next page

1

Pub. No. 31-10200
SR10313

229C

4053P056-1

FOR YOUR SAFETY

TOOL LIST

• 3/32" Drill Bit
• Electric or Hand Drill
• Flat Blade and Phillips Screwdriver
• Pencil
• Ruler and Straightedge
• Hand Saw or Saber Saw

LOCATION

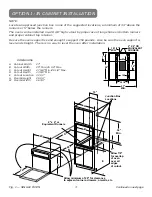
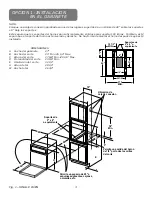
Cabinet space must be provided to enclose the
recessed part of your built-in oven.  SINGLE
OVEN INSTALLATION—

See Figure 1 for all necessary

dimensions.  

DOUBLE OVEN INSTALLATION—

See

Figure 2 for all necessary dimensions.  It is best to make a
template to insure accurate cutting.

Place the bottom of the template on a level base line.  See
Dimension E in Fig.1 

(Single Oven)

 on page 3, or Fig. 2

(Double Oven)

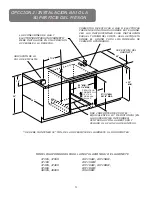
  on page 4.  For under the counter

installation, see page 5. See Figure 3 for cutout dimensions
to install a single built-in oven under approved cooktop
models.

ELECTRICAL REQUIREMENTS

This appliance must be supplied with the proper voltage
and frequency, and connected to an individual, properly
grounded branch circuit, protected by a circuit breaker or
fuse, having amperage as noted on rating plate.  (Rating
plate is located on oven frame.)

We recommend you have the electrical wiring and hookup
of your oven done by a qualified electrician.  After installation,
have the electrician show you where your main range
disconnect is located.

Check with your local utilities for electrical codes which
apply in your area.  Failure to wire your oven according to
governing codes could result in a hazardous condition.  If
there are no local codes, your range must be wired and
fused to meet the requirements of the National Electrical
Code, ANSI/NFPA No. 70-Latest Edition.

You can get a copy by writing:

National Fire Protection Association

Battery March Park

Quincy, MA 02269

Effective January 1, 1996, the National Electrical Code
requires that new, but not existing, construction utilize a
four-conductor connection to an electric range.  When
installing an electric range in new construction, follow the
instructions in NEW CONSTRUCTION AND
FOUR-CONDUCTOR BRANCH CIRCUIT CONNECTION.

You must use a three-wire, single-phase A.C. 208Y/120
Volt or 240/120 Volt, 60 Hertz electrical system.  If you
connect to aluminum wiring, properly installed connectors
approved for use with aluminum wiring must be used.

CAUTION: 

 The electrical power

to the oven supply line must be shut
off while lineconnections are being
made.  Failure to do so could result

in serious injury or death.

STOP!

Summary of Contents for 47065

Page 1: ...under the counter installation see page 5 See Figure 3 for cutout dimensions to install a single built in oven under approved cooktop models ELECTRICAL REQUIREMENTS This appliance must be supplied with the proper voltage and frequency and connected to an individual properly grounded branch circuit protected by a circuit breaker or fuse having amperage as noted on rating plate Rating plate is locat...

Page 2: ... box and the flexible conduit must be securely attached to the connector If the flexible conduit will not fit within the connector do not install the oven until a connector of the proper size is obtained Continued on next page NOTE TO ELECTRICIAN The 3 power leads supplied with this appliance are UL recognized for connection to larger gauge household wiring The insulation of these 3 leads is rated...

Page 3: ...t is level and straight There is no way to level the oven after installation A Cabinet Width 27 B Cutout Width 25 Min 25 1 4 Max C Cutout Height 27 5 8 Min 28 1 8 Max D Cutout Depth 23 5 8 Min E Cutout Location 32 1 2 H Overall Height 29 1 4 W Overall Width 26 3 4 DIMENSIONS OPTION 1 IN CABINET INSTALLATION 2 x 4 or Equivalent Runners 10 Allow 7 8 for overlap of oven over all edges of cutout Allow...

Page 4: ... is no way to level the oven after installation A Cabinet Width 27 Min B Cutout Width 25 Min 25 1 4 Max C Cutout Height 49 11 16 Min 50 1 8 Max D Cutout Depth 23 5 8 Min E Cutout Location 13 1 4 H Overall Height 51 1 4 W Overall Width 26 3 4 DIMENSIONS Fig 2 DOUBLE OVEN 4 Continued on next page Junction Box Locations Allow 7 8 for overlap of oven over all edges of cutout B E 10 56 MIN C Allow mini...

Page 5: ...N 28 1 8 MAX 25 MIN 25 1 4 MAX ALLOW 1 UNIT OVERLAP ALL EDGES USE 2 2 X 4 s OR EQUIVALENT RUNNERS SPACED 19 APART ON INSIDE SURFACES CENTERED IN OPENING FLUSH WITH TOP OF TOE PLATE 32 MIN FROM TOP OF CABINET TO TOP OF RUNNERS MUST BE MAINTAINED NOTE SEE BUILT IN OVEN INSTALLATION INSTRUCTIONS FOR COMPLETE INSTALLATION INSTRUCTIONS 5 Continued on next page OPTION 2 UNDER COUNTER INSTALLATION MODELS...

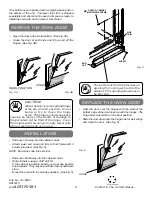
Page 6: ...NGE CAUTION REMOVE THE OVEN DOOR Slide oven 3 4 way into the cabinet cutout Attach lower end caps and trim to front frame with 3 screws provided See Fig 5 NOTE End caps snap into side trim Slide oven all the way into the cabinet cutout Drill pilot holes using a 3 32 drill bit If the cabinet is particle board you must use particle board screws They may be purchased at any hardware store Mount the o...

Page 7: ...nde está ubicado el desconectador principal del horno Consulte con las compañías de utilidades locales referente a los códigos eléctricos que se aplican en su área El no hacer el alambrado de acuerdo a los códigos vigentes podría resultar en condiciones peligrosas Si no existen códigos locales su horno tiene que ser alambrado y tener fusiblesquecumplanconlosrequerimientosdelosCódigos Eléctricos Na...

Page 8: ...ores o Cuando instale el horno en una casa de tipo Móvil o Cuando los códigos locales no permitan hacer tierra a través de neutral 1 Corte el alambre conector neutral blanco del forro Recorte el alambre conector neutral blanco para exponer el largo apropiado del conductor 2 Conecte el alambre para hacer tierra verde o cobre pelado al conductor para hacer tierra verde o cobre pelado de la residenci...

Page 9: ...rtes Esté seguro que los soportes del horno sean suficientemente sólidos para soportar 150 libras También esté seguro que el soporte del horno esté nivelado y derecho No hay forma de nivelar el horno después de que esté instalado OPCION 1 INSTALACION EN EL GABINETE Soportes de 2 x 4 o equivalente 10 Permita una salida del horno de 7 8 por todas las orillas del corte Permita un espacio de 20 a esqu...

Page 10: ...es Esté seguro que los soportes del horno sean suficientemente sólidos para soportar 150 libras También esté seguro que el soporte del horno esté nivelado y derecho No hay forma de nivelar el horno después de que esté instalado 4 Fig 2 DOUBLE OVEN Ubicación de caja de conexión Permita una salida del horno de 7 8 por todas las orillas del corte B E 10 56 MIN C Permita un espacio de 20 a esquinas ad...

Page 11: ... INSTRUCTIONS 5 MODELOS APROBADOS PARA LA INSTALACION BAJO EL GABINETE 47065 47069 47169 47465 47469 47466 48065 48069 JKP15AW JKP15BW JKP15WW JKP18AW JKP18BW JKP18WW JKS05BW LAS CONEXIONES DE GAS Y ELECTRICIDAD PARA UNA CUBIERTA DEBE INSTALARSE EN UNA POSICION ACCESIBLE A LA DERECHA SE DEBE MANTENER 32 MIN DE LA SUPERFICIE DEL GABINETE A LOS SOPORTES USE 2 SOPORTES DE 2X4 O EL EQUIVALENTE A 19 DE...

Page 12: ... paro no pase a llevarlos o trate de mover los brazos de las bisagras Las bisagras se podrían cerrar de golpe y causarle heridas en las manos o dañar la porcelana en el frente del aparato Cubra las bisagras con toallas o rollos vacíos de toallas cuando trabaje en el área del horno Fig 6 PARA REINSTALAR LA PUERTA DEL HORNO Sujete la puerta sobre las bisagras con las ranuras de la orilla del fondo a...

Reviews: