

1 2 3
User Manual
Viso5 –MSF
(UK)
!!! PLEASE REFER TO OUR WEBSITE: WWW.GEEMARC.COM
FOR AN UP TO DATE USER GUIDE, AS THERE MAY BE
IMPORTANT UPDATES AND CHANGES YOU NEED TO BE
AWARE OF !!!
1. Features
- Easy to Read and Understand Time display
- Perpetual Calendar Up to Year 2099
- 5 languages user selectable at the starting
- Day of the week, month, stage of the day modes
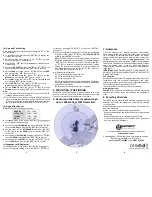
2. Unit Appearance
Part A-LCD
Part B-Button
A1:
Day of Week or Month
A2:
Stage of the day
A3:
Photoframe
A4:
Radio Control Icon
B1:
“SET/
”Button
B2:
“
▲
” Button
B3:
“
▼
” Button
Part C-Structure
C1:
Hanging Hole
C2:
Battery Door
C3:
Stand
3. Insert a picture:
⚫
Remove the temporary picture with dry protection by
sliding upwards.
⚫
Insert your picture which needs to be 15x11cm and slide
down.
4. TO BEGIN:
⚫
Open the battery Cover (C2).
⚫
Insert 2 x AAA size batteries observing polarity [“+” and
“–“marks].
⚫
Replace battery compartment cover (C2).
4.1 First starting
To begin, you have 1 minute to arrange the first setting. The
clock displays English,
press “
▲
” (B2) or ”
▼
” (B3) to select
your language and press “
SET
/
” (B1) to validate,
Press ”
▲
” (B2) or ”
▼
” (B3) to choose
the mode of display
set and press
“
SET
/
” (B1) to validate (see note)
.
If you don’t press any keys, after 1 minute the Viso5 will
launch the automatic clock setting.
Note:
Place the VISO5 near a window for the clock to
automatically set.
-DP-1 displays the day of the week
and the 2
nd
line the part
of the day.
-DP-2 displays the Month and the 2
nd
line the date and the year.
-DP-3 displays the day of week and
the 2
nd
line the time.
-DP-4 rotates between all 3 displays and you can set the time
that each display is shown. See chapter 4.3.C for full
instructions.
4.2 Radio Controlled Time:
⚫
The clock automatically starts to scan the MSF time signal
in the first 10 minutes. (Radio Control Icon “
” (A4)
flashes on LCD).
(A4) flashing
Indicates the MSF signal is
being received
(A4) Continuous flash
Indicates signal received
successfully
(A4) Icon disappears
Indicates signal reception
failed
⚫
The clock can be set to scan the radio signal manually by
holding “
▼
”(B3) button for 3 seconds. Each reception
takes around several minutes. If the reception fails,
scanning stops. (“
”(A4) on LCD disappear) and repeats
again on next full hour. E.g. scanning failed at 8:20a.m. It
will scan again at 9:00a.m.
⚫
Summer and winter time change (and reverse) is set
automatically.
4.3 Time Setting
You must wait 10 min to check the clock is set automatically
(see chapter 4.2) before you proceed to the setting, press
and hold “
▼
”(B3) for 3 seconds to turn off the automatic
clock setting (icon
(A4) disappears).


