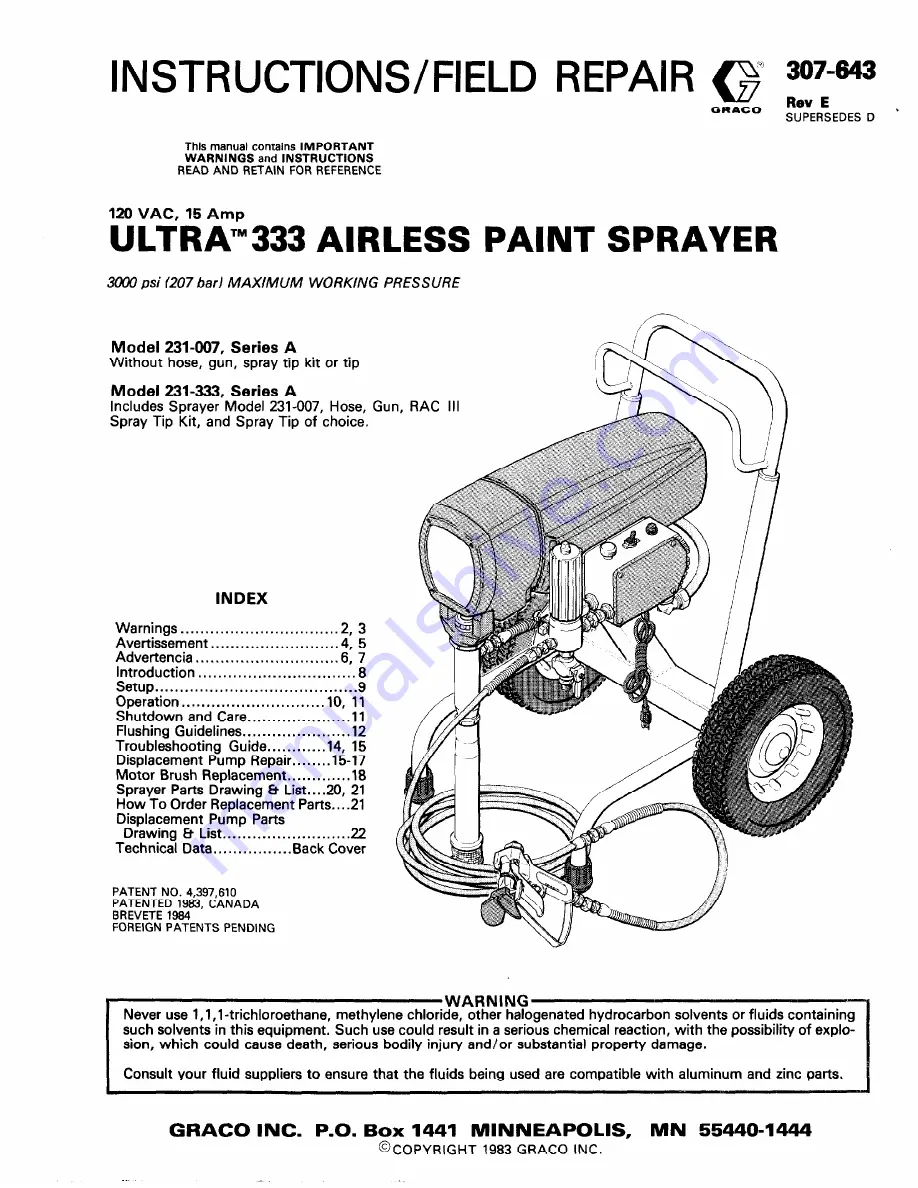
background image

Summary of Contents for Ultra 333 231-007

Page 1: ... 12 Troubleshooting Guide 14 15 Displacement Pump Repair 15 17 Motor Brush Replacement 18 Sprayer Parts Drawing 8 List 20 21 How To Order Replacement Parts 21 Displacement Pump Parts Drawing 8 List 22 Technical Data Bac k Cover PATENT NO 4 397 610 PATENTED 1963 CANADA BREVETE 1964 FOREIGN PATENTS PENDING Never use l l 1 trichloroethane methylene chloride other halogenated hydrocarbon solvents or f...

Page 2: ...en remove the spray tip Aim the gun into a metal pail holding the gun firmly to the pail Using the lowest possible pressure trigger the gun If the fluid emitted is not diffused in to an irregular stream replace the diffuser immediately Tip Guard ALWAYS have the tip guard in place on the spray gun while spraying The tip guard alerts you to the injection hazard and helps prevent accidentally placing...

Page 3: ...ted by the high velocity flow of fluid through the pump and hose If every part of the spray equip ment is not properly grounded sparking may occur and the system may become hazardous Sparking may also occur when plugging in or unplugging a power supply cord Sparks can ignite fumes from solvents and the fluid being sprayed dust particles and other flammable substances whether you are spraying indoo...

Page 4: ...s loin puis enlever I ajutage du pulwkisateur Pointer le pistolet dans un seau en m al en le maintenant fermement contre le seau Puis en utilisant la pression la plus faible possible ap puyer sur la gachette du pistolet Si le fluide projetk n est pas diffuse sous forme de jet irkgulier remplacer immbdiatement le diffuseur Protection de l ajutage TOUJOURS maintenir la protection de I ajutage en pla...

Page 5: ...fait la pulverisation Ne pas brancher ou debrancher un cordon d alimentation quel qu il soit dans la zone air se fait la pulverisation quand il y a le moindre risque que des vapeurs encore presentes dans I air prennent feu Mise a la terre ou d la masse Pour reduire les risques de production d etincelles d electricite statique le pulverisateur et tous les Bquipements utilises ou se trouvant dans la...

Page 6: ...locado en la pistola mientras se esta pulverizando Este protector llama la atencibn contra el peligro de inyeccibn y ayuda a prevenir la colocacion accidental de 10s dedos o cualquier otra parte del cuerpo cerca de la boquilla Seguridad de la boquilla pulverizadora Tener mucho cuidado al limpiar o cambiar las boquillas Si llegara a obstruirse mientras esta pulverizando enganchar el pestillo de la ...

Page 7: ... puesta a tierra en malas condiciones Leer tam bien la informaci6n sobre RIESGO DE INCENDIO 0 EXPLO SION mas arriba PELIGRO DE INCENDlO 0 EXPLOSION El flujo a alta velocidad del fluid0 al pasar por la bomba y manguera crea electricidad estatica Si todas las partes del equip0 pulverizador no tienen buena tierra pueden ocurrir chispas convirtiendo al sistema en algo peligroso Tambien pueden producir...

Page 8: ...will stay pressurized and ready to use unless you manually shut it off and relieve pressure Because the motor is DC it is less sensitive to low voltage or voltage fluctuations than an AC motor and an extension cord of up to 150 feet 45 m can be used Drive Assembly The sealed drive assembly transfers power from the DC motor to the displacement pump 8 307643 Displacement Pump The positive displaceme...

Page 9: ...0 V 60 HzAC 15 Amp minimum and that the outlet you use is properly grounded b Use an extension cord which has 3 wires of a Fig i MAlN FLUID HOSE minimum 12 gauge size and a maximum of 150 ft 45 m long Longer lengths may affect sprayer performance 5 Plug in the Sprayer a Be sure the ON OFF switch is OFF Refer to Fig 3 b Plug the power supply cord into a grounded electrical outlet that is at least 2...

Page 10: ...ncrease the pressure setting until the sprayer starts Keep the gun triggered until all air is forced out of the system and the paint flows freely from the gun Release the trigger and engage the safety NOTE If the pump is hard to prime place a con tainer under the drain valve and open it When fluid comes from the valve close it Then disengage the gun safety and pro ceed as in Step If above g Check ...

Page 11: ... Warning on page 10 Be sure the wet cup is l 3 full of TSL at all times to help prevent fluid buildup on the piston rod and premature wear of packings The packing nut should be tight enough to stop leakage but no tighter Over tightening may cause binding and excessive packing wear Use a screw driver and light hammer to adjust the nut See Fig 7 2 Clean the fluid filter often and whenever the spraye...

Page 12: ...EN Pour one half gallon 2 liters of compatible solvent into a bare metal pail Put the suction tube in the pail Remove the spray tip from the gun To reduce the risk of static sparking and IWARIIINOl splashing always remove the spray trp from the gun and hold a metal part of the gun firmly to the side of a grounded metal pail when flushing 6 Disengage the gun safety latch Point the spray gun into a ...

Page 13: ...TROUBLESHOOTING GUIDE AND REPAIR INSTRUCTIONS 307 643 13 ...

Page 14: ...Paint leaks into wet cup 1 Packing nut too loose VI Excessive surge pulsing at spray gun CAUSE 1 Power cord unplugged or building circuit fuse blown 2 Current overload circuit breaker has opened 3 Pressure setting too low 4 Damaged extension cord 5 Motor brushes worn 6 Pressure control damaged by freezing b or overpressurizing cl 7 Material or water frozen in sprayer b 1 Power cord unplugged or bu...

Page 15: ...eezing results from failure to replace water base paint or flushing water with mineral spirits at shutdown cl Overpressurization results from 1 using less than 50 ft 15 2 m of nylon spray hose 2 using wire braid hose 3 adding a shutoff device between filter and main hose 4 plugging the main fluid outlet of the filter and using drain valve as a shutoff and 51 a clogged or incorrectly assembled filt...

Page 16: ...even if the old ones still look good as the old parts cause the new ones to wear prematurely 2 Alternate leather and plastic packings as shown in Fig 3 Notice that the lips of the throat V pack ings face down against pressure and the lips of the piston V packings face up against pressure The lips of the U cup wiper 205 face down Incor rect installation damages the packings and results in the pump ...

Page 17: ... the way into the bearing housing 27 Hold the pin 20 up to the pin hole in the connecting rod assembly 3 and continue screwing in the pump until the pin slides easily into th8 hole Back off the pump until the top threads of the pump cylinder are flush with the face of the bearing housing and the outlet nip ple 45 is straight back Push the retaining spring 35 into the groove all the way around the ...

Page 18: ...econd part of Fig 15 8 Slowly push the tabbed end of the spring clip into the brush holder until the clip tab engages in the holder and the rolled portion of the tension spring rests squarely on the brush 9 Route the brush lead to the terminal and tighten the terminal screws Be sure the brush lead does not touch any part of the armature or motor housing 10 Test the brushes a With the ON OFF switch...

Page 19: ...PARTS DRAWINGS AND PARTS LISTS ...

Page 20: ...I I 37 57 58 59 54 125 23 20 307 543 15 ...

Page 21: ...her parts must be done by a qualified repair agency REF PART NO NO 57 154 636 E 178 392 104 811 60 179 811 YE 178 034 216 001 78 179 945 79 155 665 84 206 994 112 107 248 113 157 974 125 181 072 150 DESCRIPTION WASHER C RsApp ing WHEEL WARNING TAG SPRAY TIP KIT See manual 307 321 for parts ADAPTER elbow 7 16 stud l 4 x l 4 npt f 1 UNION adapter 3 8 npsm f swivel x 3 8 npt m THROAT SEAL LIQUID TSL ...

Page 22: ...13 Repair Kit 218 033 Must be purchased separately For pump packings and motor brushes Includes all star red 1 items in Darts list below plus 2 motor brushes 107 149 and sealant 102 969 f r piston DESCRIPTION QTY REF PART NO NO 214 215 216 217 218 219 220 El 223 224 203 214 I 208 217 205 DESCRIPTION 178 945 NUT hex 178 948 GUIDE ball 178 949 CYLINDER 178 964 V PACKING plastic l 178 965 V PACKING p...

Page 23: ... Outlet Paint Filter 60 mesh 250 micron Stainless Steel Screen reusable Pump Inlet Size 3 4 npt w 30 ID chamfer Fluid Outlet Size l 4 npsm from fluid filter Weight 95 lb 43 Kg approximately Wetted Parts Aluminum Delrin Nitralloy Nylon Polyethylene Polyurethane Rubber Impregnated Leather Stainless Steel Tungsten Carbide Zinc plated Steel Dimensions Width 22 5 in 572 mm1 Height 28 0 in 711 mm Length...

Reviews: