How to Connect the Power Cable
❑
Ballpoint pen holder...1
❑
Power cable...1
❑
AC adapter...1
❑
USB cable...1
❑
Media Trial Kit...1 pack
❑
Craft ROBO
Software Package CD-ROM...1
❑
Setup Instruction Sheet (this sheet)...1
❑
Quick Application Guide...1
❑
Carrier sheet...1
❑
Main unit (the Craft ROBO)...1
❑
Blade holder...1
(with 3 blade adjustment caps)
Read Me First!
Setup Instruction Sheet for the Craft ROBO (CC200-20)
Thank you for purchasing the Graphtec Craft ROBO.
This setup instruction sheet outlines the procedure for setting up your machine. After setup, refer to the “Quick Application
Guide” included with the Craft ROBO to learn how to operate it. Troubleshooting procedures are also provided in the
“When You Have Problems...” section in the “Quick Application Guide”. Please refer to this section if anything is unclear.
The user’s manuals for the Craft ROBO and the software are provided in PDF format on the CD-ROM supplied with the
Craft ROBO. Please refer to these manuals for details on the Craft ROBO functions.
Check
Install
Connect
STEP
1
STEP
2
STEP
3
(1)
(2)
(3)
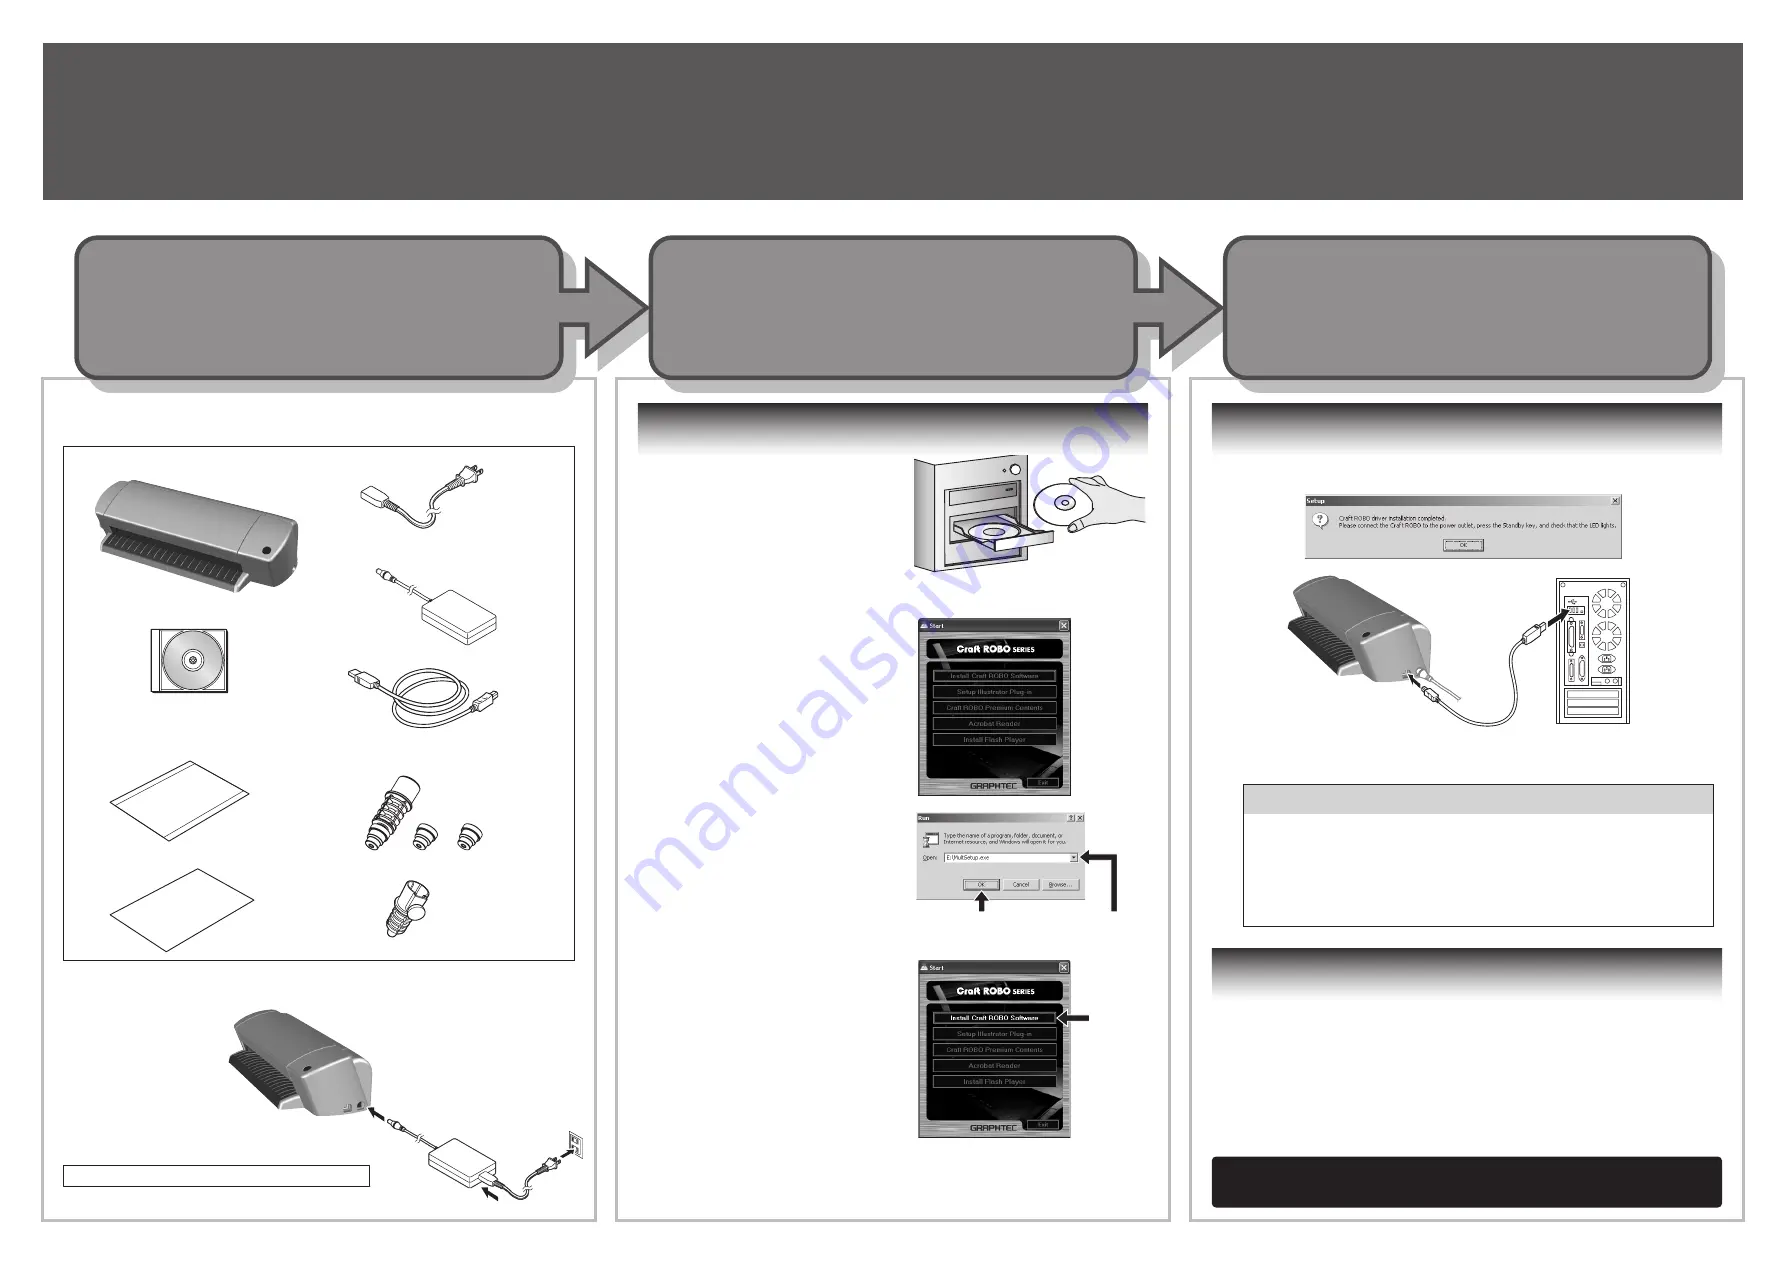
The Craft ROBO comes with the items shown in the following list. While
referring to this list, check that all the items have been included.
Referring to the diagram
shown at the right,
connect the power cable
to your machine in the
sequence (1) to (3).
Note: Do not insert the USB cable yet.
First of all
First of all
(1) Check that the Craft ROBO is not
connected to your computer.
Start Windows, and then insert the
“Craft ROBO Software Package
CD-ROM” included with your Craft
ROBO into the CD drive of your
computer.
If you are using the Craft ROBO for the first time
If you are using the Craft ROBO for the first time
(4) If the following message is displayed, use the USB cable to connect the
Craft ROBO to your computer.
The preparations are now complete
The preparations are now complete
(5) This completes the installation of the software. You can now start using
your Craft ROBO.
Close the Craft ROBO [Start] window
The ROBO Master software is installed when you set up the Craft ROBO.
This software will help you to create stickers, cut text on vinyl film, or
create pop-up greeting cards. Use this software as an introduction to
cutting stickers and signs, or making paper crafts.
When the software installation has been completed, it may be necessary
to reboot Windows. In this case, follow the instructions for rebooting. After
rebooting, and when the USB cable is used to connect the Craft ROBO to
your computer, Windows will automatically recognize the Craft ROBO. If
the “Search for New Hardware” wizard is displayed, select “Install the
software automatically (Recommended)”.
(3) Click “Setup Craft ROBO” in the
Craft ROBO [Start] window to
launch the installer. All the required
software will be successively
installed by “Setup Craft ROBO”.
Follow the displayed screens to
complete the installation.
Note: If the Craft ROBO Controller has already
been installed, select “Control Panel”
→
“Add or Remove Programs” and then
uninstall the program before performing
the setup operation.
(2) The Craft ROBO Start window is
displayed after a short interval.
If it is not displayed, select “Run”
from the Windows [Start] menu.
Click “Browse”, specify the
“MultiSetup.exe” program on the
CD-ROM, and then click the [OK]
button.
A wizard and the Help menu will be displayed. Follow the instructions to
complete the setup.
Click here
MultiSetup.exe
Click here
If you are performing installation for the second or a subsequent time
Setup of the Craft ROBO main unit is now complete.
Use the Media Trial Kit to learn the basic Craft ROBO operations.
621341730
Note: One of the blade
adjustment caps is attached
to the blade holder.
All the Included Items
the Software
the Craft ROBO to a PC


