background image

Installation and operating instructions

Mobile wireless doorbell CALIMA 800

• Bluetooth

® 

loudspeaker function 

• Individual ringing melodies in MP3 format 
• LED light ring / LED flashing light 
•  Operation with rechargeable battery or power supply unit

Summary of Contents for CALIMA 800

Page 1: ...erating instructions Mobile wireless doorbell CALIMA 800 Bluetooth loudspeaker function Individual ringing melodies in MP3 format LED light ring LED flashing light Operation with rechargeable battery or power supply unit ...

Page 2: ...ection microSD card 13 Colour selection LED light ring 16 LED setting 17 Ringtone volume 19 Mute slumber function 20 Coupling Couple wireless doorbell and wireless bell button 22 Delete coupling between wireless doorbell and wireless bell button 24 Alarm function optional with MISTRAL SE03 25 Possible combinations networking 26 Radio range 27 Technical data 27 Troubleshooting and help 28 Quick sta...

Page 3: ...detail page as PDF for download You can also find out more here Cleaning Please clean using only a slightly damp cloth not a microfibre cloth as this could scratch the surface Intended use The device described here is solely intended as a radio controlled bell and signalling system for private use The function can be impaired by different influences flat batteries radio interference etc Never use ...

Page 4: ... collection systems or via the manufacturer or importer Guarantee and liability GROTHE GmbH doorbells are produced using modern technology and are subjected to one hundred percent quality control If a defect nonetheless occurs in your device GROTHE GmbH provides a guarantee with the following scope 1 Our guarantee includes subsequent improvement or replacement delivery of a device if it verifiably...

Page 5: ...light ring flashes green as a reminder saves all settings permanently even without power supply has a coloured LED light ring with LED flash light function for optical signalling Colour and type can be adapted to your specific needs is individually adjustable You can add to every MISTRAL wireless bell button wireless motion detector etc to every general transmitters a different ringing melody a sp...

Page 6: ...6 Product overview Loudspeaker Menu button LED light ring microSD card slot Select button Table adapter with power supply unit Rechargeable battery compartment cover Product overview ...

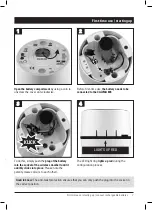
Page 7: ...er Good to know The anti twist protection ensures that you can only push the plug into the socket in the correct position The LED light ring lights up red during the configuration process LIGHTS UP RED First time use starting up connect rechargeable battery KLICK Open the battery compartment by using a coin to unscrew the cover anti clockwise Before first time use the battery needs to be connected...

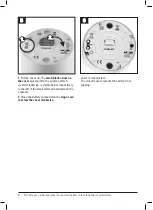
Page 8: ... black arrow on the cover must point to the contact which viewed clockwise is visible below respectively to the left of the small white arrow between the contacts 2 Close the battery compartment by sing a coin to screw the cover clockwise First time use initial operation Connect the battery Close the battery compartment ...

Page 9: ... housing Then close the housing as explained Good to know The CALIMA 800 is equipped with a long life rechargeable lithium ion battery The rechargeable battery is not permanently installed and can be easily replaced without tools We thus support a long product life of a high quality product Depending on usage habits it may at some point be necessary to replace the battery If after very frequent ch...

Page 10: ...table adapter TA55 If possible please supply the CALIMA 800 as standard via the TA55 table adapter to ensure that the battery is always sufficiently charged Of course CALIMA 800 can also be used as a mobile wireless doorbell and Bluetooth loudspeaker over a long period of time without the need for a table adapter Audio output via Bluetooth streaming is guaranteed for several hours Place the CALIMA...

Page 11: ...sumes when the ringing melody ends So you will certainly not miss a visitor BLUETOOTH MENU Press the Menu button on the wireless doorbell in its normal state once You will hear Bluetooth menu LIGHTS UP BLUE The LED light ring lights up blue PRESSING SELECT BUTTON ALTERNATING BLUETOOTH SWITCHED ON OR SWITCHED OFF Pressing the select button turns on the Bluetooth function The next time you press the...

Page 12: ...ring system Couple audio sources via Bluetooth Note When the battery is low the Bluetooth function is automatically switched off If the battery charge drops further all functions of the CALIMA 800 are then deactivated You must fully recharge CALIMA 800 using the TA55 desk adapter to be able to use its functions again In the Bluetooth menu on your smartphone or other Bluetooth enabled audio source ...

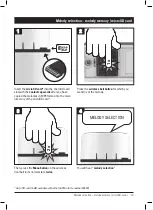
Page 13: ... the wireless bell button for which you want to set the melody You will hear melody selection Melody selection melody memory microSD card Insert the microSD card into the microSD card slot with the contacts upwards after you have copied the melodies in MP3 format into the main directory of the microSD card microSD card 16 GB available at Grothe µSD16 article number 43509 ...

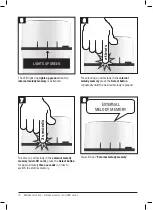
Page 14: ... To select a call melody in the external melody memory microSD card press the Select button for approximately three seconds in order to switch to external memory The LED light ring lights up green when the internal melody memory is activated 3 seconds 7 7 You will hear External melody memory 8 8 EXTERNAL MELODY MEMORY Melody selection melody memory microSD card ...

Page 15: ...ED light ring lights up according to the selection green for active internal memory yellow for active microSD card The LED light ring lights up yellow when the external melody memory is activated 9 9 LIGHTS UP YELLOW You will hear Setting finished as confirmation 11 11 SETTING FINISHED For a selection in external melody memory press the Select button repeatedly until the the desired melody is play...

Page 16: ...on The LED light ring lights up in the colour currently set Press the wireless bell button for which you want to set the colour of the LED light ring 3 3 LIGHTS UP IN THE COLOUR CURRENTLY SET COLOUR SELECTION 3 3 Now press the Select button repeatedly until the LED light ring lights up in the desired colour Your selection is saved automatically if no button is pressed for 7 seconds x times 4 4 ...

Page 17: ...nds after the last button was pressed you will hear Setting finished From now on the LED ring lights up in the set colour when the wireless bell button is pressed LIGHTS UP WHEN THE WIRELESS BELL BUTTON IS PRESSED IN THE SET COULOUR SETTING FINISHED 5 5 LED Setting 1 1 You will hear LED setting 2 2 LED SETTING Press the Menu button in the normal state vour times 4 x ...

Page 18: ...l wireless bell buttons you can distinguish which door was rung Now press the Select button repeatedly until the desired LED setting is displayed x mal 3 3 Selection options always start from the current setting in the following order White flashing Coloured lightning Coloured blinking Switched off 4 4 FLASHES LIGHTS UP BLINKS SWITCHED OFF As confirmation you will hear Setting finished 5 5 SETTING...

Page 19: ...ons used 1 1 The LED light ring blinks green as confirmation 2 2 BLINKS GREEN You will hear Volume 3 3 VOLUME Press the Select button until the call melody is played with the desired volume Your selection ist saved automatically if no button is pressed for 7 seconds x mal 4 4 Press the Menu button in the normal state five times 5 x ...

Page 20: ...yed nor does the LED ring flash The wireless doorbell signals neither visually nor acoustically To do this two options are available for you to choose from The function can either be activated for a previously defined period slumber function or for an unlimited time mute Both functions i e mute and slumber mode are indicated visually The LED ring blinks green until the wireless doorbell is back in...

Page 21: ... 1 3 or 9 hours The slumber function at a glance Press button Mute Blinking of the LED light ring 2 times for 1 hour 2 times yellow 3 times for 3 hours 3 times yellow 4 times for 9 hours 4 times yellow As confirmation the LED light ring then blinks yellow 2 to 4 times depending on how often you pressed the Select button see table While the slumber function is active the LED light ring blinks yello...

Page 22: ... for an unlimited period you must end it actively Mute Slumber function Couple wireless doorbell and wireless bell button Press the Select button to end the slumber function prematurely As confirmation the LED light ring lights up green while you press the button 7 7 LIGHTS UP GREEN Couple wireless doorbell and wireless bell button 1 1 As conformation the LED light ring blinks red Your will hear P...

Page 23: ... and wireless bell button As confirmation the LED ring lights up red and you will hear Pairing active Press the wireless bell button within 30 seconds You will hear the set melody and Setting Finished The wireless bell button is now coupled with the wireless doorbell At the end of the process the wireless doorbell returns to the normal state Repeat the process to couple additional wireless bell bu...

Page 24: ...You hear Pairing deleted and then Setting finished After the coupling has been deleted the wireless doorbell no longer responds if a wireless bell button is pressed 1 1 2 2 10 seconds LED LIGHT RING GOES OUT 3 3 1 PAIRING DELETED 2 SETTING FINISHED Important notice You always delete all existing couplings It is not possible to delete only one individual coupling between wireless bell buttons and t...

Page 25: ...way for example a person in need of help can easily draw attention to themselves Alarm function You will now hear a very loud alarm tone from the wireless doorbell 2 2 VERY LOUD ALARM SOUND Press the wireless bell button and keep it pressed for 3 seconds The red indicator flashes at the wireless bell button 1 1 3 seconds Important To use the integrated alarm function you must cut through a wire li...

Page 26: ...ll Up to 22 wireless bell buttons can activate 1 wireless doorbell several wireless bell buttons at different doors gates are coupled with one wireless doorbell in one room Matrix call Several wireless doorbells can be activated individually Several wireless bell buttons at different doors gates are coupled with several wireless doorbells in different rooms including with multiple coupling Possibl...

Page 27: ...he melody Dimensions Ø 90 mm x 140 mm Power supply Lithium ion rechargeable battery 3 6 V Power supply unit Temperature range 5 to 40 C Use in dry rooms only Please only use the delivered power supply unit Radio range Total range through both walls 40 Wall 2 80 Wall 1 50 100 freedfield approx 80 Wood glass approx 60 70 Gypsum board metal stud wall approx 50 70 Stone approx 30 50 Concrete wall appr...

Page 28: ...et of the gong Make sure that the polarity is correct Please observe the operating instructions for the CALIMA 800 from p 7 2 2 The battery in the wireless doorbell does not have the required voltage Place the CALIMA 800 on the TA55 table adapter and charge the battery 2 3 The wireless doorbell is muted or in sleep mode Press the Select button to cancel the mute sleep mode 2 4 The batteries in the...

Page 29: ...oSD card are not played 7 1 The MP3 files are not stored in the main directory of the microSD card Check the location of the call melodies and if necessary change it as described We recommend that you only save MP3 files on the microSD card which are intended as call melodies if possible Preferably delete files that are not required 8 After further ringing melodies have been added to the microSD c...

Page 30: ...en the Bluetooth function on the CALIMA 800 is switched on Connect your Bluetooth audio source with the CALIMA 800 Start a program with audio output on a paired device near Calima 800 Adjust the volume of the audio output on the paired device Couple audio sources via Bluetooth Quick start guide Bluetooth function Couple audio source via Bluetooth PRESSING SELECT BUTTON ALTERNATING BLUETOOTH SWITCH...

Page 31: ...FOR ONLY NECESSARY FOR OPTION 2 OPTION 2 MELODY SELECTION Internal melody memory LIGHTS UP GREEN External melody memory microSD card LIGHTS UP YELLOW OPTION 1 OPTION 1 Current melody memory SETTING FINISHED OPTION 2 OPTION 2 Change melody memory EXTERNAL MELODY MEMORY INTERNAL MELODY MEMORY x mal Internal melody memory LIGHTS UP GREEN External melody memory microSD card LIGHTS UP YELLOW SETTING FI...

Page 32: ...HTS UP IN THE CURRENTLY SET COLOUR COLOUR SELECTION LED Setting Colour selection LED light ring FLASHES LIGHTS UP BLINKS SWITCHED OFF LED SETTING x times Selection options always start from the current setting in the following order White flashing Coloured lightning Coloured blinking Switched off SETTING FINISHED Quick start guide Colour selection LED light ring LED setting ...

Page 33: ...nce Press button Mute Blinking of the LED light ring 2 times for 1 hour 2 times yellow 3 times for 3 hours 3 times yellow 4 times for 9 hours 4 times yellow 1 short approx all 8 seconds LIGHTS UP GREEN WHILE PRESSING THE BUTTON PRELIMINARY END FUNCTION PRELIMINARY END FUNCTION Quick start guide Volume Slumber function VOLUME SETTING FINISHED BLINKS GREEN x times ...

Page 34: ... 3 3 Quick start guide Coupling Mute PAIRING PAIRING ACTIVE within 30 sec 1 SET MELODY 2 SETTING FINISHED 1 short approx all 8 seconds 1 BLINKS GREEN LIGHTS UP GREEN WHILE PRESSING THE BUTTON Quick start guide Mute Coupling BLINKS RED LIGHTS UP RED ...

Page 35: ...use the integrated alarm function you must cut through a wire link in the wireless bell button Please refer to the installation and operating instructions for the wireless bell button MISTRAL SE03 2 2 VERY LOUD ALARM TONE 1 1 3 seconds Quick start guide Delete coupling Alarm function LED LIGHT RING GOES OUT 10 seconds ...

Page 36: ...perating instructions Furthermore the manufacturer reserves the right to change the contents of this manual without prior notification The information contained in this manual has been carefully prepared and checked but the manufacturer does not accept any responsibility for its use The same applies to the persons or companies that have been involved in the preparation and production of this manua...

Reviews: